- アンドロイド
- コルドバ
- iOS
- ウィンドウズ
- Xamarin.Android
- Xamarin.iOS
- Xamarin.Forms
概要
このチュートリアルでは、 Xamarin.Android クイック スタート プロジェクトにプッシュ通知を追加して、レコードが挿入されるたびにプッシュ通知がデバイスに送信されるようにします。
ダウンロードしたクイック スタート サーバー プロジェクトを使用しない場合は、プッシュ通知拡張機能パッケージが必要です。 詳細については、「 .NET バックエンド サーバー SDK for Azure Mobile Apps の操作 」ガイドを参照してください。
[前提条件]
このチュートリアルでは、次のセットアップが必要です。
- アクティブな Google アカウント。 accounts.google.com で Google アカウントにサインアップできます。
- Google Cloud Messaging クライアント コンポーネント。
通知ハブを構成する
Azure App Service の Mobile Apps 機能では 、Azure Notification Hubs を使用してプッシュを送信するため、モバイル アプリの通知ハブを構成します。
Azure ポータルで、アプリ サービスに移動し、アプリのバックエンドを選択します。 [ 設定] で [プッシュ] を選択 します。
通知ハブ リソースをアプリに追加するには、[ 接続] を選択します。 ハブを作成するか、既存のハブに接続できます。
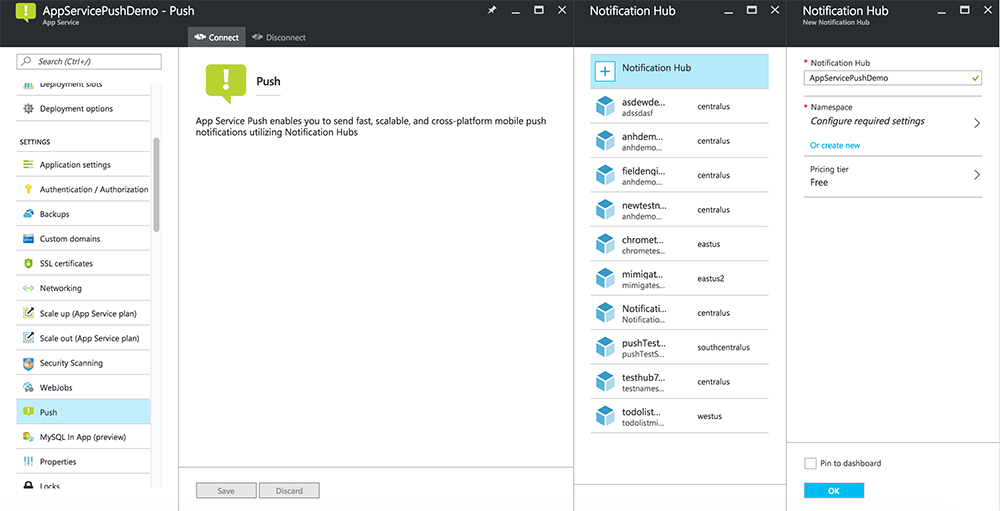
これで、通知ハブが Mobile Apps バックエンド プロジェクトに接続されました。 後で、デバイスにプッシュするプラットフォーム通知システム (PNS) に接続するようにこの通知ハブを構成します。
Firebase Cloud Messaging を有効にする
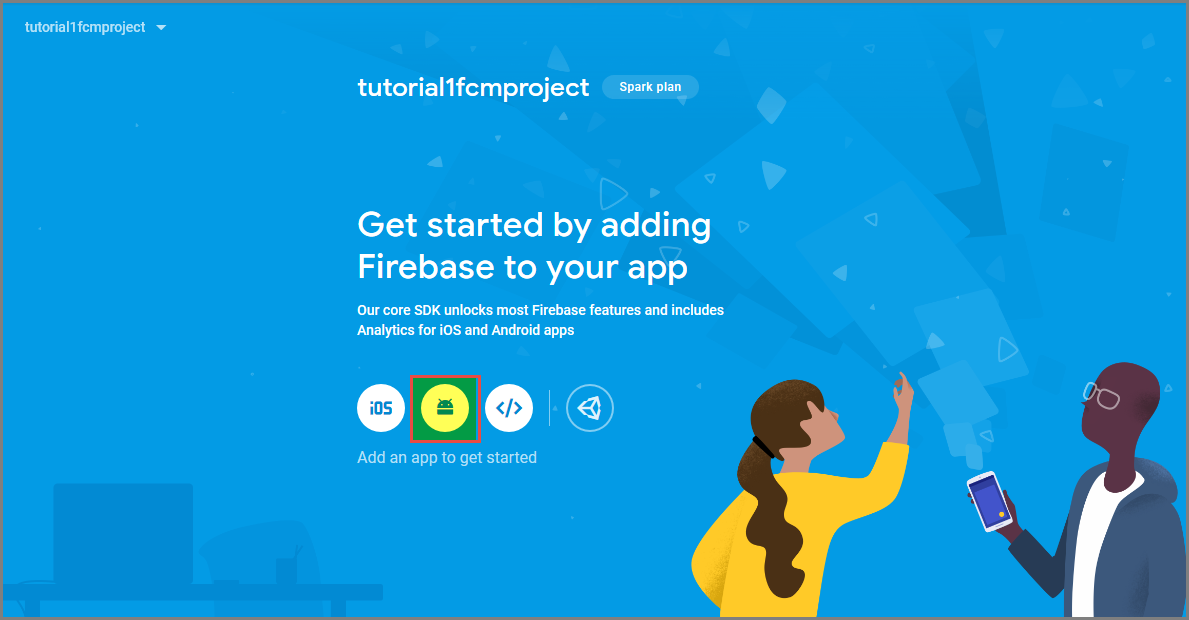
Firebase コンソールにサインインします。 Firebase プロジェクトがまだない場合は、新しく作成します。
プロジェクトを作成したら、[ Firebase を Android アプリに追加] を選択します。
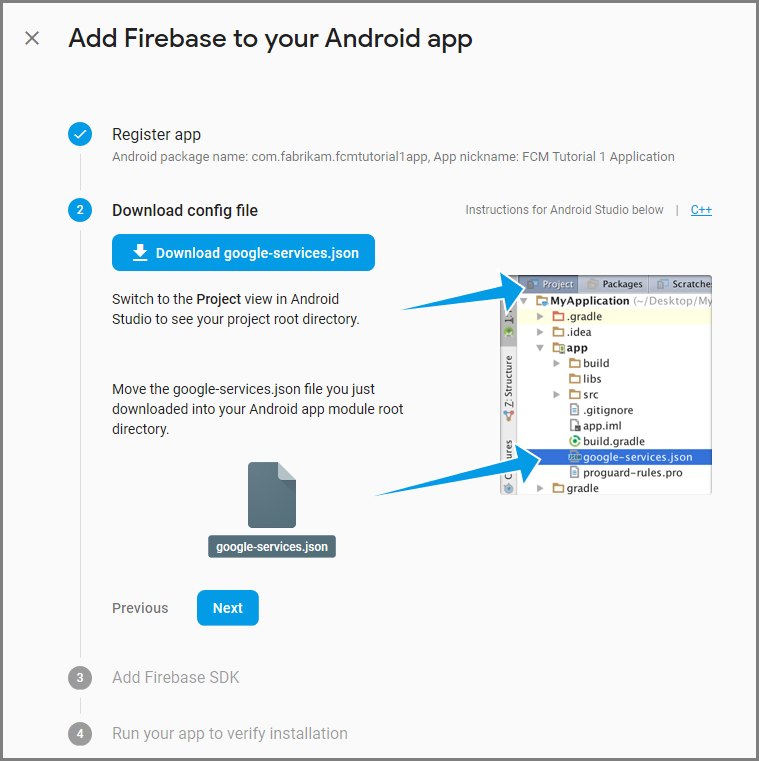
[Android アプリへの Firebase の追加] ページで、次の手順を実行します。
Android パッケージ名の場合は、アプリケーションの build.gradle ファイル内の applicationId の値をコピーします。 この例では、
com.fabrikam.fcmtutorial1appです。
[ アプリの登録] を選択します。
[ google-services.jsonダウンロード] を選択し、プロジェクトの アプリ フォルダーにファイルを保存して、[ 次へ] を選択します。
Android Studio でプロジェクトに次の 構成変更を加 えます。
プロジェクト レベルの build.gradle ファイル (<project>/build.gradle) で、 dependencies セクションに次のステートメントを追加します。
classpath 'com.google.gms:google-services:4.0.1'アプリ レベルの build.gradle ファイル (<project>/<app-module>/build.gradle) で、 dependencies セクションに次のステートメントを追加します。
implementation 'com.google.firebase:firebase-core:16.0.8'
implementation 'com.google.firebase:firebase-messaging:17.3.4'
アプリ レベルの build.gradle ファイルの最後の dependencies セクションの末尾に次の行を追加します。
apply plugin: 'com.google.gms.google-services'ツールバーの [ 今すぐ同期 ] を選択します。
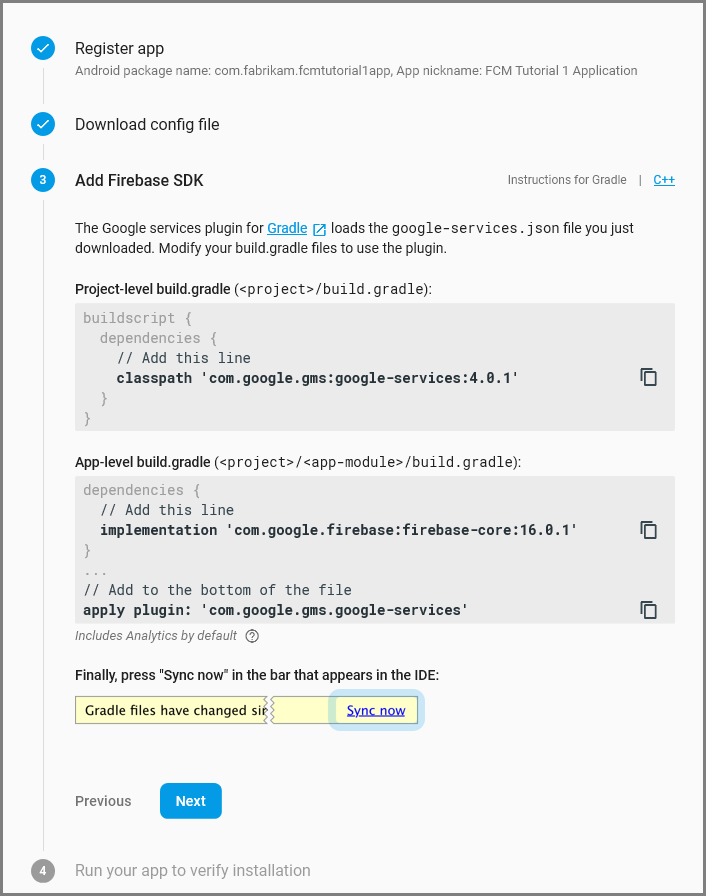
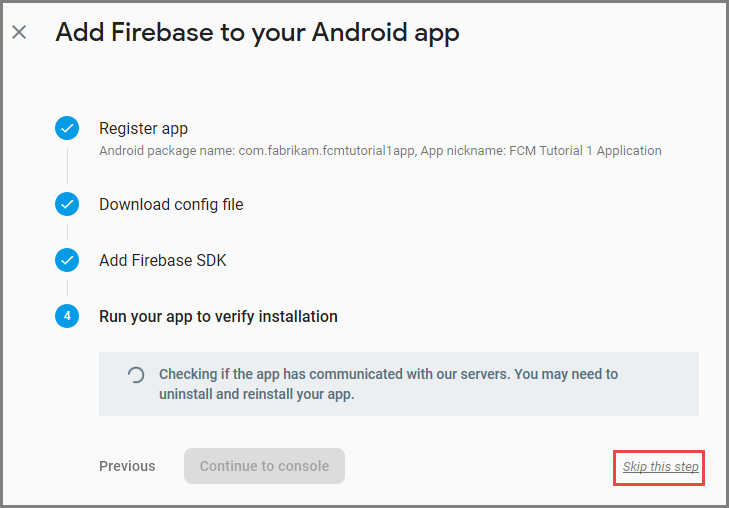
[ 次へ] を選択します。
[ この手順をスキップする] を選択します。
Firebase コンソールで、プロジェクトの歯車アイコンを選択します。 次の操作で、[プロジェクトの設定]をクリックします。
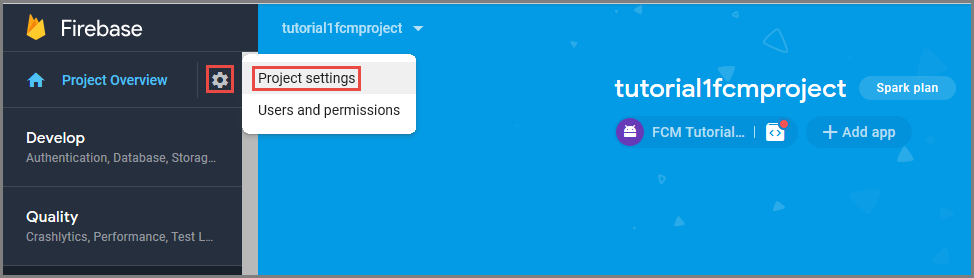
google-services.json ファイルを Android Studio プロジェクトの アプリ フォルダーにダウンロードしていない場合は、このページでダウンロードできます。
上部にある [ クラウド メッセージング ] タブに切り替えます。
後で使用するために 、サーバー キー をコピーして保存します。 この値を使用して、ハブを構成します。
プッシュ要求を送信するように Azure を構成する
Azure portal で、[すべて参照]>[App Services] をクリックし、Mobile Apps のバックエンドをクリックします。 [ 設定] で、[ App Service プッシュ] をクリックし、通知ハブ名をクリックします。
Google (GCM) に移動し、前の手順で Firebase から取得したサーバー キーの値を入力し、[保存] をクリックします。
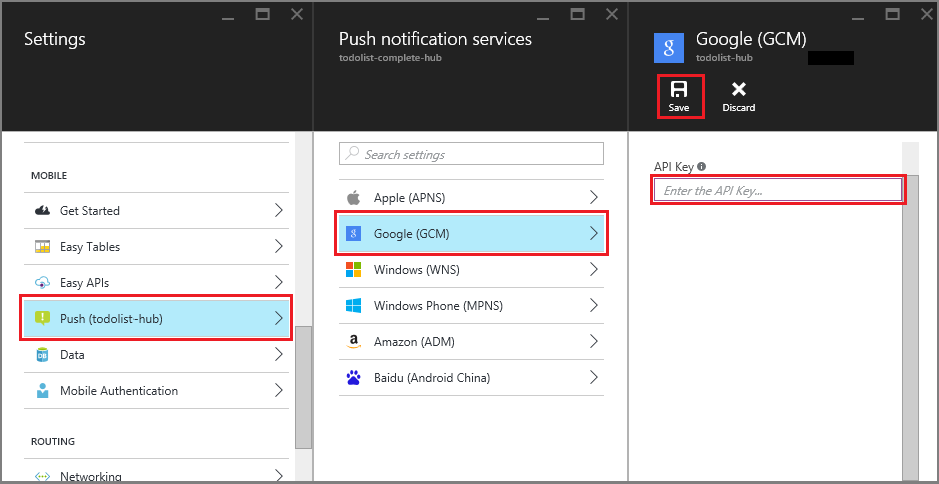
Mobile Apps バックエンドは、Firebase Cloud Messaging を使用するように構成されました。 これにより、通知ハブを使用して、Android デバイスで実行されているアプリにプッシュ通知を送信できます。
プッシュ通知を送信するようにサーバー プロジェクトを更新する
このセクションでは、新しい項目が追加されるたびにプッシュ通知を送信するように、既存の Mobile Apps バックエンド プロジェクトのコードを更新します。 このプロセスは、クロスプラットフォーム プッシュを可能にする Azure Notification Hubs の テンプレート 機能を利用します。 さまざまなクライアントはテンプレートを使用してプッシュ通知に登録され、1 つのユニバーサル プッシュですべてのクライアント プラットフォームにアクセスできます。
バックエンド プロジェクトの種類 ( .NET バックエンド またはNode.js バックエンド) に一致する次のいずれかの手順 を選択します。
.NET バックエンド プロジェクト
Visual Studio で、サーバー プロジェクトを右クリックします。 次に、[ NuGet パッケージの管理] を選択します。
Microsoft.Azure.NotificationHubsを検索し、[インストール] を選択します。 このプロセスでは、バックエンドから通知を送信するための Notification Hubs ライブラリがインストールされます。サーバー プロジェクトで、 Controllers>TodoItemController.cs を開きます。 次に、次の using ステートメントを追加します。
using System.Collections.Generic;
using Microsoft.Azure.NotificationHubs;
using Microsoft.Azure.Mobile.Server.Config;
PostTodoItem メソッドで、InsertAsync の呼び出しの後に次のコードを追加します。
// Get the settings for the server project.
HttpConfiguration config = this.Configuration;
MobileAppSettingsDictionary settings =
    this.Configuration.GetMobileAppSettingsProvider().GetMobileAppSettings();

// Get the Notification Hubs credentials for the mobile app.
string notificationHubName = settings.NotificationHubName;
string notificationHubConnection = settings
    .Connections[MobileAppSettingsKeys.NotificationHubConnectionString].ConnectionString;

// Create a new Notification Hub client.
NotificationHubClient hub = NotificationHubClient
.CreateClientFromConnectionString(notificationHubConnection, notificationHubName);

// Send the message so that all template registrations that contain "messageParam"
// receive the notifications. This includes APNS, GCM, WNS, and MPNS template registrations.
Dictionary<string,string> templateParams = new Dictionary<string,string>();
templateParams["messageParam"] = item.Text + " was added to the list.";

try
{
    // Send the push notification and log the results.
    var result = await hub.SendTemplateNotificationAsync(templateParams);

    // Write the success result to the logs.
    config.Services.GetTraceWriter().Info(result.State.ToString());
}
catch (System.Exception ex)
{
    // Write the failure result to the logs.
    config.Services.GetTraceWriter()
        .Error(ex.Message, null, "Push.SendAsync Error");
}
このプロセスは、アイテムを含むテンプレート通知を送信します。新しい項目が挿入されたときのテキスト。
サーバープロジェクトを再公開します。
Node.js バックエンドプロジェクト
バックエンド プロジェクトを設定します。
todoitem.js の既存のコードを次のコードに置き換えます。
var azureMobileApps = require('azure-mobile-apps'),
promises = require('azure-mobile-apps/src/utilities/promises'),
logger = require('azure-mobile-apps/src/logger');

var table = azureMobileApps.table();

table.insert(function (context) {
// For more information about the Notification Hubs JavaScript SDK,
// see https://aka.ms/nodejshubs.
logger.info('Running TodoItem.insert');

// Define the template payload.
var payload = '{"messageParam": "' + context.item.text + '" }';

// Execute the insert. The insert returns the results as a promise.
// Do the push as a post-execute action within the promise flow.
return context.execute()
    .then(function (results) {
        // Only do the push if configured.
        if (context.push) {
            // Send a template notification.
            context.push.send(null, payload, function (error) {
                if (error) {
                    logger.error('Error while sending push notification: ', error);
                } else {
                    logger.info('Push notification sent successfully!');
                }
            });
        }
        // Don't forget to return the results from the context.execute().
        return results;
    })
    .catch(function (error) {
        logger.error('Error while running context.execute: ', error);
    });
});

module.exports = table;
このプロセスは、新しい項目が挿入されたときに item.text を含むテンプレート通知を送信します。
ローカル コンピューターでファイルを編集するときは、サーバー プロジェクトを再発行します。
プッシュ通知用にクライアント プロジェクトを構成する
ソリューション ビュー (または Visual Studio の ソリューション エクスプローラー ) で、[ コンポーネント ] フォルダーを右クリックし、[ その他のコンポーネントの取得...] をクリックし、 Google Cloud Messaging Client コンポーネントを 検索してプロジェクトに追加します。
ToDoActivity.cs プロジェクト ファイルを開き、次の using ステートメントをクラスに追加します。
using Gcm.Client;ToDoActivity クラスに、次の新しいコードを追加します。
// Create a new instance field for this activity.
static ToDoActivity instance = new ToDoActivity();

// Return the current activity instance.
public static ToDoActivity CurrentActivity
{
    get
    {
        return instance;
    }
}
// Return the Mobile Services client.
public MobileServiceClient CurrentClient
{
    get
    {
        return client;
    }
}
これにより、プッシュ ハンドラー サービス プロセスからモバイル クライアント インスタンスにアクセスできます。
MobileServiceClient が作成された後、OnCreate メソッドに次のコードを追加します。
// Set the current instance of TodoActivity.
instance = this;

// Make sure the GCM client is set up correctly.
GcmClient.CheckDevice(this);
GcmClient.CheckManifest(this);

// Register the app for push notifications.
GcmClient.Register(this, ToDoBroadcastReceiver.senderIDs);
これで、プッシュ通知を追加するための ToDoActivity が準備されました。
プッシュ通知コードをアプリに追加する
ToDoBroadcastReceiverという名前の新しいクラスをプロジェクトに作成します。ToDoBroadcastReceiver クラスに次の using ステートメントを追加します。
using Gcm.Client;
using Microsoft.WindowsAzure.MobileServices;
using Newtonsoft.Json.Linq;
using ステートメントと名前空間宣言の間に、次のアクセス許可要求を追加します。
[assembly: Permission(Name = "@PACKAGE_NAME@.permission.C2D_MESSAGE")]
[assembly: UsesPermission(Name = "@PACKAGE_NAME@.permission.C2D_MESSAGE")]
[assembly: UsesPermission(Name = "com.google.android.c2dm.permission.RECEIVE")]
//GET_ACCOUNTS is only needed for android versions 4.0.3 and below
[assembly: UsesPermission(Name = "android.permission.GET_ACCOUNTS")]
[assembly: UsesPermission(Name = "android.permission.INTERNET")]
[assembly: UsesPermission(Name = "android.permission.WAKE_LOCK")]
既存の ToDoBroadcastReceiver クラス定義を次のように置き換えます。
[BroadcastReceiver(Permission = Gcm.Client.Constants.PERMISSION_GCM_INTENTS)]
[IntentFilter(new string[] { Gcm.Client.Constants.INTENT_FROM_GCM_MESSAGE },
    Categories = new string[] { "@PACKAGE_NAME@" })]
[IntentFilter(new string[] { Gcm.Client.Constants.INTENT_FROM_GCM_REGISTRATION_CALLBACK },
    Categories = new string[] { "@PACKAGE_NAME@" })]
[IntentFilter(new string[] { Gcm.Client.Constants.INTENT_FROM_GCM_LIBRARY_RETRY },
Categories = new string[] { "@PACKAGE_NAME@" })]
public class ToDoBroadcastReceiver : GcmBroadcastReceiverBase<PushHandlerService>
{
    // Set the Google app ID.
    public static string[] senderIDs = new string[] { "<PROJECT_NUMBER>" };
}
上記のコードでは、
<PROJECT_NUMBER>を、Google 開発者ポータルでアプリをプロビジョニングしたときに Google によって割り当てられたプロジェクト番号に置き換える必要があります。ToDoBroadcastReceiver.cs プロジェクト ファイルに、 PushHandlerService クラスを定義する次のコードを追加します。
// The ServiceAttribute must be applied to the class.
[Service]
public class PushHandlerService : GcmServiceBase
{
    public static string RegistrationID { get; private set; }
    public PushHandlerService() : base(ToDoBroadcastReceiver.senderIDs) { }
}
このクラスは GcmServiceBase から派生しており、 Service 属性をこのクラスに適用する必要があることに注意してください。
注
GcmServiceBase クラスは、OnRegistered()、OnUnRegistered()、OnMessage() および OnError() メソッドを実装します。 これらのメソッドは 、PushHandlerService クラスでオーバーライドする必要があります。
OnRegistered イベント ハンドラーをオーバーライドする PushHandlerService クラスに次のコードを追加します。
protected override void OnRegistered(Context context, string registrationId)
{
    System.Diagnostics.Debug.WriteLine("The device has been registered with GCM.", "Success!");

    // Get the MobileServiceClient from the current activity instance.
    MobileServiceClient client = ToDoActivity.CurrentActivity.CurrentClient;
    var push = client.GetPush();

    // Define a message body for GCM.
    const string templateBodyGCM = "{\"data\":{\"message\":\"$(messageParam)\"}}";

    // Define the template registration as JSON.
    JObject templates = new JObject();
    templates["genericMessage"] = new JObject
    {
        {"body", templateBodyGCM }
    };

    try
    {
        // Make sure we run the registration on the same thread as the activity,
        // to avoid threading errors.
        ToDoActivity.CurrentActivity.RunOnUiThread(

            // Register the template with Notification Hubs.
            async () => await push.RegisterAsync(registrationId, templates));

        System.Diagnostics.Debug.WriteLine(
            string.Format("Push Installation Id", push.InstallationId.ToString()));
    }
    catch (Exception ex)
    {
        System.Diagnostics.Debug.WriteLine(
            string.Format("Error with Azure push registration: {0}", ex.Message));
    }
}
このメソッドでは、返された GCM 登録 ID を使用して、プッシュ通知用に Azure に登録します。 タグは、作成後にのみ登録に追加できます。 詳細については、「 方法: デバイス のインストールにタグを追加して、タグへのプッシュを有効にする」を参照してください。
PushHandlerService の OnMessage メソッドを次のコードでオーバーライドします。
protected override void OnMessage(Context context, Intent intent)
{
    string message = string.Empty;

    // Extract the push notification message from the intent.
    if (intent.Extras.ContainsKey("message"))
    {
        message = intent.Extras.Get("message").ToString();
        var title = "New item added:";

        // Create a notification manager to send the notification.
        var notificationManager =
            GetSystemService(Context.NotificationService) as NotificationManager;

        // Create a new intent to show the notification in the UI.
        PendingIntent contentIntent =
            PendingIntent.GetActivity(context, 0,
            new Intent(this, typeof(ToDoActivity)), 0);

        // Create the notification using the builder.
        var builder = new Notification.Builder(context);
        builder.SetAutoCancel(true);
        builder.SetContentTitle(title);
        builder.SetContentText(message);
        builder.SetSmallIcon(Resource.Drawable.ic_launcher);
        builder.SetContentIntent(contentIntent);
        var notification = builder.Build();

        // Display the notification in the Notifications Area.
        notificationManager.Notify(1, notification);

    }
}
次のコードを使用して 、OnUnRegistered() メソッドと OnError() メソッドをオーバーライドします。
protected override void OnUnRegistered(Context context, string registrationId)
{
    throw new NotImplementedException();
}

protected override void OnError(Context context, string errorId)
{
    System.Diagnostics.Debug.WriteLine(
        string.Format("Error occurred in the notification: {0}.", errorId));
}
アプリでプッシュ通知をテストする
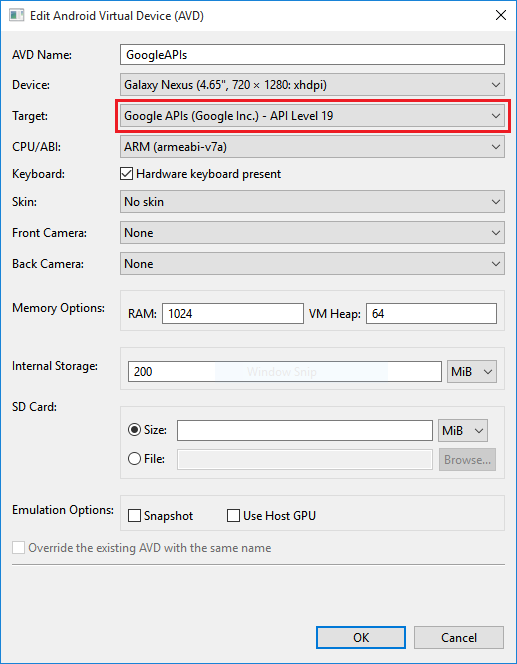
エミュレーターで仮想デバイスを使用してアプリをテストできます。 エミュレーターで実行する場合は、追加の構成手順が必要です。
仮想デバイスには、Android Virtual Device (AVD) マネージャーのターゲットとして Google API が設定されている必要があります。
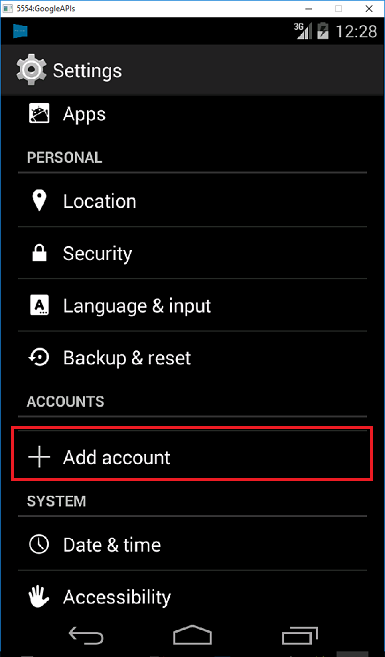
[Apps>Settings>Add account] をクリックして、Android デバイスに Google アカウントを追加し、画面の指示に従います。
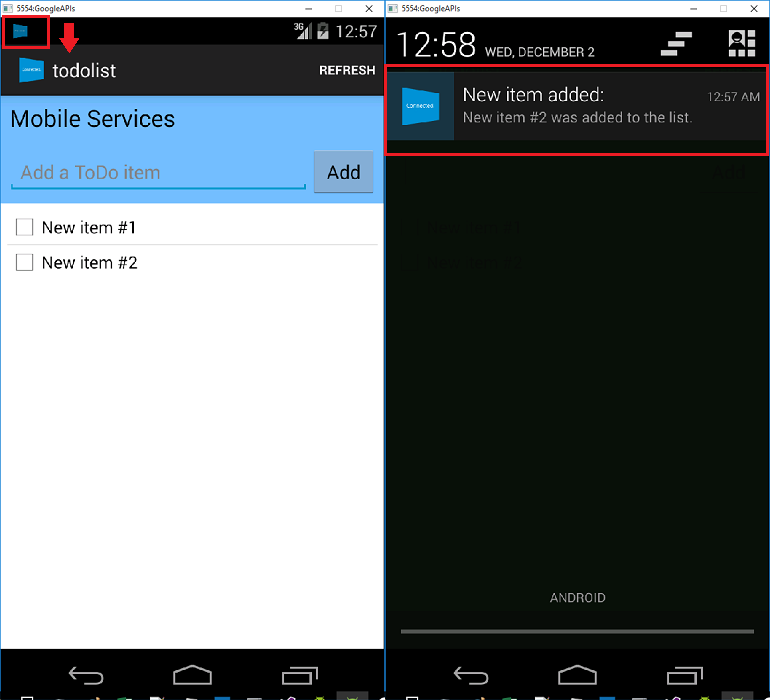
前と同様に todolist アプリを実行し、新しい todo 項目を挿入します。 今回は、通知領域に通知アイコンが表示されます。 通知ドロワーを開いて、通知の全文を表示できます。