컬렉션 뷰를 사용하면 임의의 레이아웃을 사용하여 콘텐츠 그룹을 표시할 수 있습니다. 기본 제공 지원을 사용하면 손쉽게 그리드 모양 또는 선형 레이아웃을 만들 수 있을 뿐만 아니라 사용자 지정 레이아웃도 지원할 수 있습니다.

컬렉션 뷰는 기본 대리자와 데이터 원본을 모두 사용하여 사용자 상호 작용 및 컬렉션의 콘텐츠를 제공하는 항목 컬렉션에 포함됩니다. 컬렉션 뷰는 보기 자체와 독립적인 레이아웃 하위 시스템을 기반으로 하므로 다른 레이아웃을 제공하면 컬렉션 뷰의 데이터 프레젠테이션을 즉시 변경할 수 있습니다.
컬렉션 뷰 정보
위에서 설명한 대로 컬렉션 뷰(UICollectionView)는 정렬된 항목 컬렉션을 관리하고 사용자 지정 가능한 레이아웃으로 해당 항목을 표시합니다. 컬렉션 뷰는 레이아웃을 사용하여 단일 열 이상의 항목을 표시할 수 있다는 점을 제외하고 테이블 뷰와UITableView 비슷한 방식으로 작동합니다.
tvOS에서 컬렉션 뷰를 사용하는 경우 앱은 데이터 원본(UICollectionViewDataSource)을 사용하여 컬렉션에 연결된 데이터를 제공해야 합니다. 컬렉션 뷰 데이터는 필요에 따라 구성하고 다른 그룹(섹션)으로 표시할 수 있습니다.
컬렉션 보기는 컬렉션에서 지정된 정보(예: 이미지 및 제목)의 프레젠테이션을 제공하는 셀(UICollectionViewCell)을 사용하여 화면에 개별 항목을 표시합니다.
필요에 따라 컬렉션 뷰의 프레젠테이션에 추가 보기를 추가하여 섹션 및 셀의 머리글 및 바닥글 역할을 할 수 있습니다. 컬렉션 뷰의 레이아웃은 개별 셀과 함께 이러한 보기의 배치를 정의합니다.
컬렉션 뷰는 대리자(UICollectionViewDelegate)를 사용하여 사용자 상호 작용에 응답할 수 있습니다. 또한 이 대리자는 지정된 셀이 포커스를 받을 수 있는지, 셀이 강조 표시되었는지 또는 셀이 선택되었는지 여부를 결정합니다. 경우에 따라 대리자는 개별 셀의 크기를 결정합니다.
컬렉션 뷰 레이아웃
컬렉션 뷰의 주요 기능은 표시되는 데이터와 레이아웃을 분리하는 것입니다. 컬렉션 보기 레이아웃(UICollectionViewLayout)은 컬렉션 보기의 화면 프레젠테이션에서 조직 및 셀의 위치(및 추가 보기)를 제공합니다.
개별 셀은 연결된 데이터 원본에서 컬렉션 뷰에 의해 만들어진 다음 지정된 컬렉션 뷰 레이아웃에 의해 정렬되고 표시됩니다.
컬렉션 뷰 레이아웃은 일반적으로 컬렉션 뷰를 만들 때 제공됩니다. 그러나 언제든지 컬렉션 보기 레이아웃을 변경할 수 있으며 제공된 새 레이아웃을 사용하여 컬렉션 보기 데이터의 화면 프레젠테이션이 자동으로 업데이트됩니다.
컬렉션 뷰 레이아웃은 서로 다른 두 레이아웃 간의 전환에 애니메이션 효과를 주는 데 사용할 수 있는 몇 가지 메서드를 제공합니다(기본적으로 애니메이션은 수행되지 않음). 또한 컬렉션 뷰 레이아웃은 제스처 인식기와 함께 작동하여 레이아웃이 변경되는 사용자 상호 작용에 애니메이션 효과를 더할 수 있습니다.
셀 및 보조 보기 만들기
컬렉션 뷰의 데이터 원본은 컬렉션의 항목을 지원하는 데이터뿐만 아니라 콘텐츠를 표시하는 데 사용되는 셀도 제공합니다.
컬렉션 뷰는 대량의 항목 컬렉션을 처리하도록 설계되었으므로 메모리 제한을 초과하지 않도록 개별 셀을 큐에서 제거하고 재사용할 수 있습니다. 뷰를 큐에서 제거하는 방법에는 두 가지가 있습니다.
DequeueReusableCell- 지정된 형식의 셀을 만들거나 반환합니다(앱의 Storyboard에 지정된 대로).DequeueReusableSupplementaryView- 지정된 형식의 보조 보기를 만들거나 반환합니다(앱의 Storyboard에 지정된 대로).
이러한 메서드 중 하나를 호출하기 전에 컬렉션 뷰를 사용하여 셀 보기를 만드는 데 사용되는 클래스, Storyboard 또는 .xib 파일을 등록해야 합니다. 예시:
public CityCollectionView (IntPtr handle) : base (handle)
{
    // Initialize
    RegisterClassForCell (typeof(CityCollectionViewCell), CityViewDatasource.CardCellId);
    ...
}
여기서 typeof(CityCollectionViewCell) 는 뷰를 지원하고 셀(또는 뷰 CityViewDatasource.CardCellId )이 큐에서 해제될 때 사용되는 ID를 제공하는 클래스를 제공합니다.
셀을 큐에서 제거한 후에는 셀이 나타내는 항목의 데이터로 구성하고 표시를 위해 컬렉션 뷰로 돌아갑니다.
컬렉션 뷰 컨트롤러 정보
컬렉션 뷰 컨트롤러(UICollectionViewController)는 다음 동작을 제공하는 특수 뷰 컨트롤러(UIViewController)입니다.
- 스토리보드 또는
.xib파일에서 컬렉션 뷰를 로드하고 뷰를 인스턴스화해야 합니다. 코드에서 만든 경우 구성되지 않은 새 컬렉션 뷰를 자동으로 만듭니다. - 컬렉션 뷰가 로드되면 컨트롤러는 스토리보드 또는
.xib파일에서 해당 데이터 원본 및 대리자를 로드하려고 시도합니다. 사용할 수 없는 경우 둘 다의 소스로 설정됩니다. - 컬렉션 보기가 처음 표시될 때 채워지기 전에 데이터가 로드되었는지 확인하고, 이후 각 디스플레이에서 다시 로드하고 선택을 취소합니다.
또한 컬렉션 뷰 컨트롤러는 컬렉션 뷰와 같은 AwakeFromNibViewWillDisplay수명 주기를 관리하는 데 사용할 수 있는 재정의 가능한 메서드를 제공합니다.
컬렉션 뷰 및 스토리보드
Xamarin.tvOS 앱에서 컬렉션 뷰를 사용하는 가장 쉬운 방법은 Storyboard에 컬렉션 보기를 추가하는 것입니다. 빠른 예로 이미지, 제목 및 선택 단추를 제공하는 샘플 앱을 만들려고 합니다. 사용자가 선택 단추를 클릭하면 사용자가 새 이미지를 선택할 수 있는 컬렉션 보기가 표시됩니다. 이미지를 선택하면 컬렉션 보기가 닫히고 새 이미지와 제목이 표시됩니다.
다음을 수행해 보겠습니다.
Mac용 Visual Studio 새 단일 보기 tvOS 앱을 시작합니다.
솔루션 탐색기 파일을 두 번 클릭하고
Main.storyboardiOS 디자이너에서 엽니다.이미지 뷰, 레이블 및 단추를 기존 보기에 추가하고 다음과 같이 구성합니다.

속성 탐색기의 위젯 탭에서 이미지 뷰 및 레이블에 이름을 할당합니다. 예시:

다음으로 컬렉션 뷰 컨트롤러를 스토리보드로 끌어다 놓습니다.

단추에서 컬렉션 뷰 컨트롤러로 컨트롤을 끌어서 팝업에서 푸시를 선택합니다.
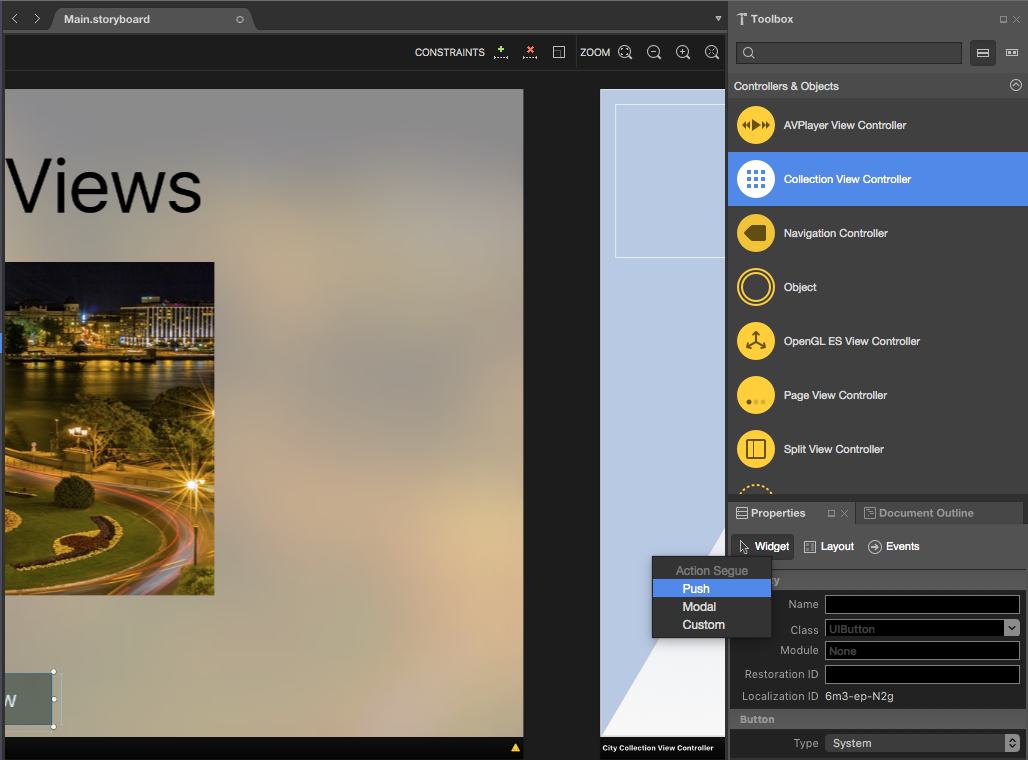
앱이 실행되면 사용자가 단추를 클릭할 때마다 컬렉션 보기가 표시됩니다.
컬렉션 보기를 선택하고 속성 탐색기의 레이아웃 탭 에 다음 값을 입력합니다.
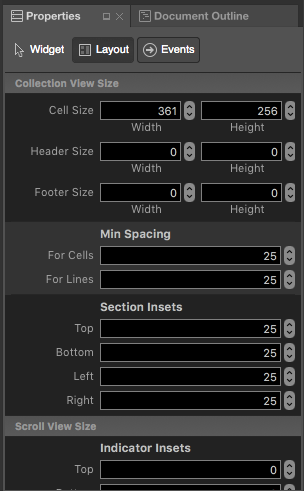
이렇게 하면 개별 셀의 크기와 컬렉션 뷰의 셀과 바깥 쪽 가장자리 사이의 테두리가 제어됩니다.
컬렉션 뷰 컨트롤러를 선택하고 위젯 탭에서 해당 클래스를
CityCollectionViewController설정합니다.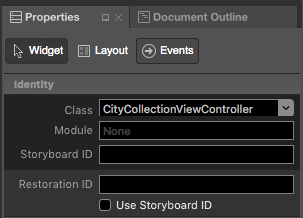
컬렉션 보기를 선택하고 위젯 탭에서 해당 클래스를
CityCollectionView설정합니다.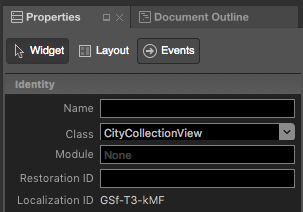
컬렉션 뷰 셀을 선택하고 위젯 탭에서 해당 클래스를
CityCollectionViewCell설정합니다.
위젯 탭에서 레이아웃
Flow이 컬렉션 보기에 대한 레이아웃이고 스크롤 방향인지Vertical확인합니다.
컬렉션 뷰 셀을 선택하고 위젯 탭에서 해당 ID를
CityCell설정합니다.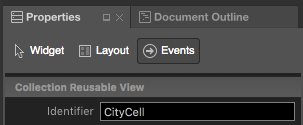
변경 내용을 저장합니다.


컬렉션 뷰의 레이아웃을 선택한 Custom 경우 사용자 지정 레이아웃을 지정했을 수 있습니다. Apple은 기본 제공 UICollectionViewFlowLayout 기능을 제공하며 UICollectionViewDelegateFlowLayout 그리드 기반 레이아웃으로 데이터를 쉽게 표시할 수 있습니다(레이아웃 스타일에서 flow 사용됨).
스토리보드 작업에 대한 자세한 내용은 Hello, tvOS 빠른 시작 가이드를 참조하세요.
컬렉션 뷰에 대한 데이터 제공
이제 컬렉션 뷰(및 컬렉션 뷰 컨트롤러)가 스토리보드에 추가되었으므로 컬렉션에 대한 데이터를 제공해야 합니다.
데이터 모델
먼저 표시할 이미지의 파일 이름, 도시를 선택할 수 있는 제목 및 플래그를 포함하는 데이터에 대한 모델을 만듭니다.
클래스를 CityInfo 만들고 다음과 같이 만듭니다.
using System;

namespace tvCollection
{
    public class CityInfo
    {
        #region Computed Properties
        public string ImageFilename { get; set; }
        public string Title { get; set; }
        public bool CanSelect{ get; set; }
        #endregion

        #region Constructors
        public CityInfo (string filename, string title, bool canSelect)
        {
            // Initialize
            this.ImageFilename = filename;
            this.Title = title;
            this.CanSelect = canSelect;
        }
        #endregion
    }
}
컬렉션 뷰 셀
이제 각 셀에 대해 데이터를 표시하는 방법을 정의해야 합니다. CityCollectionViewCell.cs 파일(Storyboard 파일에서 자동으로 생성됨)을 편집하고 다음과 같이 표시합니다.
using System;
using Foundation;
using UIKit;
using CoreGraphics;

namespace tvCollection
{
    public partial class CityCollectionViewCell : UICollectionViewCell
    {
        #region Private Variables
        private CityInfo _city;
        #endregion

        #region Computed Properties
        public UIImageView CityView { get ; set; }
        public UILabel CityTitle { get; set; }

        public CityInfo City {
            get { return _city; }
            set {
                _city = value;
                CityView.Image = UIImage.FromFile (City.ImageFilename);
                CityView.Alpha = (City.CanSelect) ? 1.0f : 0.5f;
                CityTitle.Text = City.Title;
            }
        }
        #endregion

        #region Constructors
        public CityCollectionViewCell (IntPtr handle) : base (handle)
        {
            // Initialize
            CityView = new UIImageView(new CGRect(22, 19, 320, 171));
            CityView.AdjustsImageWhenAncestorFocused = true;
            AddSubview (CityView);

            CityTitle = new UILabel (new CGRect (22, 209, 320, 21)) {
                TextAlignment = UITextAlignment.Center,
                TextColor = UIColor.White,
                Alpha = 0.0f
            };
            AddSubview (CityTitle);
        }
        #endregion


    }
}
tvOS 앱의 경우 이미지와 선택적 제목을 표시합니다. 지정된 도시를 선택할 수 없는 경우 다음 코드를 사용하여 이미지 보기를 흐리게 합니다.
CityView.Alpha = (City.CanSelect) ? 1.0f : 0.5f;
사용자가 이미지를 포함하는 셀을 포커스로 가져오는 경우 기본 제공 시차 효과를 사용하여 다음 속성을 설정하려고 합니다.
CityView.AdjustsImageWhenAncestorFocused = true;
탐색 및 포커스에 대한 자세한 내용은 탐색 및 포커스 작업 및 Siri 원격 및 Bluetooth 컨트롤러 설명서를 참조하세요.
컬렉션 뷰 데이터 공급자
데이터 모델을 만들고 셀 레이아웃을 정의한 상태에서 컬렉션 뷰에 대한 데이터 원본을 만들어 보겠습니다. 데이터 원본은 백업 데이터를 제공할 뿐만 아니라 화면에 개별 셀을 표시하기 위해 셀을 큐에서 제거해야 합니다.
클래스를 CityViewDatasource 만들고 다음과 같이 만듭니다.
using System;
using System.Collections.Generic;
using UIKit;
using Foundation;
using CoreGraphics;
using ObjCRuntime;

namespace tvCollection
{
    public class CityViewDatasource : UICollectionViewDataSource
    {
        #region Application Access
        public static AppDelegate App {
            get { return (AppDelegate)UIApplication.SharedApplication.Delegate; }
        }
        #endregion

        #region Static Constants
        public static NSString CardCellId = new NSString ("CityCell");
        #endregion

        #region Computed Properties
        public List<CityInfo> Cities { get; set; } = new List<CityInfo>();
        public CityCollectionView ViewController { get; set; }
        #endregion

        #region Constructors
        public CityViewDatasource (CityCollectionView controller)
        {
            // Initialize
            this.ViewController = controller;
            PopulateCities ();
        }
        #endregion

        #region Public Methods
        public void PopulateCities() {

            // Clear existing cities
            Cities.Clear();

            // Add new cities
            Cities.Add(new CityInfo("City01.jpg", "Houses by Water", false));
            Cities.Add(new CityInfo("City02.jpg", "Turning Circle", true));
            Cities.Add(new CityInfo("City03.jpg", "Skyline at Night", true));
            Cities.Add(new CityInfo("City04.jpg", "Golden Gate Bridge", true));
            Cities.Add(new CityInfo("City05.jpg", "Roads by Night", true));
            Cities.Add(new CityInfo("City06.jpg", "Church Domes", true));
            Cities.Add(new CityInfo("City07.jpg", "Mountain Lights", true));
            Cities.Add(new CityInfo("City08.jpg", "City Scene", false));
            Cities.Add(new CityInfo("City09.jpg", "House in Winter", true));
            Cities.Add(new CityInfo("City10.jpg", "By the Lake", true));
            Cities.Add(new CityInfo("City11.jpg", "At the Dome", true));
            Cities.Add(new CityInfo("City12.jpg", "Cityscape", true));
            Cities.Add(new CityInfo("City13.jpg", "Model City", true));
            Cities.Add(new CityInfo("City14.jpg", "Taxi, Taxi!", true));
            Cities.Add(new CityInfo("City15.jpg", "On the Sidewalk", true));
            Cities.Add(new CityInfo("City16.jpg", "Midnight Walk", true));
            Cities.Add(new CityInfo("City17.jpg", "Lunchtime Cafe", true));
            Cities.Add(new CityInfo("City18.jpg", "Coffee Shop", true));
            Cities.Add(new CityInfo("City19.jpg", "Rustic Tavern", true));
        }
        #endregion

        #region Override Methods
        public override nint NumberOfSections (UICollectionView collectionView)
        {
            return 1;
        }

        public override nint GetItemsCount (UICollectionView collectionView, nint section)
        {
            return Cities.Count;
        }

        public override UICollectionViewCell GetCell (UICollectionView collectionView, NSIndexPath indexPath)
        {
            var cityCell = (CityCollectionViewCell)collectionView.DequeueReusableCell (CardCellId, indexPath);
            var city = Cities [indexPath.Row];

            // Initialize city
            cityCell.City = city;

            return cityCell;
        }
        #endregion
    }
}
이 클래스를 자세히 살펴보겠습니다. 먼저 iOS 디자이너에서 UICollectionViewDataSource 할당한 셀 ID에 대한 바로 가기를 상속하고 제공합니다.
public static NSString CardCellId = new NSString ("CityCell");
다음으로 컬렉션 데이터에 대한 스토리지를 제공하고 데이터를 채우는 클래스를 제공합니다.
public List<CityInfo> Cities { get; set; } = new List<CityInfo>();
...

public void PopulateCities() {

    // Clear existing cities
    Cities.Clear();

    // Add new cities
    Cities.Add(new CityInfo("City01.jpg", "Houses by Water", false));
    Cities.Add(new CityInfo("City02.jpg", "Turning Circle", true));
    ...
}
그런 다음 메서드를 NumberOfSections 재정의하고 컬렉션 뷰에 있는 섹션(항목 그룹)의 수를 반환합니다. 이 경우 다음 중 하나만 있습니다.
public override nint NumberOfSections (UICollectionView collectionView)
{
    return 1;
}
다음으로, 다음 코드를 사용하여 컬렉션의 항목 수를 반환합니다.
public override nint GetItemsCount (UICollectionView collectionView, nint section)
{
    return Cities.Count;
}
마지막으로 컬렉션 뷰가 다음 코드를 사용하여 요청할 때 재사용 가능한 셀을 큐에서 제거합니다.
public override UICollectionViewCell GetCell (UICollectionView collectionView, NSIndexPath indexPath)
{
    var cityCell = (CityCollectionViewCell)collectionView.DequeueReusableCell (CardCellId, indexPath);
    var city = Cities [indexPath.Row];

    // Initialize city
    cityCell.City = city;

    return cityCell;
}
형식의 CityCollectionViewCell 컬렉션 뷰 셀을 가져와서 지정된 항목으로 채웁니다.
사용자 이벤트에 응답
사용자가 컬렉션에서 항목을 선택할 수 있도록 하려면 이 상호 작용을 처리하기 위해 컬렉션 뷰 대리자를 제공해야 합니다. 또한 호출 보기에서 사용자가 선택한 항목을 알 수 있는 방법을 제공해야 합니다.
앱 대리자
컬렉션 뷰에서 현재 선택한 항목을 호출 보기로 다시 연결할 방법이 필요합니다. 에서 사용자 지정 속성을 AppDelegate사용합니다. AppDelegate.cs 파일을 편집하고 다음 코드를 추가합니다.
public CityInfo SelectedCity { get; set;} = new CityInfo("City02.jpg", "Turning Circle", true);
이렇게 하면 속성이 정의되고 처음에 표시될 기본 도시가 설정됩니다. 나중에 이 속성을 사용하여 사용자의 선택을 표시하고 선택을 변경할 수 있도록 합니다.
컬렉션 뷰 대리자
다음으로 프로젝트에 새 CityViewDelegate 클래스를 추가하고 다음과 같이 표시합니다.
using System;
using System.Collections.Generic;
using UIKit;
using Foundation;
using CoreGraphics;

namespace tvCollection
{
    public class CityViewDelegate : UICollectionViewDelegateFlowLayout
    {
        #region Application Access
        public static AppDelegate App {
            get { return (AppDelegate)UIApplication.SharedApplication.Delegate; }
        }
        #endregion

        #region Constructors
        public CityViewDelegate ()
        {
        }
        #endregion

        #region Override Methods
        public override CGSize GetSizeForItem (UICollectionView collectionView, UICollectionViewLayout layout, NSIndexPath indexPath)
        {
            return new CGSize (361, 256);
        }

        public override bool CanFocusItem (UICollectionView collectionView, NSIndexPath indexPath)
        {
            if (indexPath == null) {
                return false;
            } else {
                var controller = collectionView as CityCollectionView;
                return controller.Source.Cities[indexPath.Row].CanSelect;
            }
        }

        public override void ItemSelected (UICollectionView collectionView, NSIndexPath indexPath)
        {
            var controller = collectionView as CityCollectionView;
            App.SelectedCity = controller.Source.Cities [indexPath.Row];

            // Close Collection
            controller.ParentController.DismissViewController(true,null);
        }
        #endregion
    }
}
이 클래스를 좀 더 자세히 살펴보겠습니다. 먼저 .UICollectionViewDelegateFlowLayout 이 클래스 UICollectionViewDelegate 에서 상속하는 이유는 기본 제공 UICollectionViewFlowLayout 을 사용하여 사용자 지정 레이아웃 형식이 아닌 항목을 표시하기 때문입니다.
다음으로, 이 코드를 사용하여 개별 항목의 크기를 반환합니다.
public override CGSize GetSizeForItem (UICollectionView collectionView, UICollectionViewLayout layout, NSIndexPath indexPath)
{
    return new CGSize (361, 256);
}
그런 다음, 지정된 셀이 다음 코드를 사용하여 포커스를 가져올 수 있는지 여부를 결정합니다.
public override bool CanFocusItem (UICollectionView collectionView, NSIndexPath indexPath)
{
    if (indexPath == null) {
        return false;
    } else {
        var controller = collectionView as CityCollectionView;
        return controller.Source.Cities[indexPath.Row].CanSelect;
    }
}
지정된 백업 데이터 조각에 플래그 CanSelect 가 설정되어 있는지 확인하고 해당 값을 반환하는 검사true. 탐색 및 포커스에 대한 자세한 내용은 탐색 및 포커스 작업 및 Siri 원격 및 Bluetooth 컨트롤러 설명서를 참조하세요.
마지막으로 다음 코드를 사용하여 항목을 선택하는 사용자에게 응답합니다.
public override void ItemSelected (UICollectionView collectionView, NSIndexPath indexPath)
{
    var controller = collectionView as CityCollectionView;
    App.SelectedCity = controller.Source.Cities [indexPath.Row];

    // Close Collection
    controller.ParentController.DismissViewController(true,null);
}
여기서는 사용자가 선택한 항목으로 AppDelegate 속성을 설정하고 SelectedCity 컬렉션 뷰 컨트롤러를 닫고 호출한 보기로 돌아갑니다. 컬렉션 뷰의 속성을 아직 정의 ParentController 하지 않은 경우 다음 작업을 수행합니다.
컬렉션 뷰 구성
이제 컬렉션 뷰를 편집하고 데이터 원본 및 대리자를 할당해야 합니다. CityCollectionView.cs 파일(Storyboard에서 자동으로 생성됨)을 편집하고 다음과 같이 표시합니다.
using System;
using Foundation;
using UIKit;

namespace tvCollection
{
    public partial class CityCollectionView : UICollectionView
    {
        #region Application Access
        public static AppDelegate App {
            get { return (AppDelegate)UIApplication.SharedApplication.Delegate; }
        }
        #endregion

        #region Computed Properties
        public CityViewDatasource Source {
            get { return DataSource as CityViewDatasource;}
        }

        public CityCollectionViewController ParentController { get; set;}
        #endregion

        #region Constructors
        public CityCollectionView (IntPtr handle) : base (handle)
        {
            // Initialize
            RegisterClassForCell (typeof(CityCollectionViewCell), CityViewDatasource.CardCellId);
            DataSource = new CityViewDatasource (this);
            Delegate = new CityViewDelegate ();
        }
        #endregion

        #region Override Methods
        public override nint NumberOfSections ()
        {
            return 1;
        }

        public override void DidUpdateFocus (UIFocusUpdateContext context, UIFocusAnimationCoordinator coordinator)
        {
            var previousItem = context.PreviouslyFocusedView as CityCollectionViewCell;
            if (previousItem != null) {
                Animate (0.2, () => {
                    previousItem.CityTitle.Alpha = 0.0f;
                });
            }

            var nextItem = context.NextFocusedView as CityCollectionViewCell;
            if (nextItem != null) {
                Animate (0.2, () => {
                    nextItem.CityTitle.Alpha = 1.0f;
                });
            }
        }
        #endregion
    }
}
먼저 다음을 액세스 AppDelegate하는 바로 가기를 제공합니다.
public static AppDelegate App {
    get { return (AppDelegate)UIApplication.SharedApplication.Delegate; }
}
다음으로 컬렉션 뷰의 데이터 원본에 대한 바로 가기와 컬렉션 뷰 컨트롤러에 액세스하는 속성(위의 대리자가 사용자가 선택할 때 컬렉션을 닫는 데 사용됨)을 제공합니다.
public CityViewDatasource Source {
    get { return DataSource as CityViewDatasource;}
}

public CityCollectionViewController ParentController { get; set;}
그런 다음, 다음 코드를 사용하여 컬렉션 뷰를 초기화하고 셀 클래스, 데이터 원본 및 대리자를 할당합니다.
public CityCollectionView (IntPtr handle) : base (handle)
{
    // Initialize
    RegisterClassForCell (typeof(CityCollectionViewCell), CityViewDatasource.CardCellId);
    DataSource = new CityViewDatasource (this);
    Delegate = new CityViewDelegate ();
}
마지막으로, 이미지 아래의 제목은 사용자가 강조 표시(포커스 내)할 때만 표시되도록 합니다. 다음 코드를 사용하여 이 작업을 수행합니다.
public override void DidUpdateFocus (UIFocusUpdateContext context, UIFocusAnimationCoordinator coordinator)
{
    var previousItem = context.PreviouslyFocusedView as CityCollectionViewCell;
    if (previousItem != null) {
        Animate (0.2, () => {
            previousItem.CityTitle.Alpha = 0.0f;
        });
    }

    var nextItem = context.NextFocusedView as CityCollectionViewCell;
    if (nextItem != null) {
        Animate (0.2, () => {
            nextItem.CityTitle.Alpha = 1.0f;
        });
    }
}
포커스가 손실된 이전 항목의 반출을 0으로 설정하고 다음 항목의 투명도는 포커스를 100%로 설정합니다. 이러한 전환에도 애니메이션이 적용되었습니다.
컬렉션 뷰 컨트롤러 구성
이제 컬렉션 뷰에서 최종 구성을 수행하고 사용자가 선택한 후 컬렉션 뷰를 닫을 수 있도록 컨트롤러가 정의한 속성을 설정하도록 허용해야 합니다.
CityCollectionViewController.cs 파일을 편집하고(Storyboard에서 자동으로 생성됨) 다음과 같이 표시합니다.
// This file has been autogenerated from a class added in the UI designer.

using System;

using Foundation;
using UIKit;

namespace tvCollection
{
    public partial class CityCollectionViewController : UICollectionViewController
    {
        #region Computed Properties
        public CityCollectionView Collection {
            get { return CollectionView as CityCollectionView; }
        }
        #endregion

        #region Constructors
        public CityCollectionViewController (IntPtr handle) : base (handle)
        {
        }
        #endregion

        #region Override Methods
        public override void AwakeFromNib ()
        {
            base.AwakeFromNib ();

            // Save link to controller
            Collection.ParentController = this;
        }
        #endregion
    }
}
모든 것을 하나로 묶습니다.
컬렉션 뷰를 채우고 제어하기 위해 모든 파트를 구성했으므로 모든 항목을 통합하기 위해 기본 보기에 대한 최종 편집을 수행해야 합니다.
ViewController.cs 파일을 편집하고(Storyboard에서 자동으로 생성됨) 다음과 같이 표시합니다.
using System;
using Foundation;
using UIKit;
using tvCollection;

namespace MySingleView
{
    public partial class ViewController : UIViewController
    {
        #region Application Access
        public static AppDelegate App {
            get { return (AppDelegate)UIApplication.SharedApplication.Delegate; }
        }
        #endregion

        #region Constructors
        public ViewController (IntPtr handle) : base (handle)
        {
        }
        #endregion

        #region Override Methods
        public override void ViewDidLoad ()
        {
            base.ViewDidLoad ();
            // Perform any additional setup after loading the view, typically from a nib.
        }

        public override void ViewWillAppear (bool animated)
        {
            base.ViewWillAppear (animated);

            // Update image with the currently selected one
            CityView.Image = UIImage.FromFile(App.SelectedCity.ImageFilename);
            BackgroundView.Image = CityView.Image;
            CityTitle.Text = App.SelectedCity.Title;
        }

        public override void DidReceiveMemoryWarning ()
        {
            base.DidReceiveMemoryWarning ();
            // Release any cached data, images, etc that aren't in use.
        }
        #endregion
    }
}
다음 코드는 처음에 속성에서 선택한 항목을 표시하고 사용자가 컬렉션 보기에서 SelectedCityAppDelegate 선택한 경우 다시 표시합니다.
public override void ViewWillAppear (bool animated)
{
    base.ViewWillAppear (animated);

    // Update image with the currently selected one
    CityView.Image = UIImage.FromFile(App.SelectedCity.ImageFilename);
    BackgroundView.Image = CityView.Image;
    CityTitle.Text = App.SelectedCity.Title;
}
앱 테스트
모든 항목이 준비되면 앱을 빌드하고 실행하는 경우 기본 보기가 기본 도시와 함께 표시됩니다.

사용자가 보기 선택 단추를 클릭하면 컬렉션 보기가 표시됩니다.

해당 CanSelect 속성이 설정된 false 모든 도시는 흐리게 표시되고 사용자는 포커스를 설정할 수 없습니다. 사용자가 항목을 강조 표시(포커스에 표시)하면 제목이 표시되고 시차 효과를 사용하여 이미지를 3D로 미묘하게 기울일 수 있습니다.
사용자가 선택한 이미지를 클릭하면 컬렉션 보기가 닫히고 기본 보기가 새 이미지로 다시 표시됩니다.

사용자 지정 레이아웃 만들기 및 항목 순서 변경
컬렉션 뷰를 사용하는 주요 기능 중 하나는 사용자 지정 레이아웃을 만드는 기능입니다. tvOS는 iOS에서 상속되므로 사용자 지정 레이아웃을 만드는 프로세스는 동일합니다. 자세한 내용은 컬렉션 뷰 소개 설명서를 참조하세요.
최근에 iOS 9용 컬렉션 뷰에 추가된 기능은 컬렉션의 항목 순서를 쉽게 다시 정렬할 수 있는 기능이었습니다. 다시 말하지만, tvOS 9는 iOS 9의 하위 집합이므로 동일한 방식으로 수행됩니다. 자세한 내용은 컬렉션 보기 변경 내용 문서를 참조하세요.
요약
이 문서에서는 Xamarin.tvOS 앱 내의 컬렉션 뷰 디자인 및 작업에 대해 설명했습니다. 먼저 컬렉션 뷰를 구성하는 모든 요소에 대해 설명했습니다. 다음으로 Storyboard를 사용하여 컬렉션 뷰를 디자인하고 구현하는 방법을 보여 줍니다. 마지막으로, 사용자 지정 레이아웃을 만들고 항목을 다시 정렬하는 방법에 대한 정보에 대한 링크가 제공됩니다.