教學課程:搭配使用 SemPy 和 Great Expectations (GX) 來驗證資料
在本教學課程中,您將了解如何搭配使用 SemPy 與 Great Expectations (GX),在 Power BI 語意模型上執行資料驗證。
本教學課程會示範如何:
- 使用 Great Expectation 的 Fabric 資料來源 (建於語義連結上) 驗證 Fabric 工作區中資料集的條件約束。
- 設定 GX 資料內容、資料資產和期望。
- 使用 GX 來檢查點檢視驗證結果。
- 使用語意連結來分析未經處理資料。
必要條件
取得 Microsoft Fabric 訂用帳戶。 或註冊免費的 Microsoft Fabric 試用版。
登入 Microsoft Fabric。
使用首頁左側的體驗切換器,切換至 Synapse 資料科學體驗。
![體驗切換器功能表的螢幕擷取畫面,顯示選取 [資料科學] 的位置。](media/tutorial-data-science-prepare-system/switch-to-data-science.png)
- 從左側瀏覽窗格中選取 [工作區],以尋找並選取您的工作區。 此工作區會成為您目前的工作區。
- 下載 Retail Analysis Sample PBIX.pbix 檔案。
- 在您的工作區中,使用 [上傳] 按鈕,將 Retail Analysis Sample PBIX.pbix 檔案上傳至工作區。
遵循筆記本中的指示
great_expectations_tutorial.ipynb 是本教學課程隨附的筆記本。
若要開啟本教學課程隨附的筆記本,請遵循為資料科學教學課程準備系統中的指示,將筆記本匯入您的工作區。
如果您想要複製並貼上此頁面中的程式碼,則可以建立新的筆記本。
開始執行程式碼之前,請務必將 Lakehouse 連結至筆記本。
設定筆記本
在本章節中,您會使用必要的模組和資料來設定筆記本環境。
- 使用
%pip筆記本內的內嵌安裝功能,從 PyPI 安裝SemPy和相關的Great Expectations程式庫。
# install libraries
%pip install semantic-link 'great-expectations<1.0' great_expectations_experimental great_expectations_zipcode_expectations

# load %%dax cell magic
%load_ext sempy
- 對稍後需要的模組執行必要的匯入:
import great_expectations as gx
from great_expectations.expectations.expectation import ExpectationConfiguration
from great_expectations_zipcode_expectations.expectations import expect_column_values_to_be_valid_zip5
設定 GX 資料內容和資料來源
若要開始使用 Great Expectations,您必須先設定 GX 資料內容。 內容可作為 GX 作業的進入點,並保留所有相關的組態。
context = gx.get_context()
您現在可以將 Fabric 資料集新增至此內容,作為資料來源,以開始與資料互動。 本教學課程使用標準 Power BI 範例語意模型 Retail Analysis Sample .pbix 檔案。
ds = context.sources.add_fabric_powerbi("Retail Analysis Data Source", dataset="Retail Analysis Sample PBIX")
指定資料資產
定義資料資產,以指定想要處理的資料子集。 資產可以像完整資料表一樣簡單,也可以像自訂 Data Analysis Expressions (DAX) 查詢一樣複雜。
在這裡,您將新增多個資產:
- Power BI 資料表
- Power BI 量值
- 自訂 DAX 查詢
- 動態管理檢視 (DMV) 查詢
Power BI 資料表
將 Power BI 資料表新增為資料資產。
ds.add_powerbi_table_asset("Store Asset", table="Store")
Power BI 量值
如果您的資料集包含預先設定的量值,可以按照類似於 SemPy 的 evaluate_measure 的 API,將量值新增為資產。
ds.add_powerbi_measure_asset(
    "Total Units Asset",
    measure="TotalUnits",
    groupby_columns=["Time[FiscalYear]", "Time[FiscalMonth]"]
)
DAX
如果您想要定義自己的量值,或更能控制特定資料列,您可以使用自訂 DAX 查詢來新增 DAX 資產。 在這裡,我們會透過分割兩個現有的量值,以定義 Total Units Ratio 量值。
ds.add_powerbi_dax_asset(
    "Total Units YoY Asset",
    dax_string=
    """
    EVALUATE SUMMARIZECOLUMNS(
        'Time'[FiscalYear],
        'Time'[FiscalMonth],
        "Total Units Ratio", DIVIDE([Total Units This Year], [Total Units Last Year])
    )
    """
)
DMV 查詢
在某些情況下,使用動態管理檢視 (DMV) 計算作為資料驗證程序的一部分可能會很有幫助。 例如,您可以追蹤資料集內的參考完整性違規數目。 如需詳細資訊,請參閱清理資料 = 更快速的報告。
ds.add_powerbi_dax_asset(
    "Referential Integrity Violation",
    dax_string=
    """
    SELECT
        [Database_name],
        [Dimension_Name],
        [RIVIOLATION_COUNT]
    FROM $SYSTEM.DISCOVER_STORAGE_TABLES
    """
)
預期結果
若要將特定條件約束新增至資產,必須先設定期望套件。 將個別期望新增至每個套件之後,就可以更新從新套件開始設定的資料內容。 如需可用預期的完整清單,請參閱 GX 預期圖庫。
首先,新增具有兩個期望的「零售商店套件」:
- 有效的郵遞區號
- 資料列計數介於 80 到 200 之間的資料表
suite_store = context.add_expectation_suite("Retail Store Suite")

suite_store.add_expectation(ExpectationConfiguration("expect_column_values_to_be_valid_zip5", { "column": "PostalCode" }))
suite_store.add_expectation(ExpectationConfiguration("expect_table_row_count_to_be_between", { "min_value": 80, "max_value": 200 }))

context.add_or_update_expectation_suite(expectation_suite=suite_store)
TotalUnits 量值
新增具有一個期望的「零售量值套件」:
- 資料行值應大於 50,000
suite_measure = context.add_expectation_suite("Retail Measure Suite")
suite_measure.add_expectation(ExpectationConfiguration(
    "expect_column_values_to_be_between",
    {
        "column": "TotalUnits",
        "min_value": 50000
    }
))

context.add_or_update_expectation_suite(expectation_suite=suite_measure)
Total Units Ratio DAX
新增具有一個期望的「零售 DAX 套件」:
- 總單位比率的資料行值應介於 0.8 和 1.5 之間
suite_dax = context.add_expectation_suite("Retail DAX Suite")
suite_dax.add_expectation(ExpectationConfiguration(
    "expect_column_values_to_be_between",
    {
        "column": "[Total Units Ratio]",
        "min_value": 0.8,
        "max_value": 1.5
    }
))

context.add_or_update_expectation_suite(expectation_suite=suite_dax)
參考完整性違規 (DMV)
新增具有一個期望的「零售 DMV 套件」:
- RIVIOLATION_COUNT 應為 0
suite_dmv = context.add_expectation_suite("Retail DMV Suite")
# There should be no RI violations
suite_dmv.add_expectation(ExpectationConfiguration(
    "expect_column_values_to_be_in_set",
    {
        "column": "RIVIOLATION_COUNT",
        "value_set": [0]
    }
))
context.add_or_update_expectation_suite(expectation_suite=suite_dmv)
驗證
若要實際對資料執行指定的預期,請先建立檢查點並將其新增至內容。 如需檢查點設定的詳細資訊,請參閱資料驗證工作流程。
checkpoint_config = {
    "name": f"Retail Analysis Checkpoint",
    "validations": [
        {
            "expectation_suite_name": "Retail Store Suite",
            "batch_request": {
                "datasource_name": "Retail Analysis Data Source",
                "data_asset_name": "Store Asset",
            },
        },
        {
            "expectation_suite_name": "Retail Measure Suite",
            "batch_request": {
                "datasource_name": "Retail Analysis Data Source",
                "data_asset_name": "Total Units Asset",
            },
        },
        {
            "expectation_suite_name": "Retail DAX Suite",
            "batch_request": {
                "datasource_name": "Retail Analysis Data Source",
                "data_asset_name": "Total Units YoY Asset",
            },
        },
        {
            "expectation_suite_name": "Retail DMV Suite",
            "batch_request": {
                "datasource_name": "Retail Analysis Data Source",
                "data_asset_name": "Referential Integrity Violation",
            },
        },
    ],
}
checkpoint = context.add_checkpoint(
    **checkpoint_config
)
現在,請執行檢查點,並將結果擷取為 pandas DataFrame,以便進行簡單的格式設定。
result = checkpoint.run()
處理並列印結果。
import pandas as pd

data = []

for run_result in result.run_results:
    for validation_result in result.run_results[run_result]["validation_result"]["results"]:
        row = {
            "Batch ID": run_result.batch_identifier,
            "type": validation_result.expectation_config.expectation_type,
            "success": validation_result.success
        }

        row.update(dict(validation_result.result))

        data.append(row)

result_df = pd.DataFrame.from_records(data)

result_df[["Batch ID", "type", "success", "element_count", "unexpected_count", "partial_unexpected_list"]]

從這些結果中,可以看到所有預期都通過驗證,但透過自訂 DAX 查詢定義的「總單位 YoY 資產」除外。
診斷
使用語意連結,可以擷取來源資料,以了解哪些確切的年份超出範圍。 語意連結提供執行 DAX 查詢的內嵌 magic。 使用語意連結來執行您傳入 GX 資料資產的相同查詢,並將產生的值視覺化。
%%dax "Retail Analysis Sample PBIX"

EVALUATE SUMMARIZECOLUMNS(
    'Time'[FiscalYear],
    'Time'[FiscalMonth],
    "Total Units Ratio", DIVIDE([Total Units This Year], [Total Units Last Year])
)
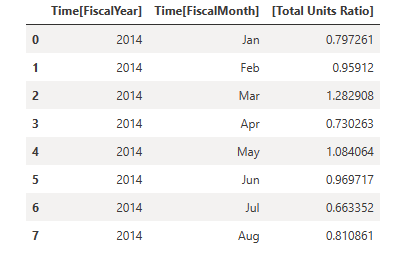
將這些結果儲存在 DataFrame 中。
df = _
繪製結果。
import matplotlib.pyplot as plt

df["Total Units % Change YoY"] = (df["[Total Units Ratio]"] - 1)

df.set_index(["Time[FiscalYear]", "Time[FiscalMonth]"]).plot.bar(y="Total Units % Change YoY")

plt.axhline(0)

plt.axhline(-0.2, color="red", linestyle="dotted")
plt.axhline( 0.5, color="red", linestyle="dotted")

None
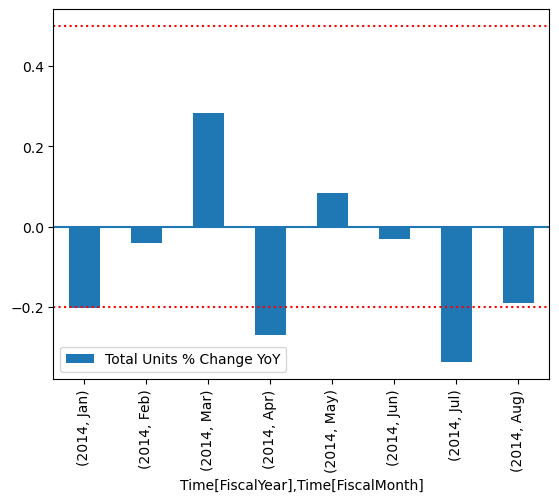
從繪圖中,您可以看到 4 月和 7 月稍微超出範圍,然後可以採取進一步的步驟進行調查。
儲存 GX 組態
隨著資料集中的資料隨著時間變更,您可能想要重新執行剛執行過的 GX 驗證。 目前,資料內容 (包含連線的資料資產、期望套件和檢查點) 暫時存回,但可以轉換成檔案內容以供日後使用。 或者,可以具現化檔案內容 (請參閱具現化資料內容)。
context = context.convert_to_file_context()
現在您已儲存內容,請將 gx 目錄複製到您的 Lakehouse。
重要
此儲存格假設您已將 Lakehouse 新增至筆記本。 如果沒有連結 Lakehouse,您不會看到錯誤,但您之後也無法取得內容。 如果您現在新增 Lakehouse,核心將會重新啟動,因此您必須重新執行整個筆記本,然後才能回到這一點。
# copy GX directory to attached lakehouse
!cp -r gx/ /lakehouse/default/Files/gx
現在,可以使用 context = gx.get_context(project_root_dir="<your path here>") 建立未來的內容,以使用本教學課程中的所有設定。
例如,在新筆記本中,連結相同的 Lakehouse,並使用 context = gx.get_context(project_root_dir="/lakehouse/default/Files/gx") 來擷取內容。
相關內容
查看語意連結/SemPy 的其他教學課程: