概觀
在本教學課程中,您會將推播通知新增至 Android 快速入門 專案,以便在每次插入記錄時將推播通知傳送至裝置。
如果您未使用下載的快速入門伺服器專案,則需要推播通知擴充功能套件。 如需詳細資訊,請參閱 使用 Azure Mobile Apps 的 .NET 後端伺服器 SDK。
先決條件
您需要下列項目:
一個整合開發環境(IDE),取決於您專案的後端。
- 如果此應用程式具有 Node.js 後端,則使用 Android Studio。
- 如果此應用程式具有 Microsoft .NET 後端,則需要使用 Visual Studio Community 2013 或更新版本。
Android 2.3 或更新版本、Google 存放庫修訂 27 或更新版本,以及適用於 Firebase 雲端通訊的 Google Play Services 9.0.2 或更新版本。
完成 Android 快速入門。
建立支援 Firebase 雲端傳訊的專案
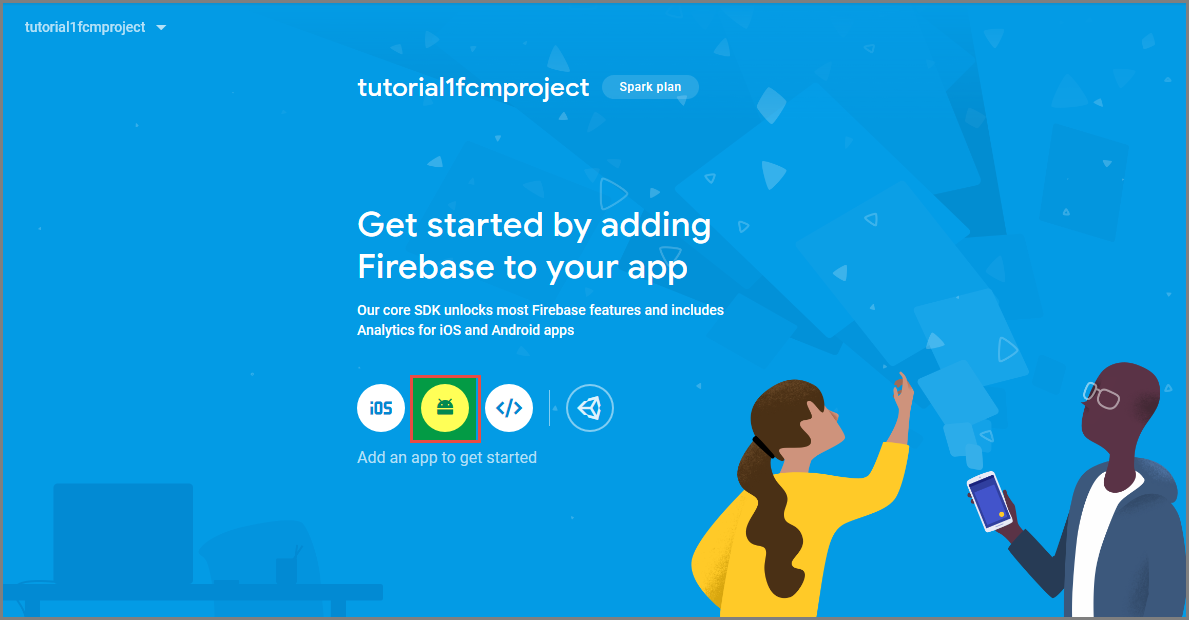
登入 Firebase 主控台。 建立新的 Firebase 專案 (如果您還沒有 Firebase 專案的話)。
建立專案之後,請選取 [將 Firebase 新增至 Android 應用程式]。
在 [將 Firebase 新增至 Android 應用程式] 頁面上,採取下列步驟:
對於 [Android 套件名稱],複製應用程式 build.gradle 檔案的 applicationId 值。 在這個範例中,它是
com.fabrikam.fcmtutorial1app。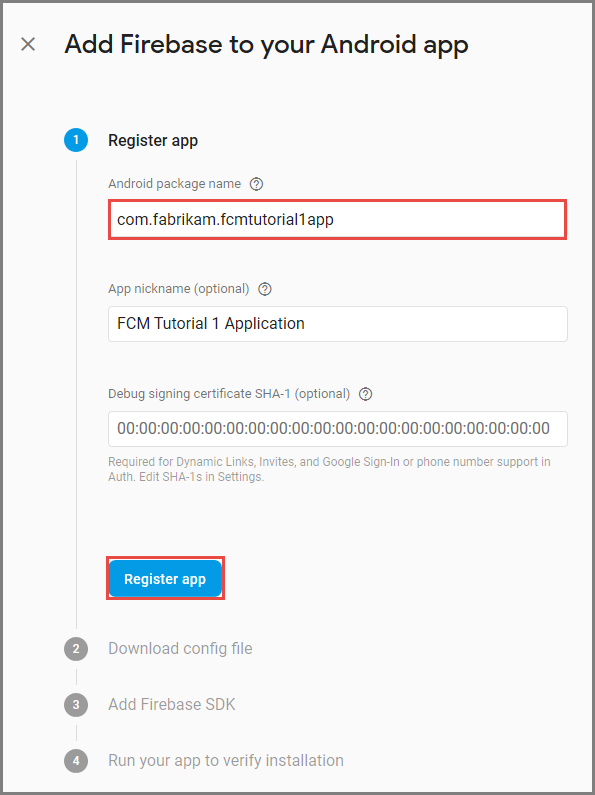
選取 註冊應用程式。
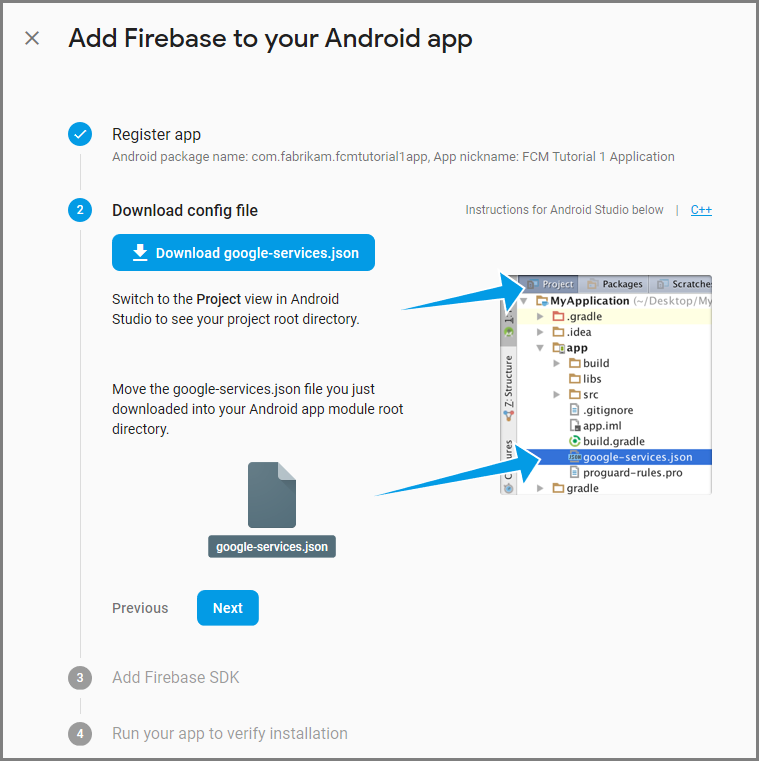
選取 [下載 google-services.json],將檔案儲存到專案的應用程式資料夾,然後選取 [下一步]。
在 Android Studio 中對於專案進行下列設定變更。
在專案層級 build.gradle 檔案 (<project>/build.gradle) 中,將下列陳述式新增至 [相依性] 區段。
classpath 'com.google.gms:google-services:4.0.1'在應用程式層級 build.gradle 檔案 (<project>/<app-module>/build.gradle) 中,將下列陳述式新增至 dependencies 區段。
implementation 'com.google.firebase:firebase-core:16.0.8'
implementation 'com.google.firebase:firebase-messaging:17.3.4'
請將以下這行新增至應用程式層級 build.gradle 檔案的結尾,於相依性區段之後。
apply plugin: 'com.google.gms.google-services'在工具列上選取 [立即同步]。

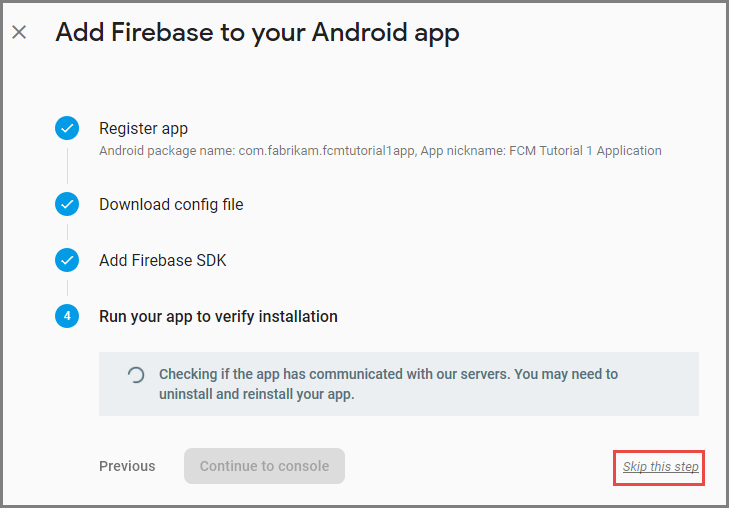
選取 下一步。
選取 [略過此步驟]。
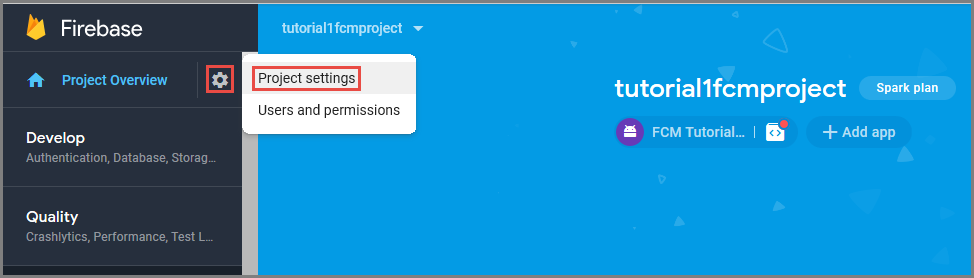
在 Firebase 主控台中,選取您專案的齒輪圖示。 然後選取 [專案設定]。
如果您尚未將 google-services.json 檔案下載到 Android Studio 專案的 app 資料夾,可以在此頁面下載。
切換到頂端的 [雲端通訊] 索引標籤。
複製並儲存伺服器金鑰以供稍後使用。 您可以使用此值來設定中樞。
設定通知中樞
Azure App Service 的 Mobile Apps 功能會使用 Azure 通知中樞 來傳送推播,因此您將設定行動應用程式的通知中樞。
在 azure 入口網站的 中,移至 App Services,然後選取您的應用程式後端。 在 [設定]下,選取 [推送]。
若要將通知中樞資源新增至應用程式,請選取 [Connect]。 您可以建立中樞或連線到已存在的中樞。
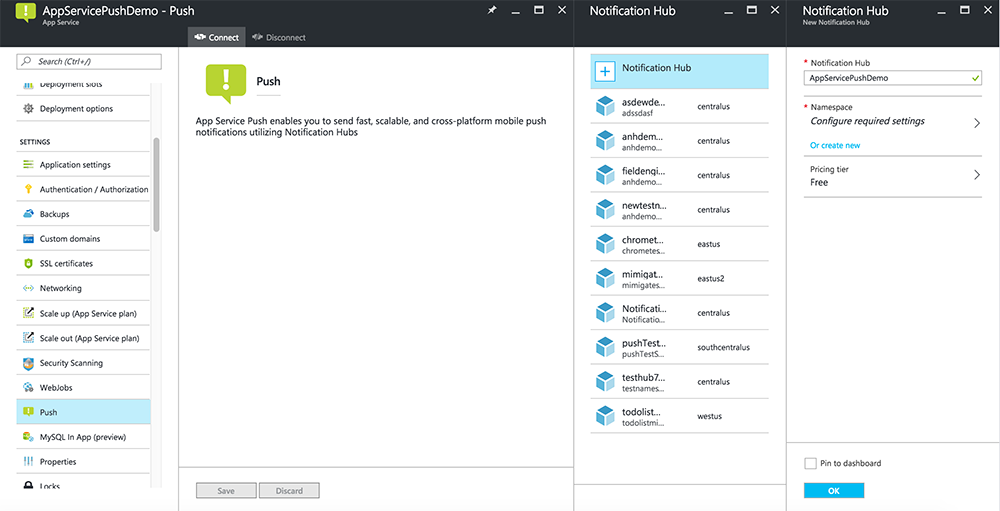
現在您已將通知中樞連線到Mobile Apps 後端專案。 稍後您會將此通知中樞設定為連線到平臺通知系統 (PNS) 以推送至裝置。
設定 Azure 以傳送推播通知
在 Azure 入口網站中,按一下 [瀏覽所有>App Services],然後按一下您的行動應用程式後端。 在 [設定]下,點擊 [App Service Push],然後點擊您的通知中樞名稱。
移至 Google(GCM),輸入您在上一步從 Firebase 取得的 伺服器金鑰 值,然後點擊 [儲存]。
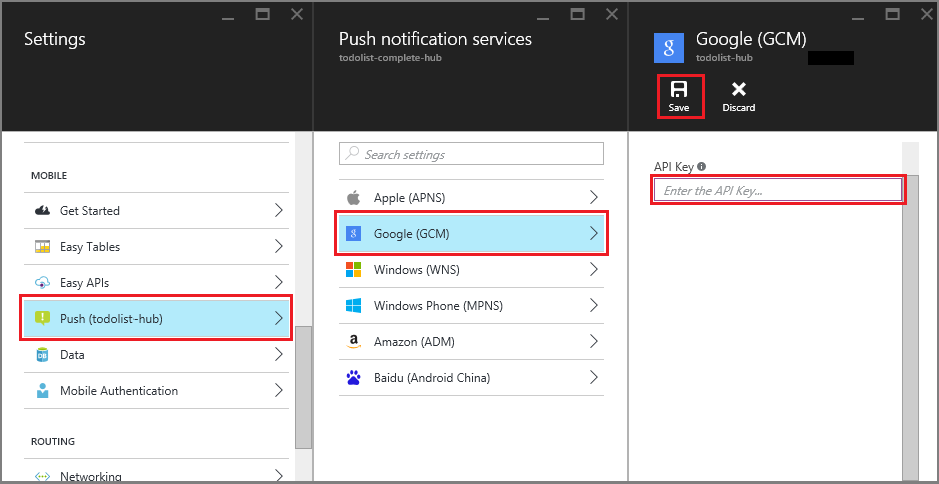
Mobile Apps 後端現在已設定為使用 Firebase 雲端通訊。 這可讓您使用通知中樞,將推播通知傳送至在Android裝置上執行的應用程式。
啟用伺服器專案的推播通知
使用與您的後端項目類型相符的方法:.NET 後端 或 Node.js 後端。
.NET 後端專案
在 Visual Studio 中,以滑鼠右鍵按一下伺服器專案,然後按一下 管理 NuGet 套件。 搜尋
Microsoft.Azure.NotificationHubs,然後按下 安裝。 這會安裝通知中樞用戶端程式庫。在 Controllers 資料夾中,開啟 [TodoItemController.cs],然後新增下列
using語句:using Microsoft.Azure.Mobile.Server.Config; using Microsoft.Azure.NotificationHubs;以下列程式碼取代
PostTodoItem方法:public async Task<IHttpActionResult> PostTodoItem(TodoItem item) { TodoItem current = await InsertAsync(item); // Get the settings for the server project. HttpConfiguration config = this.Configuration; MobileAppSettingsDictionary settings = this.Configuration.GetMobileAppSettingsProvider().GetMobileAppSettings(); // Get the Notification Hubs credentials for the Mobile App. string notificationHubName = settings.NotificationHubName; string notificationHubConnection = settings .Connections[MobileAppSettingsKeys.NotificationHubConnectionString].ConnectionString; // Create a new Notification Hub client. NotificationHubClient hub = NotificationHubClient .CreateClientFromConnectionString(notificationHubConnection, notificationHubName); // Android payload var androidNotificationPayload = "{ \"data\" : {\"message\":\"" + item.Text + "\"}}"; try { // Send the push notification and log the results. var result = await hub.SendGcmNativeNotificationAsync(androidNotificationPayload); // Write the success result to the logs. config.Services.GetTraceWriter().Info(result.State.ToString()); } catch (System.Exception ex) { // Write the failure result to the logs. config.Services.GetTraceWriter() .Error(ex.Message, null, "Push.SendAsync Error"); } return CreatedAtRoute("Tables", new { id = current.Id }, current); }重新發佈伺服器專案。
Node.js 後端專案
設定後端專案。
將 todoitem.js 檔案中的現有程式代碼替換為以下內容:
var azureMobileApps = require('azure-mobile-apps'),
promises = require('azure-mobile-apps/src/utilities/promises'),
logger = require('azure-mobile-apps/src/logger');

var table = azureMobileApps.table();

table.insert(function (context) {
// For more information about the Notification Hubs JavaScript SDK,
// see https://aka.ms/nodejshubs
logger.info('Running TodoItem.insert');

// Define the GCM payload.
var payload = {
    "data": {
        "message": context.item.text
    }
};

// Execute the insert.  The insert returns the results as a Promise,
// Do the push as a post-execute action within the promise flow.
return context.execute()
    .then(function (results) {
        // Only do the push if configured
        if (context.push) {
            // Send a GCM native notification.
            context.push.gcm.send(null, payload, function (error) {
                if (error) {
                    logger.error('Error while sending push notification: ', error);
                } else {
                    logger.info('Push notification sent successfully!');
                }
            });
        }
        // Don't forget to return the results from the context.execute()
        return results;
    })
    .catch(function (error) {
        logger.error('Error while running context.execute: ', error);
    });
});

module.exports = table;
這會在插入一個新的 todo 項目時,傳送帶有 item.text 的 GCM 通知。
在本機計算機上編輯檔案時,請重新發佈伺服器專案。
將推播通知新增至您的應用程式
在本節中,您會更新用戶端 Android 應用程式來處理推播通知。
確認 Android SDK 版本
由於進行中開發,Android Studio 中安裝的 Android SDK 版本可能不符合程式代碼中的版本。 本教學課程中所參考的 Android SDK 為 26 版,這是撰寫時的最新版本。 隨著 SDK 的新版本出現,版本號碼可能會增加,我們建議使用可用的最新版本。
版本不符的兩個徵兆為:
- 當您建置或重建專案時,可能會收到 Gradle 錯誤訊息,例如
Gradle sync failed: Failed to find target with hash string 'android-XX'。 - 程式代碼中應該根據
import語句解析的標準 Android 物件可能會產生錯誤訊息。
如果其中一項出現,則安裝在 Android Studio 中的 Android SDK 版本可能不符合所下載專案的 SDK 目標。 若要驗證版本,請進行下列變更:
在 Android Studio 中,點擊 Tools>Android>SDK Manager。 如果您尚未安裝最新版本的 SDK 平臺,請按兩下 以安裝它。 記下版本號碼。
在 [專案總管] 索引標籤的 [Gradle 腳本] 下,開啟 build.gradle (模組:app)檔案。 確定 compileSdkVersion 和 targetSdkVersion 都設定為已安裝的最新 SDK 版本。
build.gradle看起來可能像這樣:android { compileSdkVersion 26 defaultConfig { targetSdkVersion 26 } }
您的下一個步驟是安裝Google Play服務。 Firebase 雲端傳訊具有開發與測試的一些最低 API 層級需求,指令清單中的 minSdkVersion 屬性必須符合此需求。
如果您要使用較舊的裝置進行測試,請參閱 將 Firebase 新增至 Android 專案,以判斷此值可以設得多低,並適當地設置。
將 Firebase 雲端傳訊新增至專案
在 Android Studio 中,選擇 [檔案>項目結構]。 選取 [通知],選取 [Firebase 雲端通訊],然後按一下 [確定] 。
新增程式碼
在您的 app 專案中,開啟 檔案
AndroidManifest.xml。 在application開始標籤後新增下列代碼:<service android:name=".ToDoMessagingService"> <intent-filter> <action android:name="com.google.firebase.MESSAGING_EVENT"/> </intent-filter> </service> <service android:name=".ToDoInstanceIdService"> <intent-filter> <action android:name="com.google.firebase.INSTANCE_ID_EVENT"/> </intent-filter> </service>開啟檔案
ToDoActivity.java,然後進行下列變更:新增 import 語句:
import com.google.firebase.iid.FirebaseInstanceId;將
MobileServiceClient的定義從 私人 變更為 私人靜態,因此現在看起來如下:private static MobileServiceClient mClient;新增
registerPush方法:public static void registerPush() { final String token = FirebaseInstanceId.getInstance().getToken(); if (token != null) { new AsyncTask<Void, Void, Void>() { protected Void doInBackground(Void... params) { mClient.getPush().register(token); return null; } }.execute(); } }更新 類別的
ToDoActivity方法。 請務必在具現化MobileServiceClient之後新增此程序代碼。registerPush();
新增類別以處理通知。 在 [專案總管] 中,開啟 應用程式>java>your-project-namespace 節點,然後以滑鼠右鍵按兩下套件名稱節點。 按下 [新增],然後點擊 [Java 類別]。 在 [名稱] 中,輸入
ToDoMessagingService,然後按兩下 [確定]。 然後,將類別宣告取代為:import android.app.Notification; import android.app.NotificationManager; import android.app.PendingIntent; import android.content.Context; import android.content.Intent; import com.google.firebase.messaging.FirebaseMessagingService; import com.google.firebase.messaging.RemoteMessage; public class ToDoMessagingService extends FirebaseMessagingService { private static final int NOTIFICATION_ID = 1; @Override public void onMessageReceived(RemoteMessage remoteMessage) { String message = remoteMessage.getData().get("message"); if (message != null) { sendNotification("Notification Hub Demo", message); } } private void sendNotification(String title, String messageBody) { PendingIntent contentIntent = PendingIntent.getActivity(this, 0, new Intent(this, ToDoActivity.class), 0); Notification.Builder notificationBuilder = new Notification.Builder(this) .setSmallIcon(R.drawable.ic_launcher) .setContentTitle(title) .setContentText(messageBody) .setContentIntent(contentIntent); NotificationManager notificationManager = (NotificationManager) getSystemService(Context.NOTIFICATION_SERVICE); if (notificationManager != null) { notificationManager.notify(NOTIFICATION_ID, notificationBuilder.build()); } } }新增另一個類別來處理令牌更新。 建立
ToDoInstanceIdServicejava 類別,並將類別宣告取代為:import com.google.firebase.iid.FirebaseInstanceIdService; public class ToDoInstanceIdService extends FirebaseInstanceIdService { @Override public void onTokenRefresh() { ToDoActivity.registerPush(); } }
您的應用程式現在已更新以支援推播通知。
針對已發佈的行動服務測試應用程式
您可以直接連接 Android 手機與 USB 纜線,或在模擬器中使用虛擬設備來測試應用程式。
後續步驟
現在您已完成本教學課程,請考慮繼續進行下列其中一個教學課程:
- 將驗證新增至 Android 應用程式。 瞭解如何使用支援的身分識別提供者,將驗證新增至 Android 上的 todolist 快速入門專案。
- 啟用Android應用程式的離線同步處理。 瞭解如何使用Mobile Apps 後端將離線支援新增至您的應用程式。 使用離線同步處理時,即使沒有網路連線,使用者也可以與行動應用程式互動,檢視、新增或修改數據。