概觀
在本教學課程中,您會將推播通知新增至 Xamarin.Android 快速入門 專案,以便在每次插入記錄時將推播通知傳送至裝置。
如果您未使用下載的快速入門伺服器專案,您將需要推播通知擴充功能套件。 如需詳細資訊,請參閱 使用適用於 Azure Mobile Apps 的 .NET 後端伺服器 SDK 指南。
先決條件
本教學課程需要設定:
- 作用中的Google帳戶。 您可以在 accounts.google.com 註冊 Google 帳戶。
- Google 雲端傳訊用戶端元件。
設定通知中樞
Azure App Service 的 Mobile Apps 功能會使用 Azure 通知中樞 傳送推播,因此您將設定行動應用程式的通知中樞。
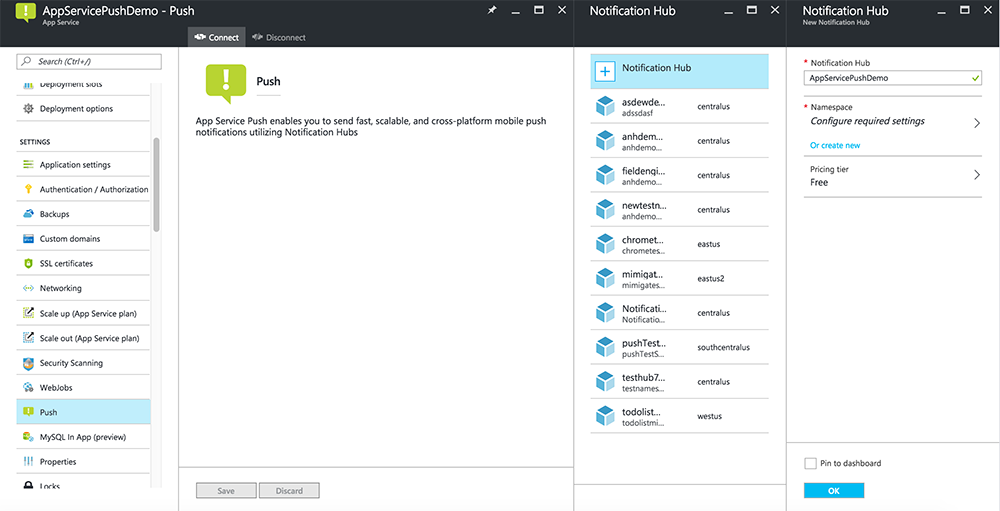
在 Azure 入口網站中,移至 [應用程式服務],然後選取您的應用程式後端。 在 設定 中,選取 推送。
若要將通知中樞資源新增至應用程式,請選取 [ 連線]。 您可以建立集線器或連接到現有的集線器。
現在您已將通知中樞連線到Mobile Apps 後端專案。 稍後您會將此通知中樞設定為連線到平臺通知系統 (PNS) 以推送至裝置。
啟用 Firebase 雲端通訊
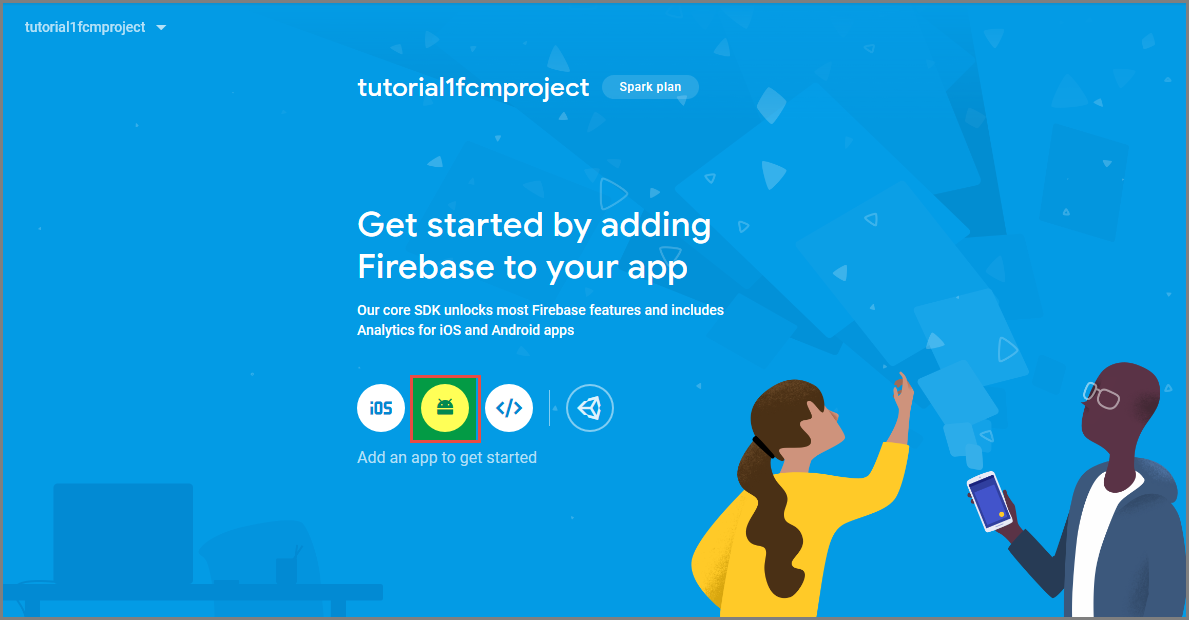
登入 Firebase 控制台。 建立新的 Firebase 專案 (如果您還沒有 Firebase 專案的話)。
建立專案之後,請選取 [將 Firebase 新增至 Android 應用程式]。
在 [將 Firebase 新增至 Android 應用程式] 頁面上,採取下列步驟:
針對 Android套件名稱,請在應用程式的build.gradle檔案中複製 applicationId 的值。 在此範例中為
com.fabrikam.fcmtutorial1app。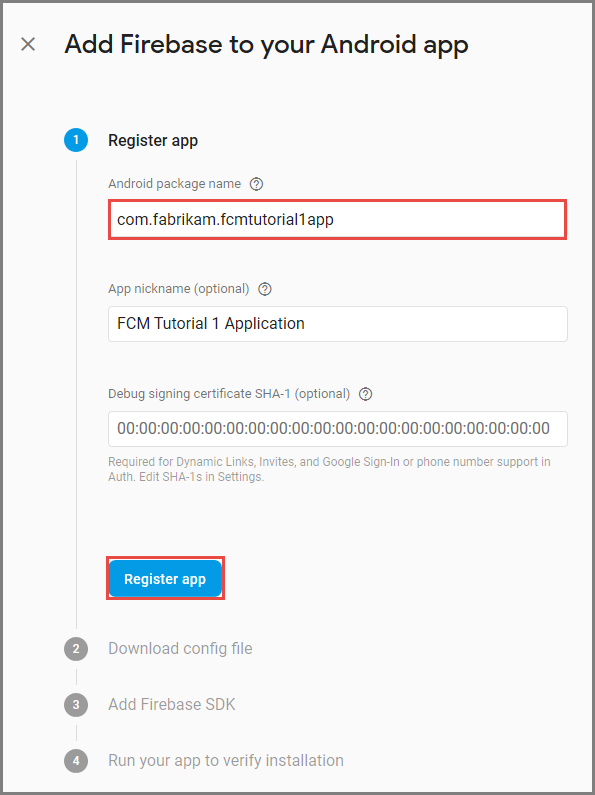
選取 [註冊應用程式]。
選取 [下載 google-services.json],將檔案儲存到您專案的 app 資料夾中,然後選取 [ 下一步]。
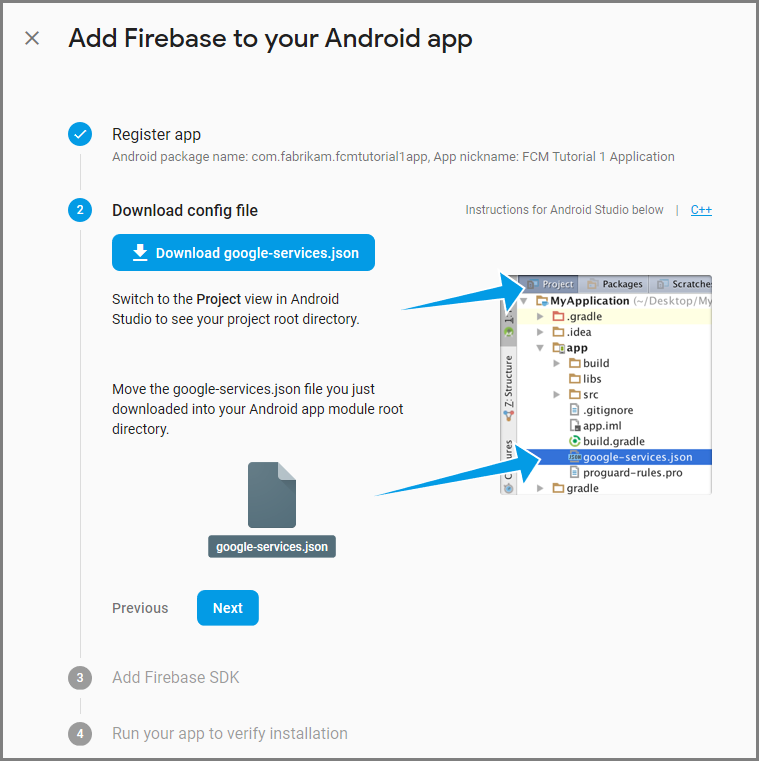
對 Android Studio 中的項目進行下列設定 變更 。
在專案層級 build.gradle 檔案 (<project>/build.gradle) 中,將下列陳述式新增至 [相依性] 區段。
classpath 'com.google.gms:google-services:4.0.1'在您的應用層級 build.gradle 檔案中(<project>/<app-module>/build.gradle),將下列語句新增至 [相依性] 區段。
implementation 'com.google.firebase:firebase-core:16.0.8'
implementation 'com.google.firebase:firebase-messaging:17.3.4'
請將以下這行新增至應用程式層級 build.gradle 檔案的結尾,於相依性區段之後。
apply plugin: 'com.google.gms.google-services'在工具列上選取 [立即同步]。

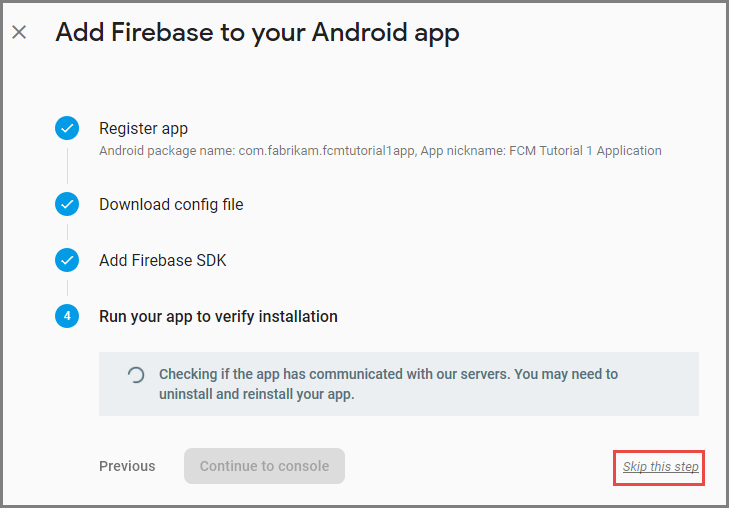
選取 [下一步]。
選取 [略過此步驟]。
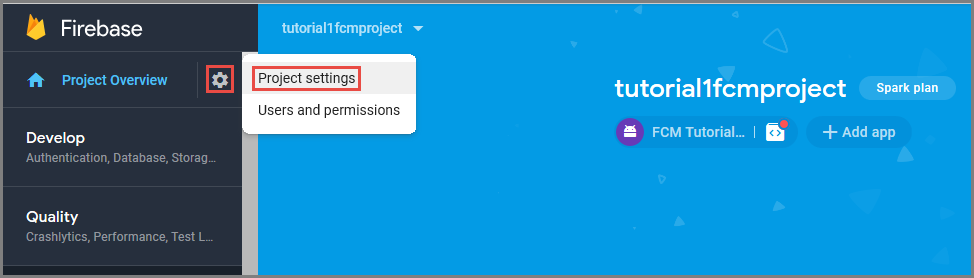
在 Firebase 主控台中,選取您專案的齒輪圖示。 然後選取 [專案設定]。
如果您尚未將 google-services.json 檔案下載到 Android Studio 專案 的應用程式 資料夾中,您可以在此頁面執行此動作。
切換到頂端的 [雲端通訊] 索引標籤。
複製並儲存 伺服器金鑰 以供稍後使用。 您可以使用此值來設定您的中樞。
設定 Azure 以傳送推播要求
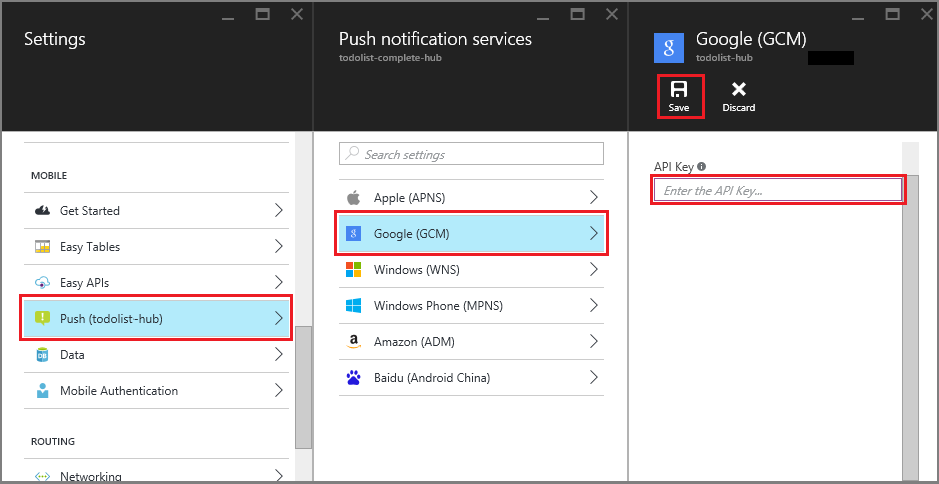
在 Azure 入口網站中,按兩下 [ 瀏覽所有>應用程式服務],然後按下您的 Mobile Apps 後端。 在 [設定] 底下,按一下 [App Service 推播],然後點選您的通知中樞名稱。
移至 Google (GCM),輸入您在上一個程式中從 Firebase 取得的伺服器 密鑰 值,然後按兩下 [ 儲存]。
Mobile Apps 後端現在已設定為使用 Firebase 雲端通訊。 這可讓您使用通知中樞,將推播通知傳送至在Android裝置上執行的應用程式。
更新伺服器專案以傳送推播通知
在本節中,您會更新現有Mobile Apps 後端專案中的程式代碼,以在每次新增專案時傳送推播通知。 此程式由 Azure 通知中樞的 範本 功能提供,可啟用跨平臺推播。 各種客戶端會使用範本註冊推播通知,而單一通用推播可以到達所有客戶端平臺。
選擇下列其中一個符合後端項目類型的程式: .NET 後端 或 Node.js 後端。
.NET 後端專案
在 Visual Studio 中,以滑鼠右鍵按兩下伺服器專案。 然後選取 [管理 NuGet 套件]。 搜尋
Microsoft.Azure.NotificationHubs,然後選取 [ 安裝]。 此程式會安裝通知中樞連結庫,以便從後端傳送通知。在伺服器專案中,開啟 [控制器>] TodoItemController.cs。 然後新增下列 using 語句:
using System.Collections.Generic;
using Microsoft.Azure.NotificationHubs;
using Microsoft.Azure.Mobile.Server.Config;
在 PostTodoItem 方法中,於呼叫 InsertAsync 之後新增下列程式代碼:
// Get the settings for the server project.
HttpConfiguration config = this.Configuration;
MobileAppSettingsDictionary settings =
    this.Configuration.GetMobileAppSettingsProvider().GetMobileAppSettings();

// Get the Notification Hubs credentials for the mobile app.
string notificationHubName = settings.NotificationHubName;
string notificationHubConnection = settings
    .Connections[MobileAppSettingsKeys.NotificationHubConnectionString].ConnectionString;

// Create a new Notification Hub client.
NotificationHubClient hub = NotificationHubClient
.CreateClientFromConnectionString(notificationHubConnection, notificationHubName);

// Send the message so that all template registrations that contain "messageParam"
// receive the notifications. This includes APNS, GCM, WNS, and MPNS template registrations.
Dictionary<string,string> templateParams = new Dictionary<string,string>();
templateParams["messageParam"] = item.Text + " was added to the list.";

try
{
    // Send the push notification and log the results.
    var result = await hub.SendTemplateNotificationAsync(templateParams);

    // Write the success result to the logs.
    config.Services.GetTraceWriter().Info(result.State.ToString());
}
catch (System.Exception ex)
{
    // Write the failure result to the logs.
    config.Services.GetTraceWriter()
        .Error(ex.Message, null, "Push.SendAsync Error");
}
此過程會在插入新項目時傳送一個包含項目文字的範本通知。
重新發佈伺服器專案。
Node.js 後端專案
設定後端專案。
以下列程式代碼取代 todoitem.js 中的現有程式代碼:
var azureMobileApps = require('azure-mobile-apps'),
promises = require('azure-mobile-apps/src/utilities/promises'),
logger = require('azure-mobile-apps/src/logger');

var table = azureMobileApps.table();

table.insert(function (context) {
// For more information about the Notification Hubs JavaScript SDK,
// see https://aka.ms/nodejshubs.
logger.info('Running TodoItem.insert');

// Define the template payload.
var payload = '{"messageParam": "' + context.item.text + '" }';

// Execute the insert. The insert returns the results as a promise.
// Do the push as a post-execute action within the promise flow.
return context.execute()
    .then(function (results) {
        // Only do the push if configured.
        if (context.push) {
            // Send a template notification.
            context.push.send(null, payload, function (error) {
                if (error) {
                    logger.error('Error while sending push notification: ', error);
                } else {
                    logger.info('Push notification sent successfully!');
                }
            });
        }
        // Don't forget to return the results from the context.execute().
        return results;
    })
    .catch(function (error) {
        logger.error('Error while running context.execute: ', error);
    });
});

module.exports = table;
此程式會在插入新項目時傳送包含item.text的範本通知。
當您在本機計算機上編輯檔案時,請重新發佈伺服器專案。
設定推播通知的客戶端專案
在 [方案] 檢視中(或 Visual Studio 中的 [方案 總管] 中,以滑鼠右鍵按兩下 [元件 ] 資料夾,按兩下 [ 取得更多元件...],搜尋 Google Cloud Messaging Client 元件,並將其新增至專案。
開啟ToDoActivity.cs項目檔,並將下列 using 語句新增至 類別:
using Gcm.Client;在 ToDoActivity 類別中,新增下列新程式代碼:
// Create a new instance field for this activity.
static ToDoActivity instance = new ToDoActivity();

// Return the current activity instance.
public static ToDoActivity CurrentActivity
{
    get
    {
        return instance;
    }
}
// Return the Mobile Services client.
public MobileServiceClient CurrentClient
{
    get
    {
        return client;
    }
}
這可讓您從推送處理程式服務進程存取行動用戶端實例。
在建立 MobileServiceClient 之後,將下列程序代碼新增至 OnCreate 方法:
// Set the current instance of TodoActivity.
instance = this;

// Make sure the GCM client is set up correctly.
GcmClient.CheckDevice(this);
GcmClient.CheckManifest(this);

// Register the app for push notifications.
GcmClient.Register(this, ToDoBroadcastReceiver.senderIDs);
您的 ToDoActivity 現在已準備好新增推播通知。
將推播通知程式代碼新增至您的應用程式
在名為
ToDoBroadcastReceiver的專案中建立新的類別。將下列 using 語句新增至 ToDoBroadcastReceiver 類別:
using Gcm.Client;
using Microsoft.WindowsAzure.MobileServices;
using Newtonsoft.Json.Linq;
在 using 語句和 命名空間 宣告之間新增下列許可權要求:
[assembly: Permission(Name = "@PACKAGE_NAME@.permission.C2D_MESSAGE")]
[assembly: UsesPermission(Name = "@PACKAGE_NAME@.permission.C2D_MESSAGE")]
[assembly: UsesPermission(Name = "com.google.android.c2dm.permission.RECEIVE")]
//GET_ACCOUNTS is only needed for android versions 4.0.3 and below
[assembly: UsesPermission(Name = "android.permission.GET_ACCOUNTS")]
[assembly: UsesPermission(Name = "android.permission.INTERNET")]
[assembly: UsesPermission(Name = "android.permission.WAKE_LOCK")]
請將現有的 ToDoBroadcastReceiver 類別定義替換為以下內容:
[BroadcastReceiver(Permission = Gcm.Client.Constants.PERMISSION_GCM_INTENTS)]
[IntentFilter(new string[] { Gcm.Client.Constants.INTENT_FROM_GCM_MESSAGE },
    Categories = new string[] { "@PACKAGE_NAME@" })]
[IntentFilter(new string[] { Gcm.Client.Constants.INTENT_FROM_GCM_REGISTRATION_CALLBACK },
    Categories = new string[] { "@PACKAGE_NAME@" })]
[IntentFilter(new string[] { Gcm.Client.Constants.INTENT_FROM_GCM_LIBRARY_RETRY },
Categories = new string[] { "@PACKAGE_NAME@" })]
public class ToDoBroadcastReceiver : GcmBroadcastReceiverBase<PushHandlerService>
{
    // Set the Google app ID.
    public static string[] senderIDs = new string[] { "<PROJECT_NUMBER>" };
}
在上述程式碼中,您必須將
<PROJECT_NUMBER>替換為 Google 在開發者平台為您的應用程式佈建時指派的專案編號。在ToDoBroadcastReceiver.cs項目檔中,新增下列程式代碼來定義 PushHandlerService 類別:
// The ServiceAttribute must be applied to the class.
[Service]
public class PushHandlerService : GcmServiceBase
{
    public static string RegistrationID { get; private set; }
    public PushHandlerService() : base(ToDoBroadcastReceiver.senderIDs) { }
}
請注意,這個類別衍生自 GcmServiceBase ,而且 Service 屬性必須套用至這個類別。
備註
GcmServiceBase 類別會實作 OnRegistered()、OnUnRegistered()、OnMessage() 和 OnError() 方法。 您必須覆寫 PushHandlerService 類別中的這些方法。
將下列程式代碼新增至覆寫 OnRegistered 事件處理程式的 PushHandlerService 類別。
protected override void OnRegistered(Context context, string registrationId)
{
    System.Diagnostics.Debug.WriteLine("The device has been registered with GCM.", "Success!");

    // Get the MobileServiceClient from the current activity instance.
    MobileServiceClient client = ToDoActivity.CurrentActivity.CurrentClient;
    var push = client.GetPush();

    // Define a message body for GCM.
    const string templateBodyGCM = "{\"data\":{\"message\":\"$(messageParam)\"}}";

    // Define the template registration as JSON.
    JObject templates = new JObject();
    templates["genericMessage"] = new JObject
    {
        {"body", templateBodyGCM }
    };

    try
    {
        // Make sure we run the registration on the same thread as the activity,
        // to avoid threading errors.
        ToDoActivity.CurrentActivity.RunOnUiThread(

            // Register the template with Notification Hubs.
            async () => await push.RegisterAsync(registrationId, templates));

        System.Diagnostics.Debug.WriteLine(
            string.Format("Push Installation Id", push.InstallationId.ToString()));
    }
    catch (Exception ex)
    {
        System.Diagnostics.Debug.WriteLine(
            string.Format("Error with Azure push registration: {0}", ex.Message));
    }
}
此方法會使用傳回的 GCM 註冊標識元向 Azure 註冊,以取得推播通知。 標記只能在建立之後新增至註冊。 如需詳細資訊,請參閱 如何:將標籤新增至裝置安裝,以啟用推送到標籤的功能。
使用下列程序代碼覆寫 PushHandlerService 中的 OnMessage 方法:
protected override void OnMessage(Context context, Intent intent)
{
    string message = string.Empty;

    // Extract the push notification message from the intent.
    if (intent.Extras.ContainsKey("message"))
    {
        message = intent.Extras.Get("message").ToString();
        var title = "New item added:";

        // Create a notification manager to send the notification.
        var notificationManager =
            GetSystemService(Context.NotificationService) as NotificationManager;

        // Create a new intent to show the notification in the UI.
        PendingIntent contentIntent =
            PendingIntent.GetActivity(context, 0,
            new Intent(this, typeof(ToDoActivity)), 0);

        // Create the notification using the builder.
        var builder = new Notification.Builder(context);
        builder.SetAutoCancel(true);
        builder.SetContentTitle(title);
        builder.SetContentText(message);
        builder.SetSmallIcon(Resource.Drawable.ic_launcher);
        builder.SetContentIntent(contentIntent);
        var notification = builder.Build();

        // Display the notification in the Notifications Area.
        notificationManager.Notify(1, notification);

    }
}
使用下列程式代碼覆寫 OnUnRegistered() 和 OnError() 方法。
protected override void OnUnRegistered(Context context, string registrationId)
{
    throw new NotImplementedException();
}

protected override void OnError(Context context, string errorId)
{
    System.Diagnostics.Debug.WriteLine(
        string.Format("Error occurred in the notification: {0}.", errorId));
}
在應用程式中測試推播通知
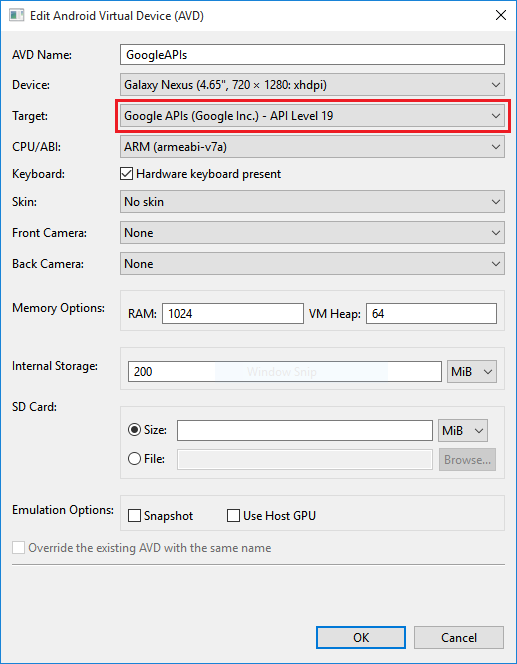
您可以在模擬器中使用虛擬設備來測試應用程式。 在模擬器上執行時,需要額外的設定步驟。
虛擬設備必須將Google API設定為 Android 虛擬裝置 (AVD) 管理員中的目標。
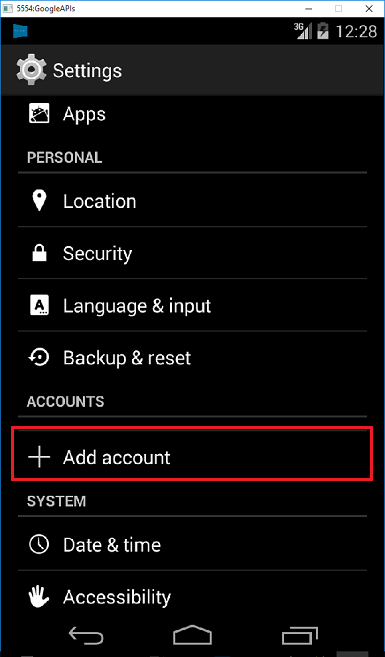
按兩下 [應用程式>設定>][新增帳戶],將Google帳戶新增至Android裝置,然後遵循提示。
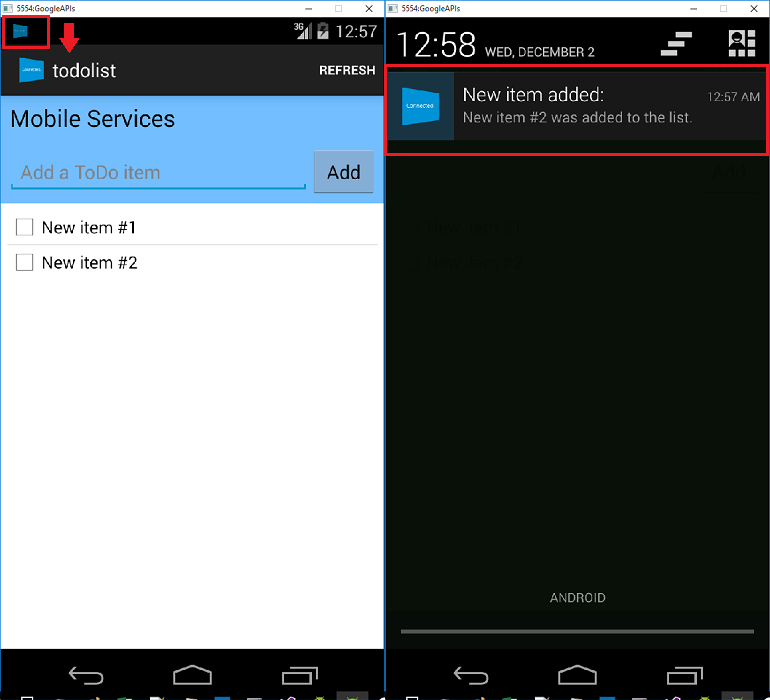
像之前一樣執行 todolist 應用程式,並插入新的 Todo 專案。 這次,通知圖示會顯示在通知區域中。 您可以開啟通知選單,以檢視通知的全文。