概觀
在本教學課程中,您會將推播通知新增至 Xamarin.iOS 快速入門 專案,以便在每次插入記錄時將推播通知傳送至裝置。
如果您未使用下載的快速入門伺服器專案,您將需要推播通知擴充功能套件。 如需詳細資訊,請參閱 使用適用於 Azure Mobile Apps 的 .NET 後端伺服器 SDK。
先決條件
- 完成 Xamarin.iOS 快速入門 教學課程。
- 實體 iOS 裝置。 iOS 模擬器不支援推播通知。
在 Apple 開發人員入口網站上註冊應用程式以取得推播通知
- 為您的應用程式註冊應用程式識別碼,。 建立明確的應用程式識別碼(不是通配符應用程式識別符),針對 套件組合標識元,請使用 Xcode 快速入門專案中的確切套件組合識別碼。 您選取 [推播通知] 選項也很重要。
- 接下來,為了準備 設定推播通知,請建立「開發」或「發行」SSL 憑證。
設定行動應用程式以傳送推播通知
- 在您的 Mac 上,啟動 Keychain Access。 在左側導覽列的 [類別目錄]下,開啟 [我的憑證] 。 尋找您在上一節下載的 SSL 憑證,然後揭露其內容。 只選取憑證(請勿選取私鑰)。 然後 匯出它。
- 在 Azure 入口網站的 中,選取 瀏覽所有>App Services。 然後選取您的行動應用程式的後端。
- 在 [設定]下,選取 [App Service 推送]。 然後選取您的通知中樞名稱。
- 移至 Apple Push Notification Services>上傳憑證。 上傳 .p12 檔案,選取正確的 模式(視您先前的用戶端 SSL 憑證為生產環境或沙箱而定)。 儲存任何變更。
您的服務現在已設定為使用 iOS 上的推播通知。
更新伺服器專案以傳送推播通知
在本節中,您會更新現有Mobile Apps 後端專案中的程式代碼,以在每次新增專案時傳送推播通知。 此過程得益於 Azure 通知中樞的 範本 功能,可啟用跨平臺推送。 各種客戶端會使用範本註冊推播通知,而單一通用推播可以到達所有客戶端平臺。
選擇下列符合您後端項目類型的程序——.NET 後端 或 Node.js 後端。
.NET 後端專案
在 Visual Studio 中,以滑鼠右鍵按兩下伺服器專案。 然後選取 [管理 NuGet 套件]。 搜尋
Microsoft.Azure.NotificationHubs,然後選取 安裝。 此程式會安裝通知中樞連結庫,以便從後端傳送通知。在伺服器專案中,開啟 Controllers>TodoItemController.cs。 然後新增下列 using 語句:
using System.Collections.Generic;
using Microsoft.Azure.NotificationHubs;
using Microsoft.Azure.Mobile.Server.Config;
在 PostTodoItem 方法中,於呼叫 InsertAsync之後新增下列程式碼:
// Get the settings for the server project.
HttpConfiguration config = this.Configuration;
MobileAppSettingsDictionary settings =
    this.Configuration.GetMobileAppSettingsProvider().GetMobileAppSettings();

// Get the Notification Hubs credentials for the mobile app.
string notificationHubName = settings.NotificationHubName;
string notificationHubConnection = settings
    .Connections[MobileAppSettingsKeys.NotificationHubConnectionString].ConnectionString;

// Create a new Notification Hub client.
NotificationHubClient hub = NotificationHubClient
.CreateClientFromConnectionString(notificationHubConnection, notificationHubName);

// Send the message so that all template registrations that contain "messageParam"
// receive the notifications. This includes APNS, GCM, WNS, and MPNS template registrations.
Dictionary<string,string> templateParams = new Dictionary<string,string>();
templateParams["messageParam"] = item.Text + " was added to the list.";

try
{
    // Send the push notification and log the results.
    var result = await hub.SendTemplateNotificationAsync(templateParams);

    // Write the success result to the logs.
    config.Services.GetTraceWriter().Info(result.State.ToString());
}
catch (System.Exception ex)
{
    // Write the failure result to the logs.
    config.Services.GetTraceWriter()
        .Error(ex.Message, null, "Push.SendAsync Error");
}
此過程會在插入新項目時傳送一個包含項目文字的範本通知。
重新發佈伺服器專案。
Node.js 後端專案
設定後端專案。
以下列程式代碼取代 todoitem.js 中的現有程式代碼:
var azureMobileApps = require('azure-mobile-apps'),
promises = require('azure-mobile-apps/src/utilities/promises'),
logger = require('azure-mobile-apps/src/logger');

var table = azureMobileApps.table();

table.insert(function (context) {
// For more information about the Notification Hubs JavaScript SDK,
// see https://aka.ms/nodejshubs.
logger.info('Running TodoItem.insert');

// Define the template payload.
var payload = '{"messageParam": "' + context.item.text + '" }';

// Execute the insert. The insert returns the results as a promise.
// Do the push as a post-execute action within the promise flow.
return context.execute()
    .then(function (results) {
        // Only do the push if configured.
        if (context.push) {
            // Send a template notification.
            context.push.send(null, payload, function (error) {
                if (error) {
                    logger.error('Error while sending push notification: ', error);
                } else {
                    logger.info('Push notification sent successfully!');
                }
            });
        }
        // Don't forget to return the results from the context.execute().
        return results;
    })
    .catch(function (error) {
        logger.error('Error while running context.execute: ', error);
    });
});

module.exports = table;
此程式會在插入新項目時傳送包含item.text的範本通知。
當您在本機計算機上編輯檔案時,請重新發佈伺服器專案。
設定 Xamarin.iOS 專案
在 Xamarin Studio 中設定 iOS 專案
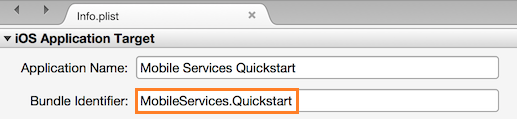
在 Xamarin.Studio 中,開啟 Info.plist,並使用您稍早使用新應用程式識別碼建立的套件組合 識別符來更新 套件組合標識符。
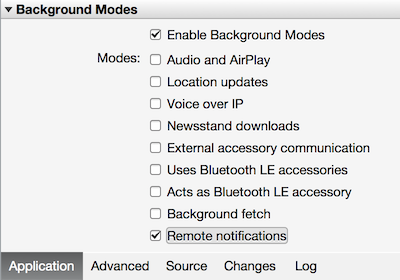
向下捲動至 背景模式。 選取 啟用背景模式 方塊和 遠端通知 方塊。
在 [方案面板] 中按兩下您的專案,以開啟 [項目選項]。
在 [建置] 下,選擇 [iOS 套件組合簽署],然後選取您剛才為此專案設定的對應身分識別和布建配置檔。
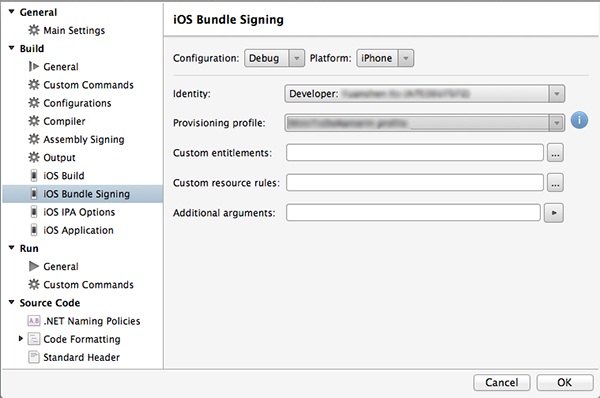
這可確保專案使用新的配置檔進行程式碼簽署。 如需官方的 Xamarin 裝置佈建檔,請參閱 Xamarin 裝置佈建。
在 Visual Studio 中設定 iOS 專案
在 Visual Studio 中,以滑鼠右鍵點擊專案,然後點擊[屬性]。
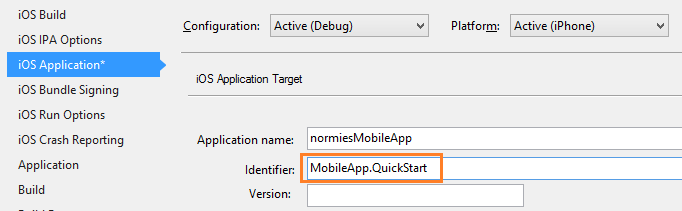
在屬性頁面中,按一下 [iOS 應用程式] 索引標籤,並使用您稍早建立的識別碼更新 識別碼。
在 [iOS 套件組合簽署] 索引標籤中,選取您剛才為此專案設定的對應身分識別和布建配置檔。
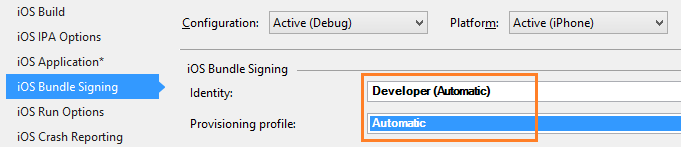
這可確保專案使用新的配置檔進行程式碼簽署。 如需官方的 Xamarin 裝置佈建檔,請參閱 Xamarin 裝置佈建。
按兩下 Info.plist 以開啟它,然後在 [背景模式] 底 下啟用 RemoteNotifications。
將推播通知新增至您的應用程式
在 QSTodoService 中,新增下列屬性,讓 AppDelegate 可以取得行動用戶端:
public MobileServiceClient GetClient {
    get
    {
        return client;
    }
    private set
    {
        client = value;
    }
}
將下列
using語句新增至 AppDelegate.cs 檔案頂端。using Microsoft.WindowsAzure.MobileServices; using Newtonsoft.Json.Linq;在 AppDelegate 中,覆寫 FinishedLaunching 事件:
 public override bool FinishedLaunching(UIApplication application, NSDictionary launchOptions)
 {
     // registers for push for iOS8
     var settings = UIUserNotificationSettings.GetSettingsForTypes(
         UIUserNotificationType.Alert
         | UIUserNotificationType.Badge
         | UIUserNotificationType.Sound,
         new NSSet());

     UIApplication.SharedApplication.RegisterUserNotificationSettings(settings);
     UIApplication.SharedApplication.RegisterForRemoteNotifications();

     return true;
 }
在相同的檔案中,覆寫
RegisteredForRemoteNotifications事件。 在此程式代碼中,您註冊的簡單範本通知將由伺服器傳送到所有支持的平臺。如需有關具有通知中樞之範本的詳細資訊,請參閱 範本。
public override void RegisteredForRemoteNotifications(UIApplication application, NSData deviceToken)
{
    MobileServiceClient client = QSTodoService.DefaultService.GetClient;

    const string templateBodyAPNS = "{\"aps\":{\"alert\":\"$(messageParam)\"}}";

    JObject templates = new JObject();
    templates["genericMessage"] = new JObject
    {
        {"body", templateBodyAPNS}
    };

    // Register for push with your mobile app
    var push = client.GetPush();
    push.RegisterAsync(deviceToken, templates);
}
然後,覆寫 didReceiveRemoteNotification 事件:
 public override void DidReceiveRemoteNotification (UIApplication application, NSDictionary userInfo, Action<UIBackgroundFetchResult> completionHandler)
 {
     NSDictionary aps = userInfo.ObjectForKey(new NSString("aps")) as NSDictionary;

     string alert = string.Empty;
     if (aps.ContainsKey(new NSString("alert")))
         alert = (aps [new NSString("alert")] as NSString).ToString();

     //show alert
     if (!string.IsNullOrEmpty(alert))
     {
         UIAlertView avAlert = new UIAlertView("Notification", alert, null, "OK", null);
         avAlert.Show();
     }
 }
您的應用程式現在已更新以支援推播通知。
在應用程式中測試推播通知
按 [ 執行] 按鈕以建置專案,並在支援 iOS 的裝置中啟動應用程式,然後按兩下 [ 確定 ] 以接受推播通知。
備註
您必須明確地接受來自您應用程式的推播通知。 此要求只會在應用程式第一次執行時發生。
在應用程式中,輸入工作,然後按下加號 (+) 圖示。
確認已收到通知,然後按兩下 [確定] [確定] 關閉通知。
重複步驟 2 並立即關閉應用程式,然後確認已顯示通知。
您已成功完成本教學課程。