新增推播通知至您的 Apache Cordova 應用程式
概觀
在本教學課程中,您會將推播通知新增至 Apache Cordova 快速入門專案,以便在每次插入一筆記錄時,將推播通知傳送至裝置。
如果您未使用下載的快速入門伺服器專案,則需要推播通知擴充套件。 如需詳細資訊,請參閱使用適用於 Mobile Apps 的 .NET 後端伺服器 SDK。
必要條件
本教學課程假設您擁有以 Visual Studio 2015 開發的 Apache Cordova 應用程式。 此裝置應在 Google Android Emulator、Android 裝置、Windows 裝置或 iOS 裝置上執行。
若要完成本教學課程,您需要:
- 具有 Visual Studio Community 2015 或更新版本的電腦
- Apache Cordova的 Visual Studio Tools
- 作用 中的 Azure 帳戶
- 已完成的 Apache Cordova 快速入門專案
- (Android) 具有已驗證電子郵件地址的Google 帳戶
- (iOS) Apple Developer Program 成員資格和 iOS 裝置 (iOS 模擬器不支援推播通知)
- (Windows) Microsoft 市集開發人員帳戶和 Windows 10 裝置
設定通知中樞
Azure App Service 的 Mobile Apps 使用 Azure 通知中樞來傳送推送,因此您將為行動應用程式設定通知中樞。
在 Azure 入口網站中,移至 [應用程式服務],然後選取應用程式後端。 在 [設定] 底下,選取 [推播]。
將通知中樞資源新增至應用程式,選取 [連線]。 您可以建立中樞或連線到現有的中樞。
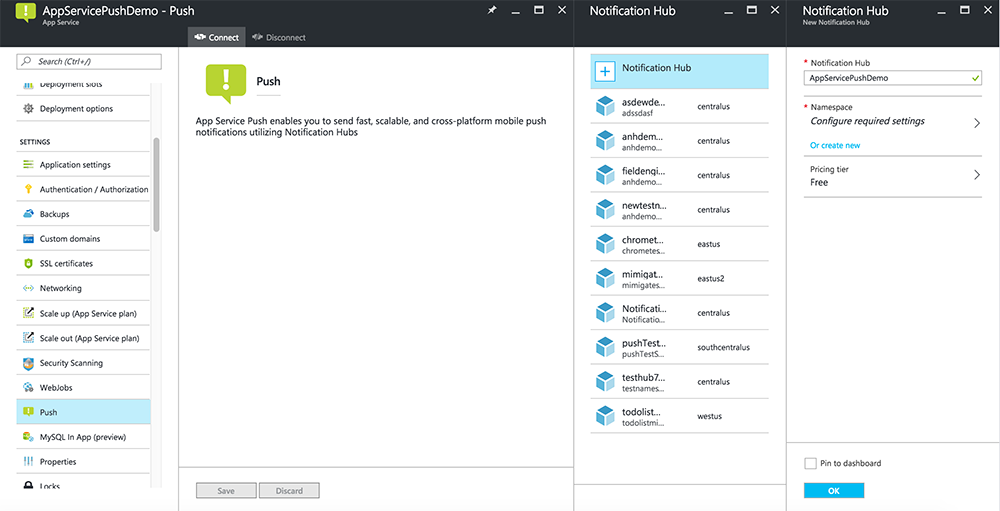
現在您已將通知中樞連接到 Mobile Apps 後端專案。 稍後您要設定此通知中樞,使其連線到平台通知系統 (PNS) 以推播至裝置。
更新伺服器專案
在本節中,您會更新現有 Mobile Apps 後端專案中的程式碼,以在每次新增項目時傳送推播通知。 此程序是由 Azure 通知中樞的範本功能所提供,可啟用跨平台推播。 各種用戶端會使用範本來註冊推播通知,而單一通用推播即可送達所有的用戶端平台。
選擇符合後端專案類型的下列其中一個程式: .NET 後端 或 Node.js後端。
.NET 後端專案
在 Visual Studio 中,以滑鼠右鍵按一下伺服器專案。 然後選取 [管理 NuGet 套件] 。 搜尋
Microsoft.Azure.NotificationHubs,然後選取 [安裝]Microsoft.Azure.NotificationHubs。 此程序會安裝通知中樞程式庫,以便從後端傳送通知。在伺服器專案中,開啟Controllers>TodoItemController.cs。 然後新增下列 using 陳述式:
using System.Collections.Generic;
using Microsoft.Azure.NotificationHubs;
using Microsoft.Azure.Mobile.Server.Config;
在 PostTodoItem 方法中,於呼叫 InsertAsync 之後新增下列程式碼:
// Get the settings for the server project.
HttpConfiguration config = this.Configuration;
MobileAppSettingsDictionary settings =
    this.Configuration.GetMobileAppSettingsProvider().GetMobileAppSettings();

// Get the Notification Hubs credentials for the mobile app.
string notificationHubName = settings.NotificationHubName;
string notificationHubConnection = settings
    .Connections[MobileAppSettingsKeys.NotificationHubConnectionString].ConnectionString;

// Create a new Notification Hub client.
NotificationHubClient hub = NotificationHubClient
.CreateClientFromConnectionString(notificationHubConnection, notificationHubName);

// Send the message so that all template registrations that contain "messageParam"
// receive the notifications. This includes APNS, GCM, WNS, and MPNS template registrations.
Dictionary<string,string> templateParams = new Dictionary<string,string>();
templateParams["messageParam"] = item.Text + " was added to the list.";

try
{
    // Send the push notification and log the results.
    var result = await hub.SendTemplateNotificationAsync(templateParams);

    // Write the success result to the logs.
    config.Services.GetTraceWriter().Info(result.State.ToString());
}
catch (System.Exception ex)
{
    // Write the failure result to the logs.
    config.Services.GetTraceWriter()
        .Error(ex.Message, null, "Push.SendAsync Error");
}
插入新的項目時,此程序會傳送包含 item.Text 的範本通知。
發佈伺服器專案。
Node.js後端專案
設定後端專案。
在 todoitem.js 中,以下列程式碼取代現有的程式碼:
var azureMobileApps = require('azure-mobile-apps'),
promises = require('azure-mobile-apps/src/utilities/promises'),
logger = require('azure-mobile-apps/src/logger');

var table = azureMobileApps.table();

table.insert(function (context) {
// For more information about the Notification Hubs JavaScript SDK,
// see https://aka.ms/nodejshubs.
logger.info('Running TodoItem.insert');

// Define the template payload.
var payload = '{"messageParam": "' + context.item.text + '" }';

// Execute the insert. The insert returns the results as a promise.
// Do the push as a post-execute action within the promise flow.
return context.execute()
    .then(function (results) {
        // Only do the push if configured.
        if (context.push) {
            // Send a template notification.
            context.push.send(null, payload, function (error) {
                if (error) {
                    logger.error('Error while sending push notification: ', error);
                } else {
                    logger.info('Push notification sent successfully!');
                }
            });
        }
        // Don't forget to return the results from the context.execute().
        return results;
    })
    .catch(function (error) {
        logger.error('Error while running context.execute: ', error);
    });
});

module.exports = table;
插入新的項目時,此程序會傳送包含 item.Text 的範本通知。
當您在本機電腦上編輯檔案時,請重新發佈伺服器專案。
修改您的 Cordova 應用程式
若要確保您的 Apache Cordova 應用程式專案能夠處理推播通知,請安裝 Cordova 推播外掛程式,還有平台特定的所有推播服務。
更新您的專案中的 Cordova 版本。
如果您的專案使用 6.1.1 版以前的 Apache Cordova,請更新用戶端專案。 若要更新專案,請採取下列步驟:
- 以滑鼠右鍵按一下
config.xml開啟設定設計工具。 - 選取 [ 平臺] 索引卷 標。
- 在 [Cordova CLI] 文字方塊中選取 [6.1.1]。
- 若要更新專案,選取 [建置],然後選取 [建置解決方案]。
安裝推播外掛程式
Apache Cordova 應用程式原本就不會處理裝置或網路功能。 這些功能是由 npm 或 GitHub 上發佈的外掛程式所提供。 phonegap-plugin-push 外掛程式會處理網路推播通知。
您可透過下列其中一種方式安裝推播外掛程式:
從命令提示:
執行以下命令:
cordova plugin add phonegap-plugin-push
從 Visual Studio 內:
在方案總管中開啟
config.xml檔案。 接下來,選取[> 外掛程式自訂]。 然後選取 [Git] 作為安裝來源。輸入
https://github.com/phonegap/phonegap-plugin-push作為來源。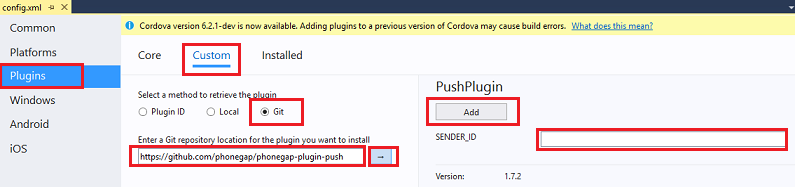
選取安裝來源旁邊的箭頭。
在 SENDER_ID 中,如果您已經有 Google 開發人員主控台專案的數值專案識別碼,您可以在此將它新增。 否則,請輸入預留位置值,例如 777777。 如果您是以 Android 為目標,您可以稍後在 config.xml 檔案中更新此值。
注意
自 2.0.0 版開始,google-services.json 必須安裝在專案的根資料夾中,以設定寄件者識別碼。 如需詳細資訊,請參閱安裝文件。
選取 [新增]。
推撥外掛程式現已安裝。
安裝裝置外掛程式
遵循您安裝推播外掛程式時的相同程序。 從核心外掛程式清單中新增裝置外掛程式。 (若要尋找它,請選取[外掛程式>Core.) 您需要此外掛程式才能取得平臺名稱。
在應用程式啟動時註冊您的裝置
最初,我們包含一些適用於 Android 的最少程式碼。 之後您可以將應用程式修改為在 iOS 或 Windows 10 上執行。
在登入程序的回呼期間將呼叫新增至 registerForPushNotifications。 或者,您可以在 onDeviceReady 方法底部新增它:
// Log in to the service.
client.login('google')
    .then(function () {
        // Create a table reference.
        todoItemTable = client.getTable('todoitem');

        // Refresh the todoItems.
        refreshDisplay();

        // Wire up the UI Event Handler for the Add Item.
        $('#add-item').submit(addItemHandler);
        $('#refresh').on('click', refreshDisplay);

            // Added to register for push notifications.
        registerForPushNotifications();

    }, handleError);
這個範例示範在成功驗證之後呼叫 registerForPushNotifications。 您可以依需要經常呼叫
registerForPushNotifications()。加入新的 registerForPushNotifications 方法,如下所示︰
// Register for push notifications. Requires that phonegap-plugin-push be installed.
var pushRegistration = null;
function registerForPushNotifications() {
    pushRegistration = PushNotification.init({
        android: { senderID: 'Your_Project_ID' },
        ios: { alert: 'true', badge: 'true', sound: 'true' },
        wns: {}
    });

// Handle the registration event.
pushRegistration.on('registration', function (data) {
    // Get the native platform of the device.
    var platform = device.platform;
    // Get the handle returned during registration.
    var handle = data.registrationId;
    // Set the device-specific message template.
    if (platform == 'android' || platform == 'Android') {
        // Register for GCM notifications.
        client.push.register('gcm', handle, {
            mytemplate: { body: { data: { message: "{$(messageParam)}" } } }
        });
    } else if (device.platform === 'iOS') {
        // Register for notifications.
        client.push.register('apns', handle, {
            mytemplate: { body: { aps: { alert: "{$(messageParam)}" } } }
        });
    } else if (device.platform === 'windows') {
        // Register for WNS notifications.
        client.push.register('wns', handle, {
            myTemplate: {
                body: '<toast><visual><binding template="ToastText01"><text id="1">$(messageParam)</text></binding></visual></toast>',
                headers: { 'X-WNS-Type': 'wns/toast' } }
        });
    }
});

pushRegistration.on('notification', function (data, d2) {
    alert('Push Received: ' + data.message);
});

pushRegistration.on('error', handleError);
}
(Android) 在上述程式碼中,從 Google Developer Console 使用應用程式的數字專案識別碼取代
Your_Project_ID。
(選擇性) 在 Android 上設定和執行應用程式
完成本節可以為 Android 啟用推播通知。
啟用 Firebase 雲端傳訊
因為一開始是以 Google Android 平台為目標,所以您必須啟用 Firebase 雲端通訊。
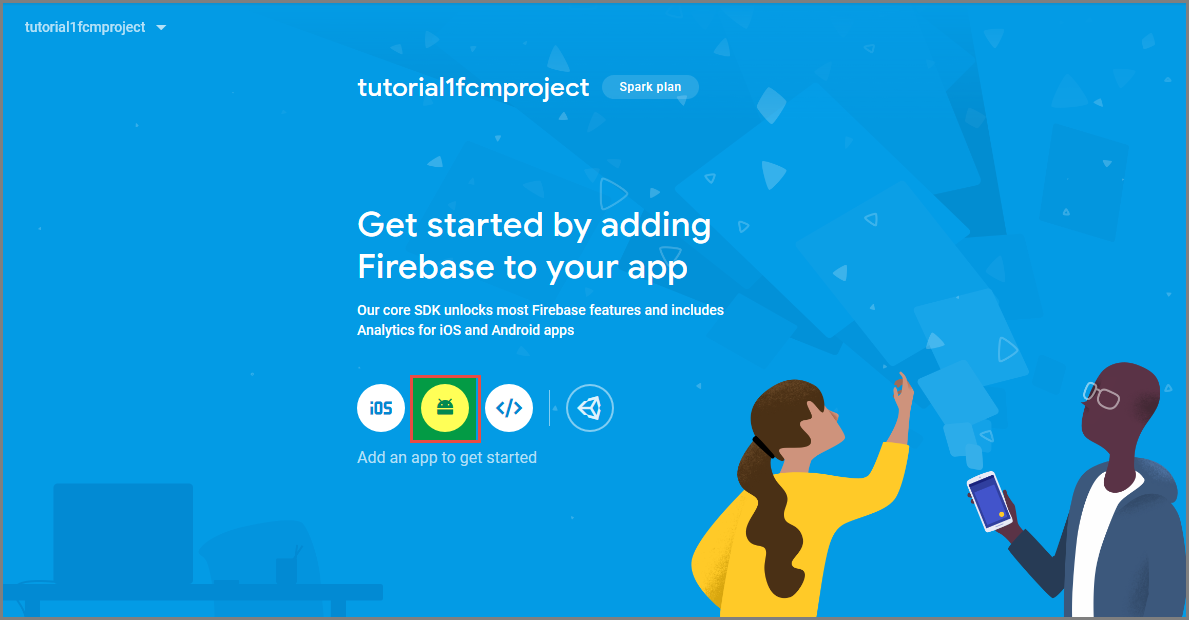
登入 Firebase 主控台。 建立新的 Firebase 專案 (如果您還沒有 Firebase 專案的話)。
建立專案之後,請選取 [將 Firebase 新增至 Android 應用程式]。
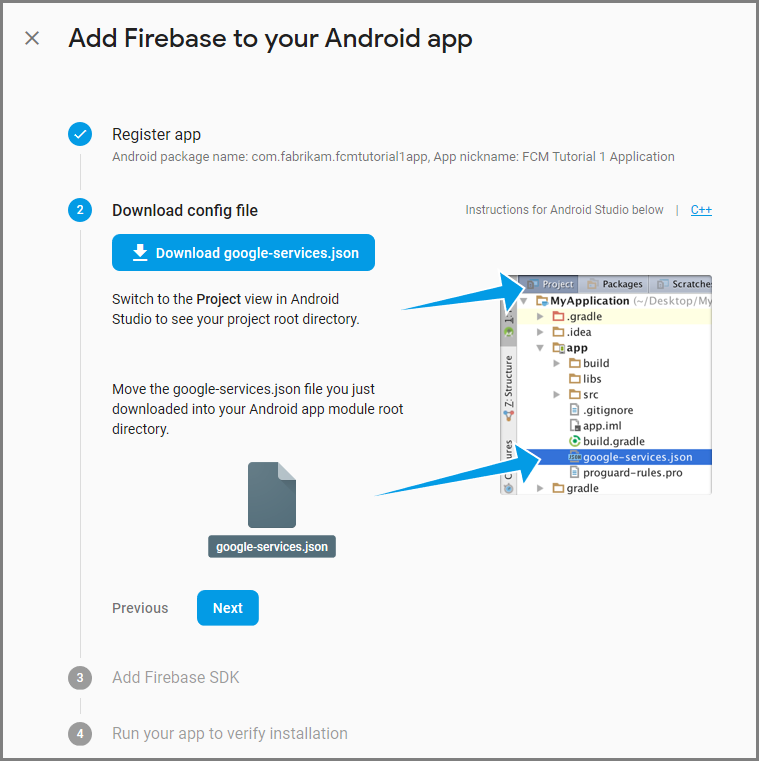
在 [將 Firebase 新增至您的Android應用程式頁面上,採取下列步驟:
對於 [Android 套件名稱],複製應用程式 build.gradle 檔案的 applicationId 值。 在此範例中為
com.fabrikam.fcmtutorial1app。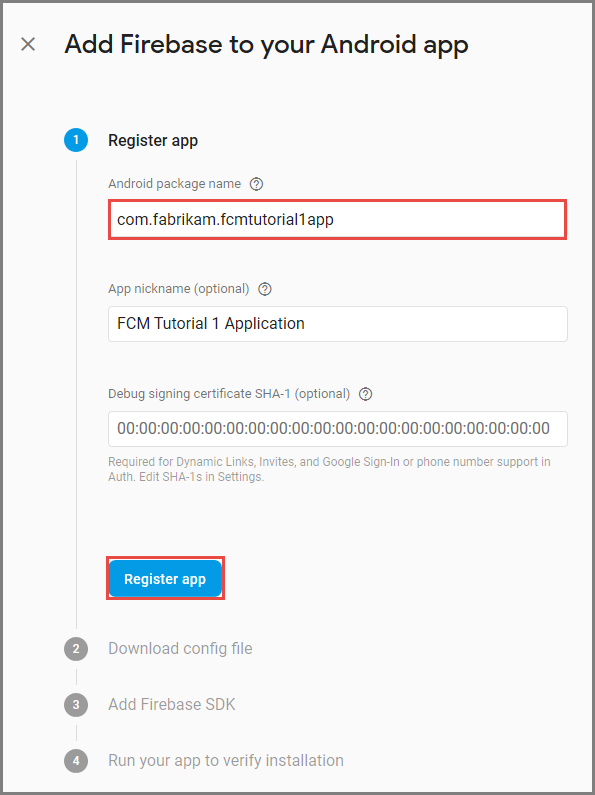
選取 [註冊應用程式]。
選取 [下載 google-services.json],將檔案儲存到專案的應用程式資料夾,然後選取 [下一步]。
在 Android Studio 中對於專案進行下列設定變更。
在專案層級 build.gradle檔案 (<專案>/build.gradle) 中,將下列陳述式加入到相依性區段。
classpath 'com.google.gms:google-services:4.0.1'在您的應用層級 build.gradle 檔案中, (< project > / < app-module > /build.gradle) ,將下列語句新增至相 依性 區段。
implementation 'com.google.firebase:firebase-core:16.0.8'
implementation 'com.google.firebase:firebase-messaging:17.3.4'
將下行新增至應用程式層級 build.gradle 檔案結尾的相依性區段之後。
apply plugin: 'com.google.gms.google-services'選取工具列上的 [立即同步 ]。

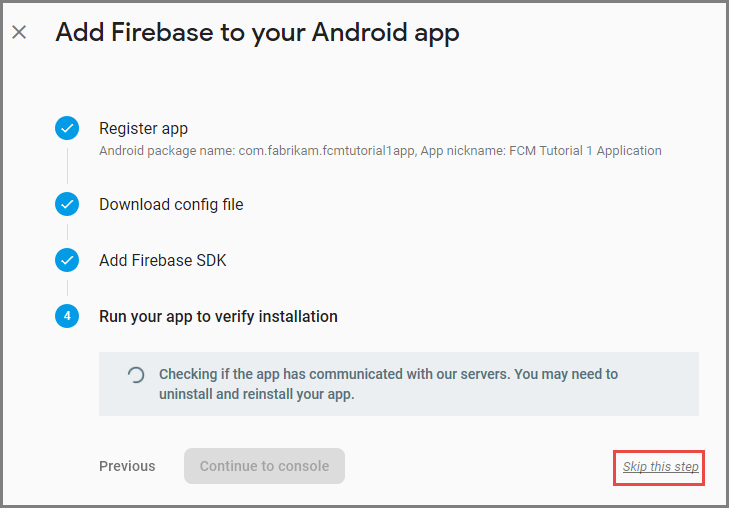
選取 [下一步] 。
選取 [略過此步驟]。
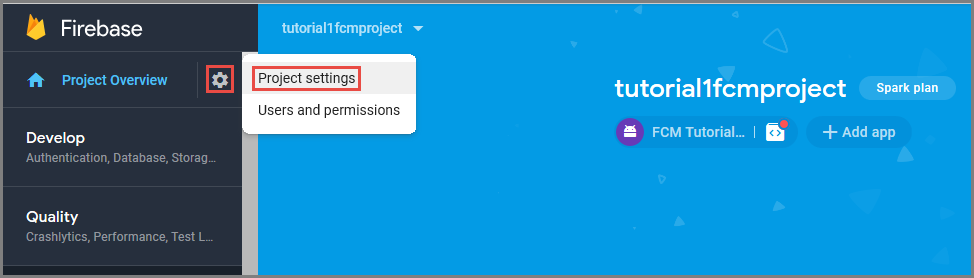
在 Firebase 主控台中,選取您專案的齒輪圖示。 然後選取 [專案設定]。
如果您尚未將 google-services.json 檔案下載到Android Studio專案的app資料夾中,您可以在此頁面執行此動作。
切換到頂端的 [雲端通訊] 索引標籤。
複製並儲存伺服器金鑰以供稍後使用。 您可以使用此值來設定中樞。
設定行動應用程式後端以使用 FCM 傳送推送要求
- 在 Azure 入口網站中,選取 [瀏覽全部]>[應用程式服務]。 然後選取您的 Mobile Apps 後端。
- 在 [設定] 底下,選取 [推播]。 然後選取 [設定推播通知服務]。
- 前往 Google (GCM)。 輸入透過 Firebase 主控台取得的 FCM 舊版伺服器金鑰,然後選取 [儲存]。
您的服務現在已設定為與 Firebase 雲端通訊搭配使用。
針對 Android 設定您的 Cordova 應用程式
在 Cordova 應用程式中,開啟 config.xml。 然後從 Google Developer Console 使用應用程式的數字專案識別碼取代 Your_Project_ID。
<plugin name="phonegap-plugin-push" version="1.7.1" src="https://github.com/phonegap/phonegap-plugin-push.git">
    <variable name="SENDER_ID" value="Your_Project_ID" />
</plugin>
開啟 index.js。 然後更新程式碼以使用您的數值專案識別碼。
pushRegistration = PushNotification.init({
    android: { senderID: 'Your_Project_ID' },
    ios: { alert: 'true', badge: 'true', sound: 'true' },
    wns: {}
});
設定 Android 裝置進行 USB 偵錯
在您可以將應用程式部署到您的 Android 裝置之前,您需要啟用 USB 偵錯。 在您的 Android 手機上執行下列步驟:
- 移至[設定>關於電話]。 然後點選 [組建編號],直到啟用開發人員模式為止 (大約七次)。
- 回到設定>開發人員選項,啟用USB 偵錯。 然後使用 USB 纜線將您的 Android 手機連接到開發電腦。
我們測試時使用的是執行 Android 6.0 (Marshmallow) 的 Google Nexus 5 X 裝置。 不過,這些技術在任何現代化 Android 版本中都是相同的。
安裝 Google Play 服務
推播外掛程式仰賴 Android Google Play 服務來進行推播通知。
在 [Visual Studio] 中,選取 [工具>Android>Android SDK 管理員]。 然後展開 [Extras] 資料夾。 請檢查適當的方塊,確定已安裝所有下列的 SDK:
- Android 2.3 或更新版本
- Google Repository 版本 27 或更高版本
- Google Play 服務 9.0.2 或更高版本
選取 [安裝套件]。 然後等待安裝完成。
phonegap-plugin-push 安裝文件中列出目前必要的程式庫。
在 Android 上的應用程式中測試推播通知
您現在可以執行應用程式,在 TodoItem 資料表中插入項目,以測試推播通知。 只要是使用相同的後端,您可以從相同的裝置或第二部裝置來測試。 以下列方法之一在 Android 平台上測試 Cordova 應用程式︰
在實體裝置上︰使用 USB 纜線將 Android 裝置連接至開發電腦。 請選取 [裝置],不要選取 [Google Android 模擬器]。 Visual Studio 會將應用程式部署至裝置,並執行應用程式。 您接著可以在裝置上與應用程式互動。
Mobizen 等螢幕畫面分享應用程式可協助您開發 Android 應用程式。 Mobizen 會將您的 Android 畫面投射至電腦上的網頁瀏覽器。
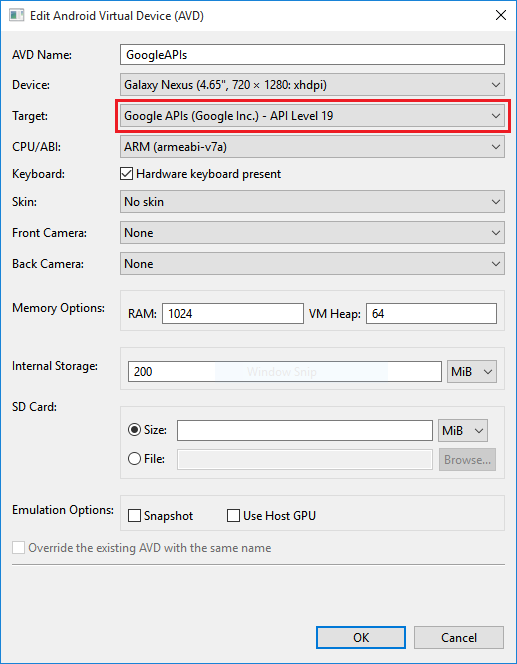
在 Android 模擬器上︰使用模擬器時,還需要其他設定步驟。
請確定您是部署至已將 Google API 設為目標的虛擬裝置,如 Android 虛擬裝置 (AVD) 管理員中所示。
如果您想要使用更快速的 x86 模擬器,請安裝 HAXM 驅動程式,並設定模擬器來使用它。
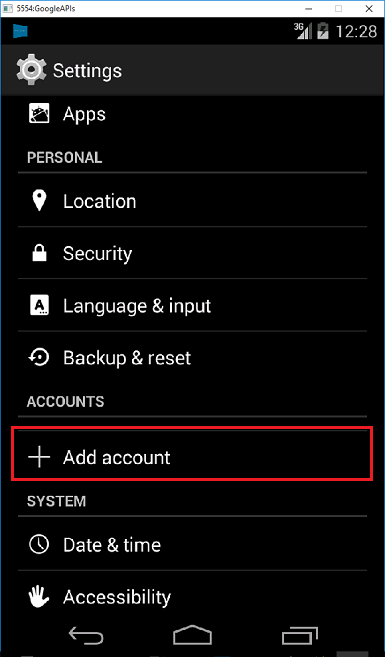
選取 [應用程式>> 設定新增帳戶],將 Google 帳戶新增至Android裝置。 然後遵循提示。
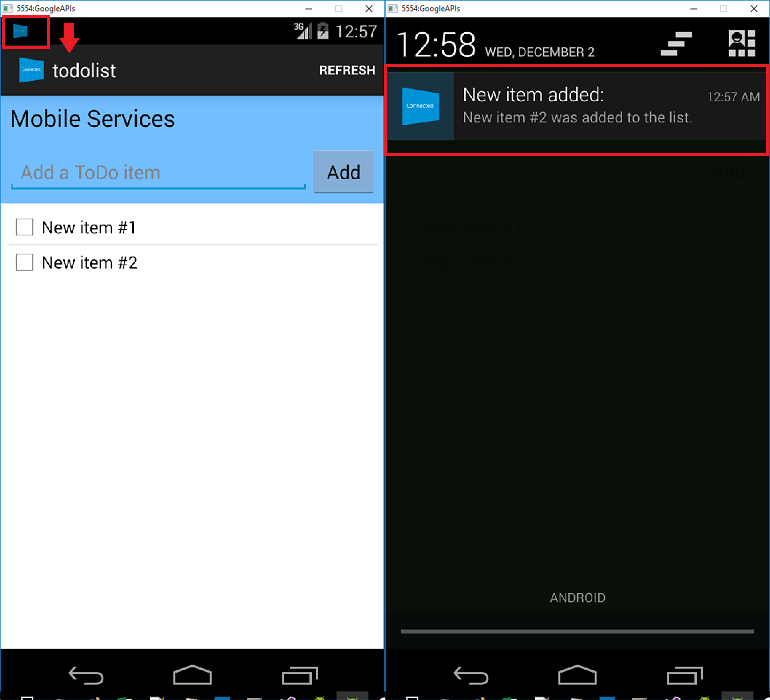
按照先前的方法執行 todolist 應用程式,然後插入新的 todo 項目。 這次,通知圖示會顯示在通知區域中。 您可以開啟通知抽屜來檢視通知的完整內容。
(選擇性) 在 iOS 上設定和執行
本節適用於在 iOS 裝置上執行 Cordova 專案。 如果未使用 iOS 裝置,可以略過這一節。
在 Mac 或雲端服務上安裝及執行 iOS 遠端組建代理程式
使用 Visual Studio 在 iOS 上執行 Cordova 應用程式之前,請先完成iOS安裝指南中的步驟,以安裝和執行遠端組建代理程式。
確定您可以建置適用於 iOS 的應用程式。 必須執行安裝指南中的步驟才能從 Visual Studio 針對 iOS 建置應用程式。 如果您沒有 Mac,您可以在 MacInCloud 之類的服務上使用遠端組建代理程式來針對 iOS 建置。 如需詳細資訊,請參閱在雲端中執行 iOS 應用程式。
注意
必須有 Xcode 7 或更新版本,才能在 iOS 上使用推播外掛程式。
尋找要做為應用程式識別碼的識別碼
在針對推播通知註冊您的應用程式之前,在 Cordova 應用程式中開啟 config.xml,在 widget 元素中尋找 id 屬性值,並加以複製以供稍後使用。 在下列 XML 中,識別碼為 io.cordova.myapp7777777。
<widget defaultlocale="en-US" id="io.cordova.myapp7777777"
    version="1.0.0" windows-packageVersion="1.1.0.0" xmlns="https://www.w3.org/ns/widgets"
    xmlns:cdv="http://cordova.apache.org/ns/1.0" xmlns:vs="https://schemas.microsoft.com/appx/2014/htmlapps">
稍後,當您在 Apple 開發人員入口網站上建立應用程式識別碼時,請使用這個識別碼。 如果您在開發人員入口網站上建立不同的應用程式識別碼,在本教學課程稍後,您必須採取一些額外的步驟。 Widget 元素中的識別碼必須符合開發人員入口網站上的應用程式識別碼。
在 Apple 的開發人員入口網站註冊應用程式以取得推播通知
- 註冊應用程式的應用程式識別碼。 建立明確的應用程式識別碼 (不是萬用字元應用程式識別碼) ,而針對套件組合識別碼,請使用您Xcode快速入門專案中的確切套件組合識別碼。 此外,請務必檢查 [推播通知] 選項。
- 下一步,若要準備設定推播通知,請建立「開發」或「散發」SSL 憑證。
設定 Azure 來傳送推播通知
- 在您的 Mac 上啟動 Keychain Access。 在左側導覽列的 [類別] 下,開啟 [我的憑證]。 尋找您在上一節中下載的 SSL 憑證,然後公開其內容。 僅選取憑證 (不選取私密金鑰)。 然後將它匯出。
- 在 Azure 入口網站中,選取 [瀏覽全部]>[應用程式服務]。 然後選取您的 Mobile Apps 後端。
- 在 [設定] 下,選取 [App Service 推播]。 然後選取您的通知中樞名稱。
- 移至Apple 推播通知服務>Upload憑證。 上傳 .p12 檔案,選取正確的模式 (根據您稍早的用戶端 SSL 憑證為生產或沙箱)。 儲存任何變更。
您的服務現在已設定成在 iOS 上使用推播通知。
確認您的應用程式識別碼符合 Cordova 應用程式
如果您在 Apple 開發人員帳戶中建立的應用程式識別碼已符合 config.xml 檔案中 widget 元素的識別碼,即可略過此步驟。 不過,如果識別碼不相符,請採取下列步驟︰
- 從您的專案中刪除 platforms 資料夾。
- 從您的專案中刪除 plugins 資料夾。
- 從您的專案中刪除 node_modules 資料夾。
- 更新config.xml檔案中 widget 元素的 id 屬性,以使用您在 Apple 開發人員帳戶中建立的應用程式識別碼。
- 重建您的專案。
在 iOS 應用程式中測試推播通知
在 Visual Studio 中,請確定已選取 iOS 作為部署目標。 然後選取 [裝置] 以在連接的 iOS 裝置上執行推播通知。
您可以在連接至 PC 與 iTunes 的 iOS 裝置上執行推播通知。 iOS 模擬器不支援推播通知。
在 Visual Studio 中選取 [執行] 按鈕或 F5 以建置專案,並在 iOS 裝置上啟動應用程式。 然後,選取 [確定] 以接收推播通知。
注意
應用程式在第一次執行期間會要求您確認推播通知。
在應用程式中輸入一項工作,然後選取加號 (+) 圖示。
驗證已收到通知。 然後選取 [確定] 關閉通知。
(選擇性) 在 Windows 上設定和執行
本節說明如何在 Windows 10 裝置 (Windows 10 支援 PhoneGap 推播外掛程式) 上執行 Apache Cordova 應用程式專案。 如果未使用 Windows 裝置,可以略過這一節。
向 WNS 註冊 Windows 應用程式以使用推播通知
若要使用 Visual Studio 中的 [存放區] 選項,請從 [解決方案平台] 清單中選取 Windows 目標,例如 Windows-x64 或 Windows-x86。 (避免 Windows-AnyCPU 使用推播通知。)
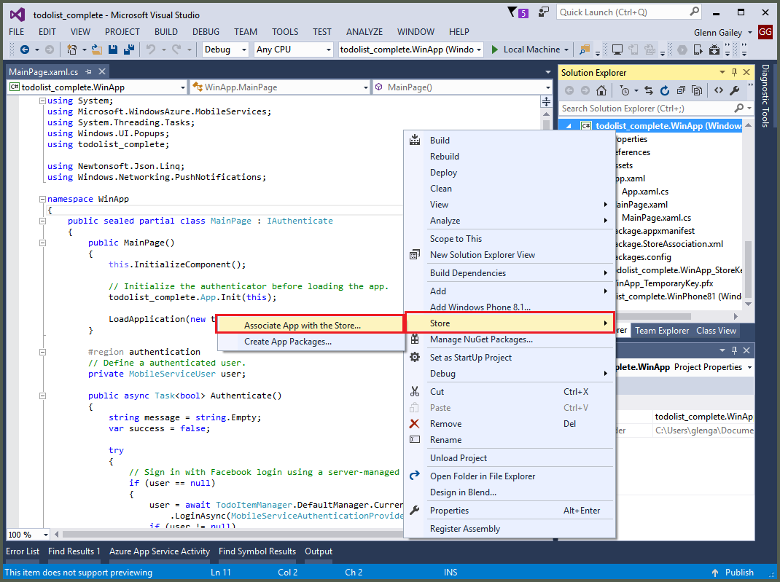
在 Visual Studio 方案總管中,以滑鼠右鍵按一下 Windows 市集應用程式專案。 然後選取[Microsoft Store>[將應用程式與Microsoft Store建立關聯]。
在精靈中,選取 [下一步]。 然後使用您的 Microsoft 帳戶登入。 在 [保留新的應用程式名稱] 中,輸入您應用程式的名稱,然後選取 [保留]。
成功建立應用程式註冊之後,選取新的應用程式名稱。 選取 [下一步],然後選取 [關聯]。 此程序會將所需的 Windows 市集註冊資訊新增至應用程式資訊清單。
使用您之前為 Windows 市集應用程式所建立的相同註冊,針對 Windows Phone 市集應用程式專案重複步驟 1 和 3。
移至 Windows 開發人員中心,然後使用您的 Microsoft 帳戶登入。 在 [我的應用程式] 中,選取新的應用程式註冊。 然後展開[服務>推播通知]。
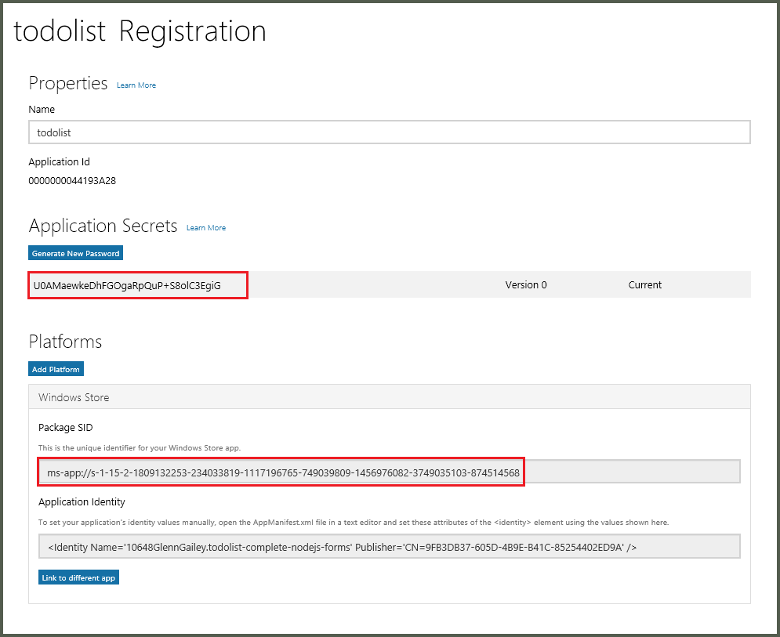
在 [推播通知]頁面的[Windows推播通知服務] 底下, ([WNS) ] 和 [Microsoft Azure Mobile Apps] 底下,選取[線上服務網站]。 記下封裝 SID的值,以及應用程式密碼中的目前值。
重要
應用程式密碼與封裝 SID 是重要的安全性認證。 請勿與任何人共用這些值,或與您的應用程式一起散發密碼。
設定 WNS 的通知中樞
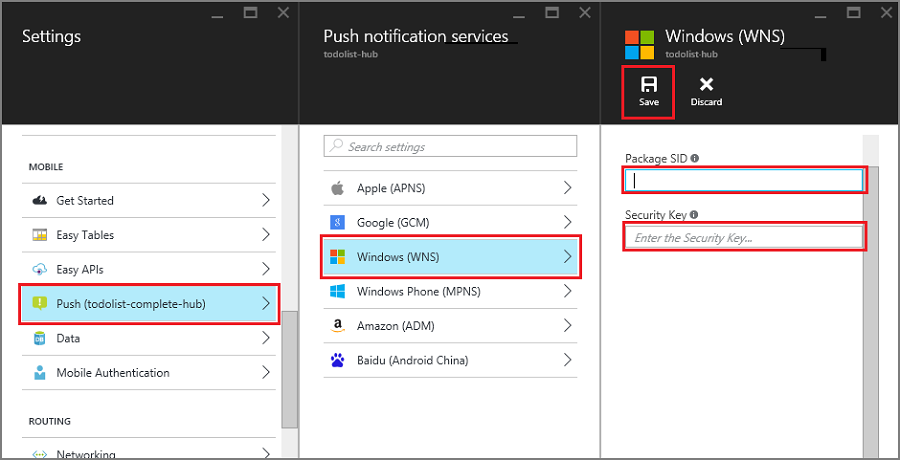
在 Azure 入口網站中,選取 [瀏覽全部]>[應用程式服務]。 然後選取您的 Mobile Apps 後端。 在 [設定] 下,選取 [App Service 推播]。 然後選取您的通知中樞名稱。
移至 Windows (WNS)。 然後輸入您從線上服務網站取得的 [安全性金鑰] \(用戶端秘密) 和 [封裝 SID]。 接下來,選取 [儲存]。
您的後端現在已設定成使用 WNS 傳送來傳送推播通知。
設定 Cordova 應用程式以支援 Windows 推播通知
以滑鼠右鍵按一下 config.xml 開啟設定設計工具。 然後選取 [檢視設計工具]。 接下來,選取 [Windows] 索引標籤,然後在 [Windows 目標版本] 底下選取 [Windows 10]。
若要支援預設 (偵錯) 組建中的推播通知,請開啟 build.json 檔案。 然後將 "release" 設定複製到您的偵錯設定。
"windows": {
    "release": {
        "packageCertificateKeyFile": "res\\native\\windows\\CordovaApp.pfx",
        "publisherId": "CN=yourpublisherID"
    }
}
更新之後, build.json 檔案應該包含下列程式碼:
"windows": {
    "release": {
        "packageCertificateKeyFile": "res\\native\\windows\\CordovaApp.pfx",
        "publisherId": "CN=yourpublisherID"
        },
    "debug": {
        "packageCertificateKeyFile": "res\\native\\windows\\CordovaApp.pfx",
        "publisherId": "CN=yourpublisherID"
        }
    }
建置應用程式並確認沒有錯誤。 您的用戶端應用程式現在應註冊來自 Mobile Apps 後端的通知。 針對方案中每個 Windows 專案重複操作這一節。
在 Windows 應用程式中測試推播通知
在 Visual Studio 中,確定已選取 Windows 平台做為部署目標,例如 Windows-x64 或 Windows-x86。 若要在裝載 Visual Studio 的 Windows 10 電腦上執行應用程式,請選擇 [本機電腦]。
選取 [執行] 按鈕,以建置專案並啟動應用程式。
在應用程式中輸入新 todoitem 的名稱,然後選取加號 (+) 圖示來加入它。
確認在加入項目時收到通知。
下一步
了解如何使用下列 SDK: