最新バージョンの Azure AI 翻訳をお試しください。 このクイックスタートでは、Translator サービスを使用して、選択したプログラミング言語または REST API でテキストを翻訳します。 このプロジェクトでは、テクノロジを学習している間は無料価格レベル (F0) を使用し、後で運用環境向けの有料レベルにアップグレードすることをお勧めします。
Visual Studio プロジェクトをセットアップする
現在のバージョンの Visual Studio IDE があることを確認します。
Visual Studio を開きます。
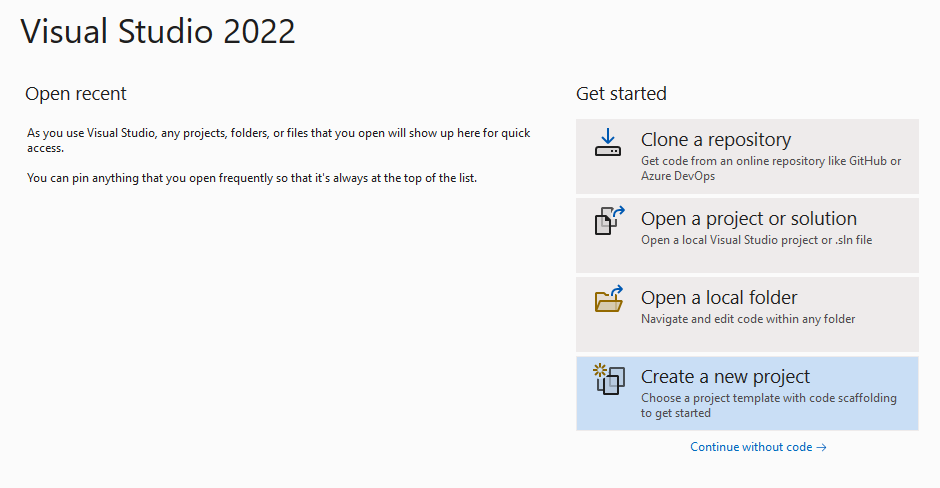
スタート ページで、[新しいプロジェクトの作成] を選択します。

[新しいプロジェクトの作成] ページで、検索ボックスに「コンソール」と入力します。 [コンソール アプリケーション] テンプレートを選択し、 [次へ] を選択します。
![スクリーンショット: Visual Studio の [新しいプロジェクトの作成] ページ。](media/quickstarts/create-new-project.png)
[新しいプロジェクトの構成] ダイアログ ウィンドウの [プロジェクト名] ボックスに「translator_quickstart」と入力します。 [ソリューションとプロジェクトを同じディレクトリに配置する] チェック ボックスをオフのままにして、[次へ] を選択します。
![スクリーンショット: Visual Studio の [新しいプロジェクトの構成] ダイアログ ウィンドウ。](media/quickstarts/configure-new-project.png)
[追加情報] ダイアログ ウィンドウで、[.NET 6.0 (長期的なサポート)] が選択されていることを確認します。 [最上位レベルのステートメントを使用しない] チェック ボックスをオフのままにし、[作成] を選択します。
![スクリーンショット: Visual Studio の [追加情報] ダイアログ ウィンドウ。](media/quickstarts/additional-information.png)
NuGet を使用して Newtonsoft.json パッケージをインストールする
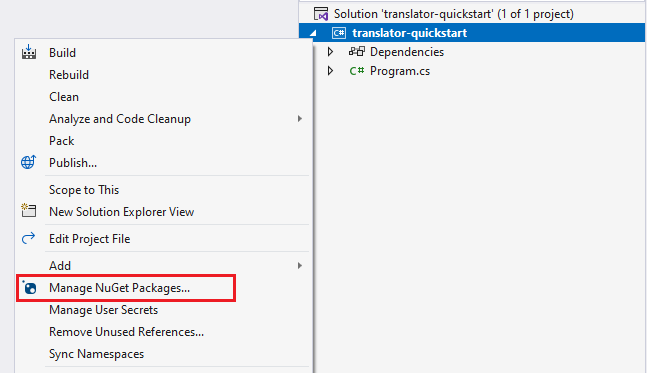
translator_quickstart プロジェクトを右クリックし、[NuGet パッケージの管理...] を選択します。

[参照] タブを選択し、「Newtonsoft.json」と入力します。

プロジェクトにパッケージを追加するには、適切なパッケージ マネージャー ウィンドウから [インストール] を選びます。

注意
- .NET 6 以降では、
console テンプレートを使用する新しいプロジェクトによって、以前のバージョンとは異なる新しいプログラム スタイルが生成されます。
- この新しい出力では、記述する必要があるコードを簡素化できる最新の C# 機能が使用されています。
- 新しいバージョンで使用する場合、記述する必要があるのは、`Main` メソッドの本体のみです。 最上位レベルのステートメント、グローバル using ディレクティブ、または暗黙的な using ディレクティブを含める必要はありません。
- 詳細については、「C# コンソール アプリ テンプレートで最上位レベルのステートメントが生成される」を "参照してください"。
Program.cs ファイルを開きます。
Console.WriteLine("Hello World!") という行を含む既存のコードを削除します。 コード サンプルをコピーして、アプリケーションの Program.cs ファイルに貼り付けます。 キー変数は、Azure portal の Translator インスタンスの値で更新するようにしてください。
using System.Text;
using Newtonsoft.Json;

class Program
{
    private static readonly string key = "<your-translator-key>";
    private static readonly string endpoint = "https://api.cognitive.microsofttranslator.com";

    // location, also known as region.
    // required if you're using a multi-service or regional (not global) resource. It can be found in the Azure portal on the Keys and Endpoint page.
    private static readonly string location = "<YOUR-RESOURCE-LOCATION>";

    static async Task Main(string[] args)
    {
        // Input and output languages are defined as parameters.
        string route = "/translate?api-version=3.0&from=en&to=fr&to=zu";
        string textToTranslate = "I would really like to drive your car around the block a few times!";
        object[] body = new object[] { new { Text = textToTranslate } };
        var requestBody = JsonConvert.SerializeObject(body);

        using (var client = new HttpClient())
        using (var request = new HttpRequestMessage())
        {
            // Build the request.
            request.Method = HttpMethod.Post;
            request.RequestUri = new Uri(endpoint + route);
            request.Content = new StringContent(requestBody, Encoding.UTF8, "application/json");
            request.Headers.Add("Ocp-Apim-Subscription-Key", key);
            // location required if you're using a multi-service or regional (not global) resource.
            request.Headers.Add("Ocp-Apim-Subscription-Region", location);

            // Send the request and get response.
            HttpResponseMessage response = await client.SendAsync(request).ConfigureAwait(false);
            // Read response as a string.
            string result = await response.Content.ReadAsStringAsync();
            Console.WriteLine(result);
        }
    }
}
アプリケーションにコード サンプルを追加したら、formRecognizer_quickstart の横にある緑色の [スタート] ボタンを選び、プログラムをビルドして実行するか、F5 キーを押します。

翻訳の出力:
呼び出しが成功すると、次の応答が表示されます。
[
    {
        "detectedLanguage": {
            "language": "en",
            "score": 1.0
        },
        "translations": [
            {
                "text": "J'aimerais vraiment conduire votre voiture autour du pâté de maisons plusieurs fois!",
                "to": "fr"
            },
            {
                "text": "Ngingathanda ngempela ukushayela imoto yakho endaweni evimbelayo izikhathi ezimbalwa!",
                "to": "zu"
            }
        ]
    }
]
Go アプリケーションは、テキスト エディターを使用して記述することができます。 最新バージョンの Visual Studio Code と Go 拡張機能を使用することをお勧めします。
最新バージョンの Go がインストールされていることを確認します。
お使いのオペレーティング システムに応じた Go プログラミング言語バージョンをダウンロードします。
ダウンロードが完了したら、インストーラーを実行します。
コマンド プロンプトを開き、次のように入力して Go がインストールされたことを確認します。
go version
コンソール ウィンドウ (cmd、PowerShell、Bash など) で、アプリ用の新しいディレクトリを translator-app という名前で作成し、そこに移動します。
translator-app ディレクトリで、translation.go という名前の新しい Go ファイルを作成します。
指定したコード サンプルをコピーして translation.go ファイルに貼り付けます。 キー変数は、Azure portal の Translator インスタンスの値で更新するようにしてください。
package main

import (
    "bytes"
    "encoding/json"
    "fmt"
    "log"
    "net/http"
    "net/url"
)

func main() {
    key := "<YOUR-TRANSLATOR-KEY>"
    endpoint := "https://api.cognitive.microsofttranslator.com/"
    uri := endpoint + "/translate?api-version=3.0"

    // location, also known as region.
    // required if you're using a multi-service or regional (not global) resource. It can be found in the Azure portal on the Keys and Endpoint page.
    location := "<YOUR-RESOURCE-LOCATION>"

    // Build the request URL. See: https://go.dev/pkg/net/url/#example_URL_Parse
    u, _ := url.Parse(uri)
    q := u.Query()
    q.Add("from", "en")
    q.Add("to", "fr")
    q.Add("to", "zu")
    u.RawQuery = q.Encode()

    // Create an anonymous struct for your request body and encode it to JSON
    body := []struct {
        Text string
    }{
        {Text: "I would really like to drive your car around the block a few times."},
    }
    b, _ := json.Marshal(body)

    // Build the HTTP POST request
    req, err := http.NewRequest("POST", u.String(), bytes.NewBuffer(b))
    if err != nil {
        log.Fatal(err)
    }
    // Add required headers to the request
    req.Header.Add("Ocp-Apim-Subscription-Key", key)
    // location required if you're using a multi-service or regional (not global) resource.
    req.Header.Add("Ocp-Apim-Subscription-Region", location)
    req.Header.Add("Content-Type", "application/json")

    // Call the Translator API
    res, err := http.DefaultClient.Do(req)
    if err != nil {
        log.Fatal(err)
    }

    // Decode the JSON response
    var result interface{}
    if err := json.NewDecoder(res.Body).Decode(&result); err != nil {
        log.Fatal(err)
    }
    // Format and print the response to terminal
    prettyJSON, _ := json.MarshalIndent(result, "", "  ")
    fmt.Printf("%s\n", prettyJSON)
}
アプリケーションにコード サンプルを追加したら、Go プログラムをコマンドまたはターミナル プロンプトで実行できます。 プロンプトのパスが translator-app フォルダーに設定されていることを確認し、次のコマンドを使用します。
go run translation.go
翻訳の出力:
呼び出しが成功すると、次の応答が表示されます。
[
    {
        "detectedLanguage": {
            "language": "en",
            "score": 1.0
        },
        "translations": [
            {
                "text": "J'aimerais vraiment conduire votre voiture autour du pâté de maisons plusieurs fois!",
                "to": "fr"
            },
            {
                "text": "Ngingathanda ngempela ukushayela imoto yakho endaweni evimbelayo izikhathi ezimbalwa!",
                "to": "zu"
            }
        ]
    }
]
コンソール ウィンドウ (cmd、PowerShell、Bash など) で、アプリ用の新しいディレクトリを translator-text-app という名前で作成し、そこに移動します。
mkdir translator-text-app && translator-text-app
mkdir translator-text-app; cd translator-text-app
translator-text-app ディレクトリから gradle init コマンドを実行します。 このコマンドによって、Gradle 用の重要なビルド ファイルが作成されます。たとえば、実行時にアプリケーションを作成して構成するために使用される build.gradle.kts などです。
gradle init --type basic
DSL を選択するよう求められたら、Kotlin を選択します。
Return または Enter キーを選択して、既定のプロジェクト名 (translator-text-app) を受け入れます。
次のコードを使用して build.gradle.kts を更新します。
plugins {
  java
  application
}
application {
  mainClass.set("TranslatorText")
}
repositories {
  mavenCentral()
}
dependencies {
  implementation("com.squareup.okhttp3:okhttp:4.10.0")
  implementation("com.google.code.gson:gson:2.9.0")
}
translator-text-app ディレクトリから、次のコマンドを実行します。
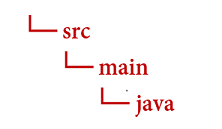
mkdir -p src/main/java
次のディレクトリ構造を作成します。

java ディレクトリに移動して、TranslatorText.java という名前のファイルを作成します。
ヒント
PowerShell を使用して新しいファイルを作成できます。
Shift キーを押しながらフォルダーを右クリックして、プロジェクト ディレクトリで PowerShell ウィンドウを開きます。
New-Item TranslatorText.java コマンドを入力します。
IDE で、TranslatorText.java という名前の新しいファイルを作成し、それを java ディレクトリに保存することもできます。
IDE で TranslatorText.java ファイルを開き、次のコード サンプルをコピーしてアプリケーションに貼り付けます。 キーは、Azure portal の Translator インスタンスからのいずれかのキー値で更新してください。
import java.io.IOException;

import com.google.gson.*;
import okhttp3.MediaType;
import okhttp3.OkHttpClient;
import okhttp3.Request;
import okhttp3.RequestBody;
import okhttp3.Response;

public class TranslatorText {
    private static String key = "<your-translator-key";

    // location, also known as region.
   // required if you're using a multi-service or regional (not global) resource. It can be found in the Azure portal on the Keys and Endpoint page.
    private static String location = "<YOUR-RESOURCE-LOCATION>";


    // Instantiates the OkHttpClient.
    OkHttpClient client = new OkHttpClient();

    // This function performs a POST request.
    public String Post() throws IOException {
        MediaType mediaType = MediaType.parse("application/json");
        RequestBody body = RequestBody.create(mediaType,
                "[{\"Text\": \"I would really like to drive your car around the block a few times!\"}]");
        Request request = new Request.Builder()
                .url("https://api.cognitive.microsofttranslator.com/translate?api-version=3.0&from=en&to=fr&to=zu")
                .post(body)
                .addHeader("Ocp-Apim-Subscription-Key", key)
                // location required if you're using a multi-service or regional (not global) resource.
                .addHeader("Ocp-Apim-Subscription-Region", location)
                .addHeader("Content-type", "application/json")
                .build();
        Response response = client.newCall(request).execute();
        return response.body().string();
    }

    // This function prettifies the json response.
    public static String prettify(String json_text) {
        JsonParser parser = new JsonParser();
        JsonElement json = parser.parse(json_text);
        Gson gson = new GsonBuilder().setPrettyPrinting().create();
        return gson.toJson(json);
    }

    public static void main(String[] args) {
        try {
            TranslatorText translateRequest = new TranslatorText();
            String response = translateRequest.Post();
            System.out.println(prettify(response));
        } catch (Exception e) {
            System.out.println(e);
        }
    }
}
アプリケーションにコード サンプルを追加したら、メイン プロジェクト ディレクトリ (translator-text-app) に戻り、コンソール ウィンドウを開き、次のコマンドを入力します。
build コマンドを使用してアプリケーションをビルドします。
gradle build
run コマンドを使用してアプリケーションを実行します。
gradle run
翻訳の出力:
呼び出しが成功すると、次の応答が表示されます。
[
  {
    "translations": [
      {
        "text": "J'aimerais vraiment conduire votre voiture autour du pâté de maisons plusieurs fois!",
        "to": "fr"
      },
      {
        "text": "Ngingathanda ngempela ukushayela imoto yakho endaweni evimbelayo izikhathi ezimbalwa!",
        "to": "zu"
      }
    ]
  }
]
Node.js Express プロジェクトを設定する
最新バージョンの Node.js がインストールされていることを確認します。 Node.js のインストールには、ノード パッケージ マネージャー (npm) が含まれます。
ヒント
Node.js を初めて使う場合は、「Node.js の概要」Learn モジュールを試してください。
コンソール ウィンドウ (cmd、PowerShell、Bash など) で、アプリ用の新しいディレクトリを translator-app という名前で作成し、そこに移動します。
mkdir translator-app && cd translator-app
mkdir translator-app; cd translator-app
npm init コマンドを実行して、アプリケーションを初期化し、プロジェクトをスキャフォールディングします。
npm init
ターミナルに表示されるプロンプトを使用して、プロジェクトの属性を指定します。
- 最も重要な属性は、名前、バージョン番号、およびエントリ ポイントです。
- エントリ ポイント名は
index.js を保持することをお勧めします。 説明、テスト コマンド、GitHub リポジトリ、キーワード、作成者、ライセンス情報はオプションの属性であり、このプロジェクトでは省略可能です。
- [戻る] または Enter キーを押して、かっこで囲んだ候補を受け入れます。
- 画面の指示に従って入力すると、translator-app ディレクトリに
package.json ファイルが作成されます。
コンソール ウィンドウを開き、npm を使用して axios HTTP ライブラリと uuid パッケージをインストールします。
npm install axios uuid
index.js というファイルをアプリケーション ディレクトリ内に作成します。
ヒント
PowerShell を使用して新しいファイルを作成できます。
Shift キーを押しながらフォルダーを右クリックして、プロジェクト ディレクトリで PowerShell ウィンドウを開きます。
次のコマンド New-Item index.js を入力します。
IDE で、index.js という名前の新しいファイルを作成し、それを translator-app ディレクトリに保存することもできます。
JavaScript アプリケーションをビルドする
次のコード サンプルを index.js ファイルに追加します。 キー変数は、Azure portal の Translator インスタンスからの値で更新してください。
    const axios = require('axios').default;
    const { v4: uuidv4 } = require('uuid');

    let key = "<your-translator-key>";
    let endpoint = "https://api.cognitive.microsofttranslator.com";

    // location, also known as region.
    // required if you're using a multi-service or regional (not global) resource. It can be found in the Azure portal on the Keys and Endpoint page.
    let location = "<YOUR-RESOURCE-LOCATION>";

    axios({
        baseURL: endpoint,
        url: '/translate',
        method: 'post',
        headers: {
            'Ocp-Apim-Subscription-Key': key,
             // location required if you're using a multi-service or regional (not global) resource.
            'Ocp-Apim-Subscription-Region': location,
            'Content-type': 'application/json',
            'X-ClientTraceId': uuidv4().toString()
        },
        params: {
            'api-version': '3.0',
            'from': 'en',
            'to': 'fr,zu'
        },
        data: [{
            'text': 'I would really like to drive your car around the block a few times!'
        }],
        responseType: 'json'
    }).then(function(response){
        console.log(JSON.stringify(response.data, null, 4));
    })
アプリケーションにコード サンプルを追加したら、プログラムを実行します。
アプリケーション ディレクトリ (translator-app) に移動します。
ご利用のターミナルで、次のコマンドを入力します。
node index.js
翻訳の出力:
呼び出しが成功すると、次の応答が表示されます。
[
    {
        "translations": [
            {
                "text": "J'aimerais vraiment conduire votre voiture autour du pâté de maisons plusieurs fois!",
                "to": "fr"
            },
            {
                "text": "Ngingathanda ngempela ukushayela imoto yakho endaweni evimbelayo izikhathi ezimbalwa!",
                "to": "zu"
            }
        ]
    }
]
最新バージョンの Python 3.x がインストールされていることを確認します。 Python のインストールには、Python インストーラー パッケージ (pip) が含まれます。
ヒント
Python を初めて使う場合は、「Python の概要」Learn モジュールを試してください。
ターミナル ウィンドウを開き、pip を使用して Requests ライブラリと uuid0 パッケージをインストールします。
pip install requests uuid
注意
json という名前の Python 組み込みパッケージも使用します。 これは JSON データの操作に使用されます。
任意のエディターまたは IDE で、translator-app.py という名前の新しい Python ファイルを作成します。
次のコード サンプルを translator-app.py ファイルに追加します。 キーは、Azure portal の Translator インスタンスからのいずれかの値で更新してください。
import requests, uuid, json

# Add your key and endpoint
key = "<your-translator-key>"
endpoint = "https://api.cognitive.microsofttranslator.com"

# location, also known as region.
# required if you're using a multi-service or regional (not global) resource. It can be found in the Azure portal on the Keys and Endpoint page.
location = "<YOUR-RESOURCE-LOCATION>"

path = '/translate'
constructed_url = endpoint + path

params = {
    'api-version': '3.0',
    'from': 'en',
    'to': ['fr', 'zu']
}

headers = {
    'Ocp-Apim-Subscription-Key': key,
    # location required if you're using a multi-service or regional (not global) resource.
    'Ocp-Apim-Subscription-Region': location,
    'Content-type': 'application/json',
    'X-ClientTraceId': str(uuid.uuid4())
}

# You can pass more than one object in body.
body = [{
    'text': 'I would really like to drive your car around the block a few times!'
}]

request = requests.post(constructed_url, params=params, headers=headers, json=body)
response = request.json()

print(json.dumps(response, sort_keys=True, ensure_ascii=False, indent=4, separators=(',', ': ')))
アプリケーションにコード サンプルを追加したら、プログラムをビルドして実行します。
translator-app.py ファイルに移動します。
コンソールで次のコマンドを入力します。
python translator-app.py
翻訳の出力:
呼び出しが成功すると、次の応答が表示されます。
[
  {
    "translations": [
      {
        "text": "J'aimerais vraiment conduire votre voiture autour du pâté de maisons plusieurs fois!",
        "to": "fr"
      },
      {
        "text": "Ngingathanda ngempela ukushayela imoto yakho endaweni evimbelayo izikhathi ezimbalwa!",
        "to": "zu"
      }
    ]
  }
]
![スクリーンショット: Azure portal の [キーとエンドポイント] ページ。](media/quickstarts/keys-and-endpoint-portal.png)

![スクリーンショット: Visual Studio の [新しいプロジェクトの作成] ページ。](media/quickstarts/create-new-project.png)
![スクリーンショット: Visual Studio の [新しいプロジェクトの構成] ダイアログ ウィンドウ。](media/quickstarts/configure-new-project.png)
![スクリーンショット: Visual Studio の [追加情報] ダイアログ ウィンドウ。](media/quickstarts/additional-information.png)


