App Center Webhooks
Important
Visual Studio App Center is scheduled for retirement on March 31, 2025. While you can continue to use Visual Studio App Center until it is fully retired, there are several recommended alternatives that you may consider migrating to.
Webhooks are a simple way to notify third-party applications when a specified event has occurred. The main goal of webhooks is to communicate important information from App Center to users rather than having users come to the portal, or run API calls to be notified when certain events happen.
App Center's webhooks allow users to send automatic notifications to connected applications for the following events:
Build:
Build success:
- Always: when your app builds successfully
- Only if previously failed: when your app has successfully built after one or more failed builds
- Never: you won't receive notifications for build success
Build failure:
- Always: when your app fails to build
- Only if previously successful: when your app has failed to build after one or more successful builds
- Never: you won't receive notifications for build failure
Crashes: when a crash group is created
Distribute: when a new version is released to a distribution group
Note
For Distribute, the webhook will be triggered when a new version is released to a distribution group. If you checked do not notify testers in the Review step of creating a new release, the webhook won't fire. For Diagnostics, the webhook will be triggered for new error groups with symbols provided. If no symbols are found for the new error group, the webhook won't fire.
App Center will send an HTTP POST payload to the webhook's specified URL. Webhooks are configured at the app level under the Settings page of your specified app. Users must have manager or developer permissions in the app to create and configure the webhooks. We currently only support webhooks for Slack and Microsoft Teams. To post to other platforms, you may write an Azure function that translates the way we POST to fit the requirements of the platform.
Navigate to App Center, and select the specific app you want for webhooks integration.
In your app, in the far left-hand panel, select Settings
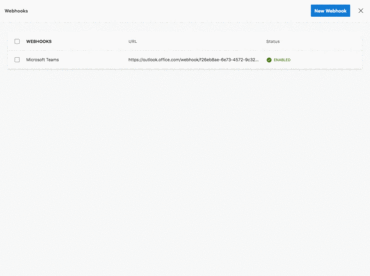
In the row panel titled Webhooks, go to the right-hand corner and click on the pencil icon, which brings up the Webhooks panel.

In the top-right corner, click the blue New Webhook button and enter:
Webhook name
Webhook URL
You can obtain the webhook URL from your integrated application's settings (for example, here are details on how to obtain the webhook URL from Microsoft Teams and how to obtain the webhook URL from Slack).
Select the dropdown for Build status notifications and the checkbox for Crashes and Distribute notifications to decide what events will trigger the webhook alerts.
Done! Your webhook is now created and enabled. You may create multiple webhooks by repeating step 4.
Toggle to the extreme right hand of the webhook to test, disable, or delete the webhook.
- test will send a test alert to your connected application.
- disable keeps the webhook inactive but present in your dashboard.
- delete will remove the webhook from your dashboard.
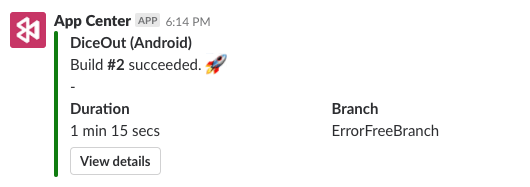
When these events happen, App Center notifications are posted into your integrated applications. For example, here is how a Build success notification looks like with a connected Slack application:
Here are examples of the JSON webhook payload for:
- Build
{
  "app_name": "myFirstApp",
  "branch": "main",
  "build_status": "Succeeded",
  "build_id": "33",
  "build_link": "https://appcenter.ms/users/{user-id}/apps/{app-name}/build/branches/main/builds/33",
  "build_reason": "manual",
  "finish_time": "2018-06-14T23:59:05.2542221Z",
  "icon_link": "https://appcenter-filemanagement-distrib4ede6f06e.azureedge.net/f7794e4c-42f1-4e7c-8013-07ed2e1b733d/ic_launcher.png?sv=2020-02-18&sr=c&sig=gs4JfcWjpKeYH%2F%2Fg0jEtSKKbeRkug9q%2FldslmzzeOg0%3D&se=2020-02-26T08%3A57%3A58Z&sp=r",
  "notification_settings_link": "https://appcenter.ms/users/{user-id}/apps/{app-name}/settings/notifications",
  "os": "iOS",
  "start_time": "2018-06-14T23:57:03.4379381Z",
  "source_version": "55820a357ba26831f2eeb3be9973a4ef20618b73",
  "sent_at": "2018-06-14T23:59:08.4897604Z"
}
- Crash
{
  "id":"3698593379u",
  "name":"android.app.Activity.performResume (Activity.java:5084)",
  "reason":"android.app.SuperNotCalledException",
  "url":"https://appcenter.ms/orgs/{org-id}/apps/{app-name}/crashes/errors/3698273379u",
  "app_display_name":"{app-name}",
  "app_platform":"Java",
  "app_version":"2.0.1(42)",
  "stack_trace":[],
  "affected_users":0,
  "crash_count":0,
  "sent_at":"2019-05-16T23:47:31.4881512Z",
  "app_id":"00001111-aaaa-2222-bbbb-3333cccc4444"
}
- Distribute
{
  "app_name":"{app-name}",
  "app_display_name":"{app-display-name}",
  "release_id":"123",
  "platform":"Android",
  "uploaded_at":"2018-07-17T20:46:14Z",
  "fingerprint":"0abed1269e4ae3bf524e4cc7165f4f34",
  "release_notes":"",
  "version":"74",
  "short_version":"1.7.0",
  "min_os":"4.0.3",
  "mandatory_update":true,
  "size":2634279,
  "provisioning_profile_name":null,
  "provisioning_profile_type":null,
  "bundle_identifier":"com.microsoft.appcenter.test",
  "install_link":"https://install.appcenter.ms/orgs/{org-name}/apps/{app-name}/releases/123?source=email",
  "icon_link":"https://appcenter-filemanagement-distrib4ede6f06e.azureedge.net/f7794e4c-42f1-4e7c-8013-07ed2e1b733d/ic_launcher.png?sv=2020-02-18&sr=c&sig=gs4JfcWjpKeYH%2F%2Fg0jEtSKKbeRkug9q%2FldslmzzeOg0%3D&se=2020-02-26T08%3A57%3A58Z&sp=r",
  "distribution_group_id":"1a5a0605-4b9c-4de2-9a35-t569456df0cc",
  "installable":true,
  "sent_at":"2019-05-16T23:20:08.7799314Z",
  "app_id":"11112222-bbbb-3333-cccc-4444dddd5555"
}
You can also inspect the payload by using RequestBin. To do that, navigate to RequestBin, click Create a RequestBin, and then copy the generated URL under Bin URL and paste the URL as a webhook in App Center.
To post to other platforms, you can write an Azure function that translates the way we POST to fit the requirements of the platform. To do that, create an Azure function, paste the URL under the Webhook URL field in step 4, and App Center will post the webhook payload to that endpoint. You may then modify the payload to the platform's requirements.