Desktop Bridge – Expanding a desktop application with a UWP component
In one of the previous posts we have seen how the Desktop Bridge can be helpful to take an existing desktop application and expanding it with some APIs from the Universal Windows Platform, without having to immediately rewrite it completely as a native UWP app. When a Win32 application is running, in fact, inside the UWP container (in the previous post, it was a Windows Forms application), we have the chance to leverage some of the new generation’s UWP APIs to perform tasks like sending notifications, updating the live tile or leverage speech services.
In this post we’re going to see another expansion entry: not just using simple APIs, but real specific components that belong to the UWP world, like background tasks.
As we have mentioned in the first article of the series, UWP apps have a different lifecycle compared to traditional desktop applications. In a regular Win32 app, the user has total control over the application’s lifecycle: he can launch it, close it, minimize it, etc. No matter which is the current state of the app, the operating system doesn’t have the opportunity to change it: the app will stay up & running until the user will explicitly close it (or it would fail due to an error or an exception). If the user minimizes the application in the taskbar, it will continue to perform operations in background, independently by how much memory or CPU power the computer has left to handle it. Visual Studio is the perfect example of this approach: if you start building your project then you minimize it, the build process will continue to run, no matter if, at the same time, you’ll try to launch a triple A game which requires lot of memory and CPU power.
In the world of UWP applications, instead, things work in a different way: they can be launched on a wide range of devices, like phones or tablets, which can have less memory and CPU power compared to a traditional computer, not to mention the battery consumption. Consequently, the lifecycle of a UWP app has many differences compared to the Win32 one: the user is still in control, but also the system has the chance to make changes, based on the status of the system. For example, when a UWP application isn’t in foreground anymore, it’s suspended after 10 seconds, which means that it’s kept in memory (so that it can be quickly resumed), but any thread, network connection and operation is interrupted, so that all the resources of the device can be redirected to the new application in foreground. The main consequence of this approach is that, compared to traditional desktop apps, a UWP app isn’t able to perform background operations without any limitation, since they could have a huge impact on the battery life and on the reactivity of the device. If you want to know more about the lifecycle of a UWP app, you can refer to this great post by the Windows team: https://blogs.windows.com/buildingapps/2016/04/28/the-lifecycle-of-a-uwp-app/
Despite the previous approach makes totally sense, it would be a huge limitation not to allow developers to perform any kind of background operation. As such, the Universal Windows Platform has introduced the concept of background tasks: they are Windows Runtime Components which contains some code that can be executed independently from the current state of the app (running, suspended, terminated, etc.) and that are connect to the concept of trigger, which is the event that invokes the execution of the task. Even if we’re going to see a real example in the next posts of the series, it’s important to highlight at this point that Windows 10 Anniversary Update has introduced the concept of single background process model, which means that the code to perform in background doesn’t necessarily have to be included in a separate Windows Runtime Component, but it can included in the UWP app itself. However, as already mentioned, we will discuss in details this approach in a future post, since we aren’t going to leverage it in the current post. However, if you want to start learning more about this new approach and, generally speaking, about background tasks, you can start from the official documentation: https://msdn.microsoft.com/en-us/windows/uwp/launch-resume/support-your-app-with-background-tasks
If you’re reading this post, you probably are a desktop developer and you may be wondering why you could be interested into implementing a background task in a Win32 application: since you don’t have the same limitations of a UWP app, you have the chance to run your background code at anytime, without relying on external components.
This consideration isn’t 100% true, since background tasks offer a series of features that make them interesting also for a traditional desktop app:
- They’re handled directly by Windows. Consequently, they can be executed even when the application isn’t even running. A traditional desktop application, instead, doesn’t have this opportunity if it’s closed: you are forced to leverage other approaches, like keeping a process always alive or embedding a Windows service. However, both scenarios aren’t as simple and efficient to implement as a background task.
- Background tasks are respectful of the user experience and the reactivity of the system: Windows will apply all the required techniques to avoid that the execution of a background task could degrade the system performance or of the application that is currently running.
- The Universal Windows Platform offers a wide choice of triggers, which are handled directly by the operating system: every time one of these events will be triggered, Windows will take care of executing the connected task, without asking to the developer to do any extra work. If some kind of triggers (like the TimeTrigger, which allows to periodically repeat an operation) are easy to implement also in a traditional desktop app, there are some others which can be harder to handle instead, like the ones related to Bluetooth connection, network status changes, time zone changes, etc.
In this post we’re going to see how to implement one of these scenarios: the Windows Forms application will register a background task, which will be invoked every time the time zone of the device will change. Every time this event will occur, the task will take care of updating the tile of the application and sending a notification to the user.
Let’s start our sample by creating a new solution in Visual Studio. Also in this case, we’re going to leverage the Desktop Bridge package and deployment extension which is available for the Preview of the next Visual Studio version (previously known as Visual Studio 15 and now officially called Visual Studio 2017), which we have learned to use in one of the previous posts.
Our solution, at the end of the post, will be made by three projects:
- The background task
- The Windows Forms application
- The deployment project, which will take care of executing the Win32 application inside the UWP container, like if it has been converted into an AppX package (we have already learned how to use and configure it in this post, so I won’t repeat again in this post the procedure to create and configure it).
Let’s start from the background task, which is the project that contains the code that will be executed in background when the trigger we have chosen will be invoked. A background task is simply made by a Windows Runtime Component: you will find a specific template when you create a new project in Visual Studio in the section Windows –> Universal

The only requirement for a Windows Runtime Component to act as a background task is to include a class, which needs to implement the IBackgroundTask interface (which is included in the Windows.ApplicationModel.Background namespace). This interface will force you to implement a method called Run(), which is executed every time the task will be invoked by the trigger. Consequently, it needs to contain the code that we want to perform in background.
Here is how the background task looks like:
 using System;
using Windows.ApplicationModel.Background;
using Windows.Data.Xml.Dom;
using Windows.UI.Notifications;

namespace TileBackgroundTask
{
    public sealed class TileTask : IBackgroundTask
    {
        public void Run(IBackgroundTaskInstance taskInstance)
        {
            string tileXml = $@"<tile>
                            <visual>
                                <binding template='TileMedium' branding='logo'>
                                    <group>
                                        <subgroup>
                                            <text hint-style='caption'>Time zone changed!</text>
                                            <text hint-style='captionSubtle' hint-wrap='true'>Last update at {DateTime.Now}</text>
                                        </subgroup>
                                    </group>
                                </binding>
                            </visual>
                        </tile>";

            XmlDocument tileDoc = new XmlDocument();
            tileDoc.LoadXml(tileXml);

            TileNotification notification = new TileNotification(tileDoc);
            TileUpdateManager.CreateTileUpdaterForApplication().Update(notification);

            string toastXml = $@"<toast>
                            <visual>
                                <binding template='ToastGeneric'>
                                    <text>Time zone changed!</text>
                                    <text>Last update at {DateTime.Now}</text>
                                </binding>
                            </visual>
                        </toast>";

            Windows.Data.Xml.Dom.XmlDocument toastDoc = new Windows.Data.Xml.Dom.XmlDocument();
            toastDoc.LoadXml(toastXml);

            ToastNotification toast = new ToastNotification(toastDoc);
            ToastNotificationManager.CreateToastNotifier().Show(toast);
        }
    }
}
If you have some previous experience with UWP development, the code should be easy to understand: toast and tile notifications, under the hood, work in the same way. In both cases, the content is defined by a XML payload: the only difference is that, when it comes to toast notifications, we use the ToastNotification class to define them and the ToastNotificationManager class to show them by calling the Show() method. In case of a tile update, instead, we use the TileNotification class to define it and we leverage the TileUpdateManager class to update it by calling the Update() method.
That’s all: as you can notice, a background task doesn’t have any connection to the trigger that will be linked to it, but it just defines the code that we want to execute in background: it will be up to the main application to register it and to specify its requirements. In the traditional UWP world, this job would be up to the UWP app. In our case, instead, it will be the Windows Forms application to register the task and to choose which trigger will invoke it.
Now it’s time to add to our solution the Windows Forms project and, as we did in one of the previous post, as first step we need to add a reference to the Universal Windows Platform, by adding a reference to the following files:
- The Windows.md file, stored in the path C:\Program Files (x86)\Windows Kits\10\UnionMetadata
- The System.Windows.Runtime.dll file, stored in the path C:\Program Files (x86)\Reference Assemblies\Microsoft\Framework\.NETCore\v4.5.1
Now we can add to the user interface of the application a button, which we’re going to handle thanks to the Click event exposed by the control with the following code:
 private async void OnRegisterTask(object sender, EventArgs e)
{
    string triggerName = "TimeZoneTriggerTest";

    // Check if the task is already registered
    foreach (var cur in BackgroundTaskRegistration.AllTasks)
    {
        if (cur.Value.Name == triggerName)
        {
            // The task is already registered.
            return;
        }
    }

    BackgroundTaskBuilder builder = new BackgroundTaskBuilder();
    builder.Name = triggerName;
    builder.SetTrigger(new SystemTrigger(SystemTriggerType.TimeZoneChange, false));
    builder.TaskEntryPoint = "TileBackgroundTask.TileTask";
    var status = await BackgroundExecutionManager.RequestAccessAsync();
    if (status != BackgroundAccessStatus.DeniedByUser && status != BackgroundAccessStatus.DeniedBySystemPolicy)
    {
        builder.Register();
    }
}
Also in this case, if you have ever developed a UWP app, you will find yourself at home, since it’s the standard code required to register a background task in an application. First, we need to assign a unique name to the task (in this case, TimeZoneTriggerTest), to avoid that the same task can be registered multiple times: this is the purpose of the first code block (the foreach cycle), which makes sure that the task hasn’t been already registered in the past, by leveraging the BackgroundTaskRegistration.AllTasks collection, which contains the list of all the background tasks that have been registered by the application itself.
If that’s not the case, we can move on and register the task, by leveraging the BackgroundTaskBuilder class which belongs to the Windows.ApplicationModel.Background namespace. Here are all the steps that are performed by the previous code:
- By using the Name property, we assign a name to the task.
- By using the SetTrigger() method, we specify which trigger we want to connect to the task. In our sample, the trigger is connected to the time zone change, which is part of the SystemTrigger type. Consequently, we need to create a new SystemTrigger object passing, as parameter, one of the values of the SystemTriggerType enumerator (in our case, it’s TimeZoneChange). The second value is a boolean that defines the execution frequency: true means that it will be a one shot trigger, false that the task will be continuously invoked every time the event will be triggered.
- By using the TaskEntryPoint property we need to specify the full signature of the class that implements the background task (namespace + name of the class). In our case, we assign the value TileBackgroundTask.TileTask, which is the signature of the class we defined inside the Windows Runtime Component which we have created in the previous steps.
- We need to ask to Windows the permission to register the task by calling the BackgroundExecutionManager.RequestAccessAsync() method: in our case, since we’re talking about an application which will run only on a desktop machine, this authorization will always be granted. In fact, the chance that the authorization will be denied only on some devices with memory and CPU constraints (like some low memory phones), where Windows limits the maximum number of background tasks that can be registered at the same time.
- Once we have received the permission (by checking that the result of the RequestAccessAsync() method is different from DeniedByUser or DeniedBySystemPolicy), we can finally register the task by calling the Register() method.
The job on the Windows Forms application is done: by pressing the button we have included in our user interface, the task will be registered in Windows 10. Our job, however, isn’t done yet: there’s one last step we need to perform to effectively register the task.
Background tasks are part of the UWP components defined extensions and, as such, they need to be registered inside the manifest file, other than the in application itself like we did in the previous step. Consequently, we need now to move from the Win32 world to the UWP world, by changing the AppxManifest.xml file which is included inside the folder that, at the end of our job, will be converted into an AppX package. Since we are using Visual Studio 2017 and the Desktop Bridge extension, we will find this file inside the PackageLayout folder which we have manually created inside the deployment project.
We have two changes to apply to the manifest file. The first one is to add a new Extension element inside the Application entry, like in the following sample:
 <Applications>
  <Application Id="Extend" Executable="Extend.exe" EntryPoint="Windows.FullTrustApplication">
    <uap:VisualElements DisplayName="Extend" Description="Extend" BackgroundColor="#777777"
    Square150x150Logo="Assets\SampleAppx.150x150.png" Square44x44Logo="Assets\SampleAppx.44x44.png" />
    <Extensions>
      <Extension Category="windows.backgroundTasks" EntryPoint="TileBackgroundTask.TileTask">
        <BackgroundTasks>
          <Task Type="systemEvent" />
        </BackgroundTasks>
      </Extension>
    </Extensions>
  </Application>
</Applications>
This element has two important properties:
- Category, which is the extension type we want to register (in this case, background tasks are identified by the keyword windows.backgroundTasks)
- EntryPoint, which is the same entry point we have have previously specified when we registered the task in the code of the desktop application: it’s the signature of the class that implements the IBackgroundTask interface (in our case, it’s TileBackgroundTask.TileTask).
Inside this extension we need to specify which kind of trigger we want to handle with this task, by adding a new element which type is Task with a specific attribute called Type. In this case, since the TimeZoneTrigger is part of the system events’ family, we need to set as value of this attribute the keyword systemEvent.
Additionally, in the final part of the manifest, we need to add the following XML code:
 <Extensions>
  <Extension Category="windows.activatableClass.inProcessServer">
    <InProcessServer>
      <Path>CLRHost.dll</Path>
      <ActivatableClass ActivatableClassId="TileBackgroundTask.TileTask" ThreadingModel="both" />
    </InProcessServer>
  </Extension>
</Extensions>
In a regular UWP application we wouldn’t need this code but, since we are in a particular scenario (a desktop application that is registering a background task), it’s required to allow the task to properly work.
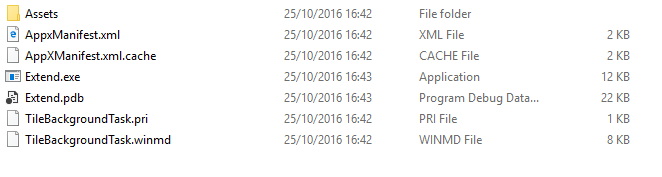
There’s a last operation to perform: the background task we have created is a Windows Runtime Component and, as such, it produces an output when it’s compiled by Visual Studio. In this case, since it isn’t a traditional .NET library, it doesn’t output a normal DLL, but a file with a .winmd extension, that needs to be included in the PackageLayout folder which will be converted into an AppX folder.
The simplest way to achieve this goal is to define a set of post build operations: every time we compile the project that contains the background task, the output files (the .winmd and the .pri ones) will be copied inside the PackageLayout folder. We can setup this operation by right clicking on the background task’s project, choosing Project and moving to the Build events tab. In the area called post-build event command line we can add the following commands:
 xcopy /y /s "$(TargetDir)TileBackgroundTask.pri" "$(SolutionDir)Extend.DesktopToUWP\PackageLayout"
xcopy /y /s "$(TargetDir)TileBackgroundTask.winmd" "$(SolutionDir)Extend\PackageLayout"
Of course, in your scenario you can’t just copy and paste the previous commands in your project’s configuration, but you will need to change the name of the files and the folders based on the configuration of your project. The previous post build operations are referred to the sample project that you can download from GitHub: https://github.com/qmatteoq/DesktopBridge/tree/master/5.%20Extend
Now that all the pieces of the puzzle are in place, we can check the result of our job. A first test we can do is to compile the background task’s project. If we have properly configured the post build commands, we should see in the Output Window of Visual Studio a result similar to the following one:

This means that the build output of the Windows Runtime Component has been properly copied into the PackageLayout folder. We can check it by looking at the content of this folder, which should look like in the following image:
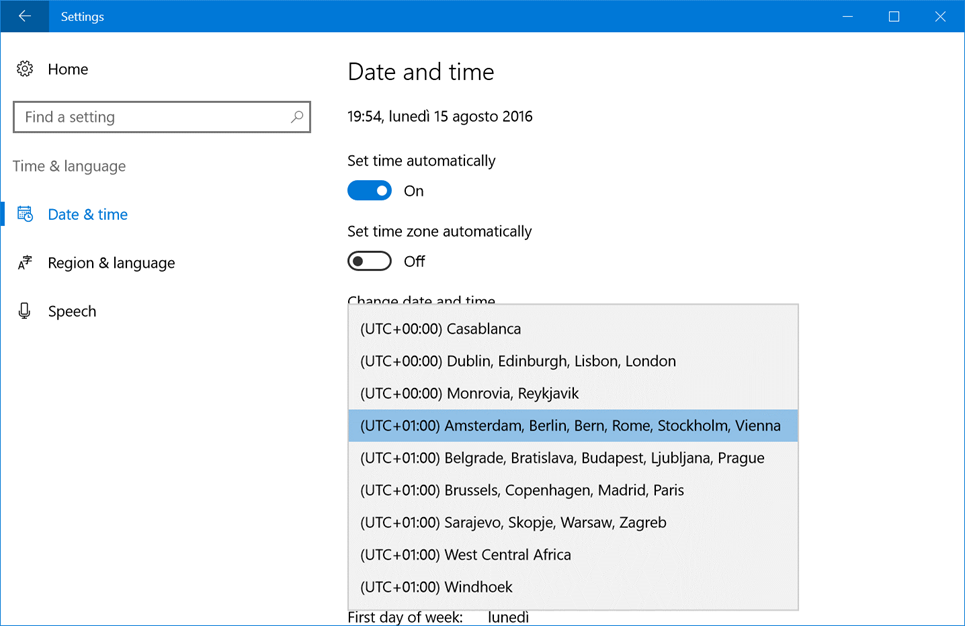
To check that the background task has been properly registered, in Visual Studio launch the UWP deployment project and, in the Windows Forms application, click on the button that we have previously added. Now open the Window’s settings and, in the Time & Language –> Date & Time section, try to change the time zone:
In the lower left corner you should see a notification like the following one:
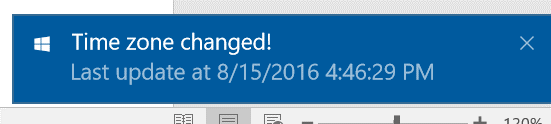
Additionally, if you have added the application on the Start screen of your PC, you should see also a similar message appearing on the tile:

You can immediately notice one of the advantages of using a background task to handle this scenario: if you try to completely close the Win32 application (if you want to be double sure, check in the Windows’ Task Manager that the process isn’t running anymore) and change the time zone of your PC, you will see the toast notification appearing and the live tile updating again, despite the fact that the Win32 process isn’t running anymore.
Inside this post we have seen a different approach in using the Desktop Bridge, which allows us to move even more to the UWP world: in this case, we haven’t just used some UWP APIs, but we have leveraged some real components that belong to this new world. This way, we can start to modernize our application, without having to learn a completely new way to write desktop application, since we have been able to reuse all the knowledge we’ve acquired in creating Win32 applications with the .NET framework.
You can find the sample code used in this post on my GitHub repository at the URL https://github.com/qmatteoq/DesktopBridge/tree/master/5.%20Extend
Happy coding!
- Anonymous
March 26, 2017
Hi Matteo Pagani,When the background task is running, where I can find the task? I check the task manager and only find the windows form process, and not find the background task process, but it works well.Thanks!- Anonymous
March 26, 2017
Hello Shirley,background tasks are handled by a unique Windows process (backgroundTaskHost.exe), there isn't a separate process for every task. You can see all the registered tasks in Windows by opening the Windows Settings and go to Privacy -> Background Apps.- Anonymous
March 28, 2017
Thanks Matteo!
- Anonymous
- Anonymous
- Anonymous
May 16, 2017
Hello Matteo,If we have a windows server which launches my win32 application by finding and launching the installed .exe file, and how should the server launch my converted app? It can't find the .exe file any more.Thanks a lot!- Anonymous
May 16, 2017
Hello Shirley-cheng,the best way would be to include an alias for your app in your converted version of the application: https://docs.microsoft.com/en-us/windows/uwp/porting/desktop-to-uwp-extensions#aliasWith this approach, an alias to your main executable will be registered into the system and, no matter where you are going to invoke it (a shortcut, a command prompt, another application, etc.), the converted version of your app will start.Let me know if you have further questions!Best- Anonymous
May 21, 2017
The comment has been removed- Anonymous
May 21, 2017
Weird. Do you have the chance to share with me the package that you have created to that I can test it on my machine? Feel free to reach me by mail at name.surname@microsoft.com
- Anonymous
- Anonymous
- Anonymous
- Anonymous
May 23, 2017
Hi, MatteoI'm sorry that I can't send my package to you successfully, it always return the error information that it can't find the receiver.My converted package is 14M, I don't know if the file is too large to sent to you by email.And I don't find any way to share you the packages, so do you have some way to share?Thanks!- Anonymous
May 23, 2017
Hello Shirley-cheng, did you replace name.surname with my real name and surname? As an alternative, you can upload your file using any of the cloud storage services available out there. For example, if you have a Microsoft Account, you can upload your package on OneDrive and share the link.
- Anonymous