Configuring Network Device Enrollment Service for Windows Server 2008 with Custom Certificates
Hello, this is Jonathan from the Directory Services team.
The Network Device Enrollment Service (NDES) is one of the role services of the Active Directory Certificate Services (ADCS) role. It implements the Simple Certificate Enrollment Protocol (SCEP). SCEP defines the communication between network devices and a Registration Authority (RA) for certificate enrollment.
When the NDES role is added, it automatically requests two certificates that it uses as part of its functionality. The first is an Exchange Enrollment Agent certificate the other is a CEP Encryption certificate. In both cases, the private keys associated with this certificate are not exportable, so it is difficult to share these certificates amongst multiple instances of the RA.
This document describes the steps necessary to replace the original certificates requested during the install of the role with a new set of certificates requested manually afterwards. As part of the manual request process, the Administrator can specify that the private keys be exportable facilitating the sharing of certificates and keys amongst multiple servers.
While not recommended, it assumed that the risks associated with this practice are understood and accepted by the Administrator.
Finally, this document assumes that the issuing CA is running Microsoft Windows Server 2008 Active Directory Certificate Services in Enterprise mode.
The first step in the process is to remove the original certificates from the server. Next, new certificates will be requested from the CA and installed in the Local Computer Personal store. After that, the permissions on the new private keys will be modified to permit the SCEP Agent account specified during role install access to the private keys. Finally, the IIS service will be reset. NDES will locate the new certificates when it receives the first SCEP request from a network device.
After the NDES role is installed, there will be two certificates in the Local Computer Personal store issued to the NDES Registration Authority. The name of the RA is constructed like so:
%COMPUTERNAME%-MSCEP-RA
These certificates should be revoked on the CA and removed from the server. Simply deleting the certificates from the Local Computer Personal store is sufficient, but Windows stores private keys separately from the associated certificate so deleting the certificates will result in orphaned private keys that remain on the server. It is good practice to delete the private keys first, and then remove the associated certificates.
The first step is to identify the private keys. NDES does not support the new Crypto Next Generation (CNG) Cryptographic Service Providers (CSP) introduced in Windows Server 2008. Instead, it uses the legacy CryptoAPI (CAPI) providers. The default Windows CAPI CSPs store private keys encrypted in the file system. You can use the following method to locate the encrypted key files so that you can delete them.
The private key files for certificates issued to the Local Computer are located in the following directory:
%systemdrive%\ProgramData\Microsoft\Crypto\RSA\MachineKeys
ProgramData is a hidden system directory so you must be a local Administrator to perform this task. Once you have opened the directory, you then need to determine which of the files contained therein is associated with the certificate you wish to remove. This is easily accomplished using certutil.exe.
Certutil can be used to enumerate the certificates in the Local Computer Personal store and display the associated key container. The name of the key container will match the name of the file in the directory mentioned above. Please note, non-Microsoft CSPs may not behave in this manner since key storage implementations can vary from vendor to vendor, but the behavior is consistent amongst the Microsoft default CAPI CSPs.
The following command will search the Local Computer Personal store for all certificates issued to the RA and display the key container name.
for /f "tokens=*" %i in ('certutil -store MY %COMPUTERNAME%-MSCEP-RA') do @echo %i | findstr /i /c:"Unique container name"
The above command line has been wrapped, but it should be entered on one line in the command prompt. It uses the for command to step through each line of the certutil.exe output and pipe the result to the findstr.exe command. Findstr looks for the string “Key Container” and prints the line to the command prompt if it is found. Any line that does not contain the string “Key Container” is ignored.
The actual key container names will vary from machine to machine, but the output should look similar to the following:
Key Container = 355b8e247af95b2340ba226a6bc25ab5_cde5adfd-972a-420b-986e-e40fef6ea415
Key Container = bc1fa1b6c3c724366bcb30b581f4280f_cde5adfd-972a-420b-986e-e40fef6ea415
Putting everything together, you would delete the following files:
%systemdrive%\ProgramData\Microsoft\Crypto\RSA\MachineKeys\355b8e247af95b2340ba226a6bc25ab5_cde5adfd-972a-420b-986e-e40fef6ea415
%systemdrive%\ProgramData\Microsoft\Crypto\RSA\MachineKeys\bc1fa1b6c3c724366bcb30b581f4280f_cde5adfd-972a-420b-986e-e40fef6ea415
Once the private keys have been deleted, you can simply delete the certificates in the Local Computer Personal store issued to NDES RA (%COMPUTERNAME%-MSCEP-RA).
The next step in the process is to request new certificates from the CA to be used by the NDES RA. The following steps will use certreq.exe to create and submit the certificate request, and to retrieve and install the issued certificate. Let's start with the Exchange Enrollment Agent certificate.
First, you'll need to create an .INF file containing information that certreq.exe will use to generate the request. A sample ws08_ndes_sign.inf is included below.
; FileName: ws08_ndes_sign.inf ; Purpose: Windows Server 2008 Network Device Enrollment Service Enrollment ; Agent certificate request .INF file for certreq.exe. ; ; Command Line to generate request: ; certreq -f -new ws08_ndes_sign.inf ws08_ndes_sign.req ; ; -f : force overwrite of existing ; ws08_ndes_sign.req file ; -new : generate new request ; ; Note: This file will produce a warning because the EnrollmentAgentOffline ; certificate template was designed to be requested in the User ; context rather than the Machine context. When prompted, just accept; the warning and move on. ; ; Description: This .INF file creates the request for the MSCEP Registration ; Authority (RA) Signing certificate. This certificate ; is required in order to sign requests submitted by the MSCEP-RA ; to the Certification Authority (CA) on behalf of the network ; device. ; [NewRequest] ; Subject must be included in the file ; The Subject name should be somewhat descriptive. A good format is ; %COMPUTERNAME%-MSCEP-RA. Modify the Subject to fit your environment. ; Subject = "CN=WS08SRV03-MSCEP-RA,OU=Accounting,O=Contoso,L=Redmond,S=Washington,C=US" Exportable = TRUE KeyLength = 1024 KeySpec = 2 KeyUsage = 0x80 MachineKeySet = TRUE ProviderName = "Microsoft Enhanced Cryptographic Provider v1.0" ProviderType = 1 [EnhancedKeyUsageExtension] OID = 1.3.6.1.4.1.311.20.2.1 [RequestAttributes] CertificateTemplate = EnrollmentAgentOffline |
Once the ws08_ndes_sign.inf file has been created you use certreq.exe to generate the request, submit it to the CA, retrieve the issued certificate, and then install it. Follow these steps to accomplish these tasks:
Open the command prompt and change to the directory that contains the file ws08_ndes_sign.inf.
Run the following command:
certreq –f -new ws08_ndes_sign.inf ws08_ndes_sign.req
This command will generate the certificate request and save it as ws08_ndes_sign.req. If you see the warning dialog that states "User context template conflicts with machine context", click Ok. This warning can be ignored. Please review the sample ws08_ndes_sign.inf file for more information on the switches in the command line above.
Next, run the following command:
certreq –submit ws08_ndes_sign.req ws08_ndes_sign.cer
You will be prompted to select to which CA the request should be submitted. Once that is done, the request will be submitted and the issued certificate will be retrieved and saved as ws08_ndes_sign.cer.
Finally, run the following command:
certreq –accept ws08_ndes_sign.cer
This command import the new certificate and move it into the Local Computer Personal store.
Figure 1 below shows the commands described above and the expected output.

Figure 1
Next you’ll need to request the CEP Encryption certificate. As with the Exchange Enrollment Agent certificate, you will need to create and .INF file that contains information that certreq.exe will use to generate the request. A sample ws08_ndes_xchg.inf file is included below.
; FileName: ws08_ndes_xchg.inf ; Purpose: Windows Server 2008 Network Device Enrollment Service Request ; Agent certificate request .INF file for certreq.exe. ; ; Command Line to generate request: ; certreq -f -new ws08_ndes_xchg.inf ws08_ndes_xchg.req ; ; -f : force overwrite of existing ; ws08_ndes_sign.req file ; -new : generate new request ; ; Description: This .INF file creates the request for the MSCEP Registration ; Authority (RA) Request Agent certificate. This certificate ; is required to authenticate the RA to the CA in order to submit ; requests on behalf of the network device. ; [NewRequest] ; Subject must be included in the file ; The Subject name should be somewhat descriptive. A good format is ; %COMPUTERNAME%-MSCEP-RA. Modify the Subject to fit your environment. Subject = "CN=WS08SRV03-MSCEP-RA,OU=Accounting,O=Contoso,L=Redmond,S=Washington,C=US" Exportable = TRUE KeyLength = 1024 KeySpec = 1 KeyUsage = 0x20 MachineKeySet = TRUE ProviderName = "Microsoft RSA Schannel Cryptographic Provider" ProviderType = 12 [EnhancedKeyUsageExtension] OID = 1.3.6.1.4.1.311.20.2.1 [RequestAttributes] CertificateTemplate = CEPEncryption |
Once the ws08_ndes_xchg.inf file has been created you use certreq.exe to generate the request, submit it to the CA, retrieve the issued certificate, and then install it. Follow these steps to accomplish these tasks:
Open the command prompt and change to the directory that contains the file ws08_ndes_xchg.inf.
Run the following command:
certreq –f –new ws08_ndes_xchg.inf ws08_ndes_xchg.req
This command will generate the certificate request and save it as ws08_ndes_xchg.req. Please review the sample ws08_ndes_xchg.inf file for more information on the switches in the command line above.
Next, run the following command:
certreq –submit ws08_ndes_xchg.req ws08_ndes_xchg.cer
You will be prompted to select to which CA the request should be submitted. Once that is done, the request will be submitted and the issued certificate will be retrieved and saved as ws08_ndes_xchg.cer.
Finally, run the following command:
certreq –accept ws08_ndes_xchg.cer
This command import the new certificate and move it into the Local Computer Personal store.
Figure 2 below shows the command described above and the expected output.
![clip_image001[6]](https://msdntnarchive.z22.web.core.windows.net/media/TNBlogsFS/BlogFileStorage/blogs_technet/askds/WindowsLiveWriter/ConfiguringNetworkDeviceEnrollmentServic_BF80/clip_image001%5B6%5D.jpg)
Figure 2
You can now run the following command to verify that both certificates have been installed in the Local Computer Personal store:
certutil -store My %COMPUTERNAME%-MSCEP-RA
The output should look similar to the following:
My ================ Certificate 0 ================ Serial number: 6148326f0000000000004 Issuer: CN=corp-WS08SRV02-CA, DC=corp, DC=contoso, DC=com NotBefore: 3/22/2008 2:33 PM NotAfter: 3/22/2010 2:33 PM Subject: CN=WS08SRV03-MSCEP-RA, OU=Accounting, O=Contoso, L=Redmond, S=Washington, C=US Certificate Template Name (Certificate Type): EnrollmentAgentOffline Non-root Certificate Template: EnrollmentAgentOffline, Exchange Enrollment Agent (Offline Request) Cert Hash(sha1): fc 09 33 fb 72 cc 0d 51 0d 42 ff 08 4f 18 ea 79 c1 f2 85 85 Key Container = Certreq-EnrollmentAgentOffline-5090c814-cc5b-45c4-b9cd-7b87db7ff38b Unique Container Name: 8672d6c619559d9466ab1f1de69e5c80_33b038e1-2695-46eb-97b7-6eafe8518f17 Provieer = Microsoft Enhanced Cryptographic Provider v1.0 Signature test passed ================ Certificate 1 ================ Serial number: 6148326f0000000000005 Issuer: CN=corp-WS08SRV02-CA, DC=corp, DC=contoso, DC=com NotBefore: 3/22/2008 2:48 PM NotAfter: 3/22/2010 2:48 PM Subject: CN=WS08SRV03-MSCEP-RA, OU=Accounting, O=Contoso, L=Redmond, S=Washington, C=US Certificate Template Name (Certificate Type): CEPEncryption Non-root Certificate Template: CEPEncryption, CEP Encryption Cert Hash(sha1): a5 6e 8c 36 76 a3 cb 5d d9 bb 7b 23 bd e7 ef da 65 0a 8c 9a Key Container = Certreq-CEPEncryption-32a4aa85-182f-49a4-93a2-8e359ee8048f Unique Container Name: a6dd6175f9ff03e39a787aeb02a2d5a7_33b038e1-2695-46eb-97b7-6eafe8518f17 Provieer = Microsoft RSA Schannel Cryptographic Provider Encryption test passed Certutil: -store command completed successfully. |
Next, the permissions on the private keys files will need to be modified to permit the MSCEP RA service account to access the associated key material.
Windows Server 2008 now makes it easier to manage permissions on private keys through the Certificates snap-in. Once the new NDES RA certificates have been installed, the Administrator needs to grant access to the associated private keys to the MSCEP RA service account.
To grant the MSCEP RA access to the private keys, follow these steps:
1. Open the Certificates MMC snap-in focused on the Local Computer.
2. Open the Personal store, and select the CEP Encryption certificate issued to the MSCEP RA.
3. Right-click on the certificate, select All Tasks from the context menu, and then select Manage Private Keys... as in Figure 3 below.

Figure 3
4. This will launch the ACL Editor.
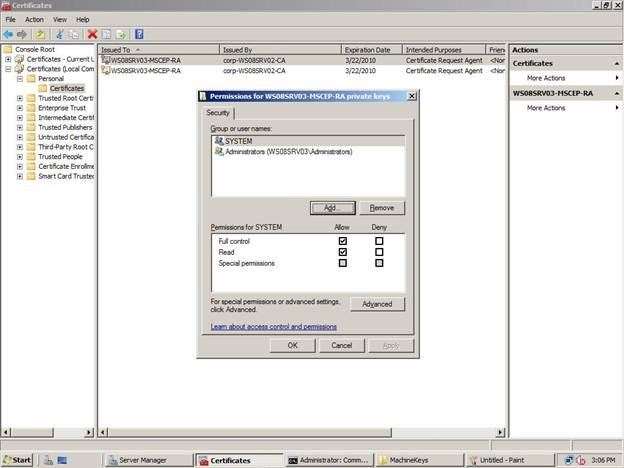
Figure 4
5. Click Add, and select the NDES service account created prior to installing the NDES role.
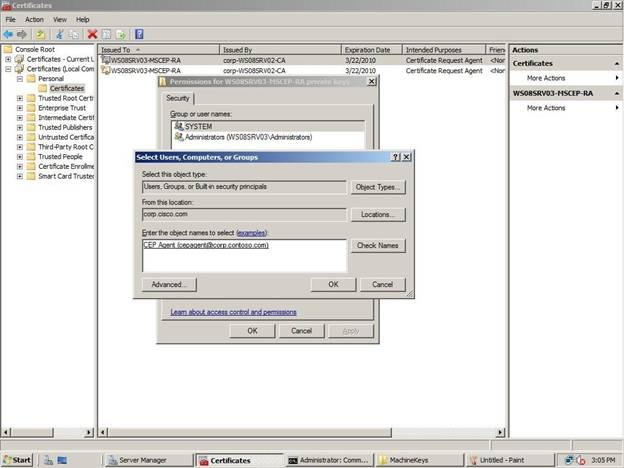
6. Click Ok.
7. Verify that the NDES service account has full control over the key, and then click Ok.
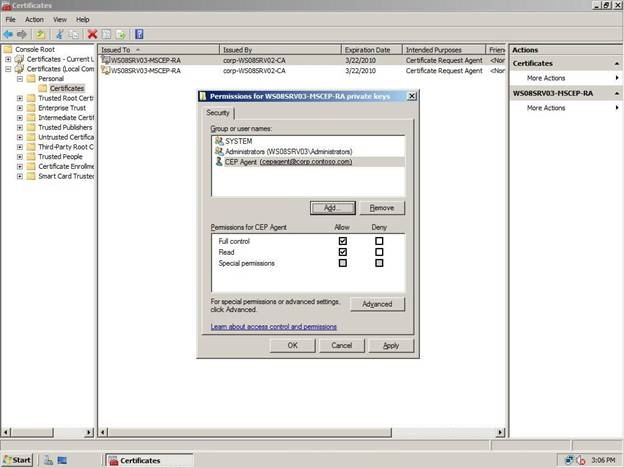
Figure 5
Repeat this process with the Exchange Enrollment Agent certificate issued to the MSCEP RA account.
Once all the above steps have been complete, reset the IIS service on the NDES server. To do this, launch the command prompt and run iisreset.exe. The NDES service is now ready to accept device administrator password requests as well as SCEP enrollment requests from the network devices.
At this point the device administrator should attempt an SCEP enrollment from a network device to verify that the NDES service is configured correctly.
To obtain the SCEP password, the device administrator uses Internet Explorer to go to the following site:
https://<servername>/certsrv/mscep_admin
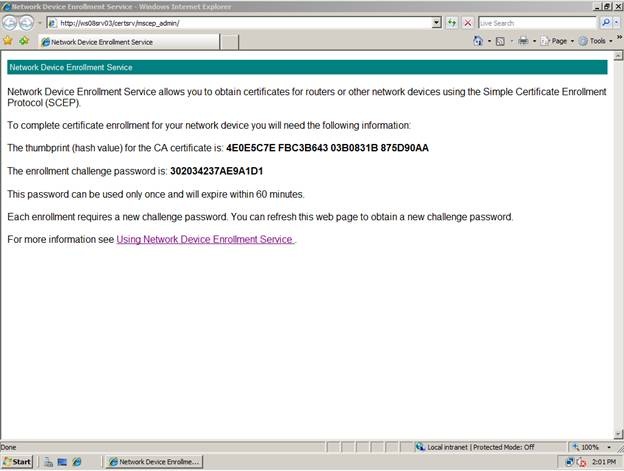
Figure 6
With the password in hand, the device administrator configures the network device with the password and the enrollment site in order for the device to enroll for the certificate. The enrollment site is:
https://<servername>/certsrv/mscep
If enrollment succeeds the NDES service is configured correctly.
The goal of this document was to replace the non-exportable certificates and keys generated during the install of the Network Device Enrollment Service role with new certificates that are exportable. The server administrator should now take steps to export the CEP Encryption and Enrollment Agent certificates issued to the MSCEP RA so that they can be imported on another server as needed.
- Jonathan Stephens
Anonymous
February 26, 2009
Unfortunately this is not working for me: in the default configuration of Server 2008 "Microsoft RSA Schannel Cryptographic Provider" is not allowed for CEPEncryption. I changed it to the "Microsoft Enhanced Cryptographic Provider v1.0" (which is allowed for this template). The certificates are fine, and installed in the right store. NDES is unable to start. The eventlog reveals the following: The Network Device Enrollment Service cannot retrieve one of its required certificates (0x80070057). The parameter is incorrect. The Network Device Enrollment Service cannot be started (0x80004005). Unspecified error Maybe someone can help me out here. Thanks in advance Greetings MMFAnonymous
March 06, 2009
If someone is interested, how the drama continues: http://social.technet.microsoft.com/Forums/en/winservergen/thread/b46a637b-2401-4e32-aaa0-cce5e09b6f81