Journey to the Kubernetes from Legacy docker environment on Azure with VSTS
Personally, I'd like to see what happens if I migrate from a docker based legacy system into Kubernetes. For this purpose, I migrate a small legacy system to a Kubernetes cluster with VSTS.
Since this is on the public repo, your can reproduce this step by yourself. I'd like to share the obstacles and solutions.
Overview
I chose PartsUnlimitedMRP project. It is widely used for HoL and demos for DevOps. It is the Java based application which has three services. It is not like Hello World stuff. A Little bit complicated. The structure is like this. Also, it supports Docker HoL. Using this document, I'll try to migrate from Plain Old Docker environment to Kubernetes cluster with CI / CD pipeline. I hope you enjoy this.
Web frontend -> Order(API) -> MongoDB
However, I don't know about the source code. I've never read the actual code base. Someone create this repo, and you need to migrate it. It happens a lot in an actual project, right? Let's try!
1. Creating A cluster using Azure Container Engine
First of all, we need to create Kubernetes Cluster to migrate. We have several ways to this. For example, you can do it via Portal. However, if you want to re-create the cluster, I'd like to recommend to use Azure Container Engine.
Install acs-engine command
1. ACS Engine Install
2. Prepare SSH keys and Service Principle
Now you are ready to create a k8s cluster.
You fill kubernetes.json. Then create an ARM template and a parameter file.
$ acs-engine ./kubernetes.json
You will find these directories and files. The directory name will be changed.
 $ tree _output
_output
└── Kubernetes-11198844
 ├── apimodel.json
 ├── apiserver.crt
 ├── apiserver.key
 ├── azuredeploy.json
 ├── azuredeploy.parameters.json
 ├── ca.crt
 ├── ca.key
 ├── client.crt
 ├── client.key
 ├── kubeconfig
 │   ├── kubeconfig.australiaeast.json
 │   ├── kubeconfig.australiasoutheast.json
 │   ├── kubeconfig.brazilsouth.json
 │   ├── kubeconfig.canadacentral.json
 │   ├── kubeconfig.canadaeast.json
 │   ├── kubeconfig.centralindia.json
 │   ├── kubeconfig.centralus.json
 │   ├── kubeconfig.eastasia.json
 │   ├── kubeconfig.eastus.json
 │   ├── kubeconfig.eastus2.json
 │   ├── kubeconfig.japaneast.json
 │   ├── kubeconfig.japanwest.json
 │   ├── kubeconfig.northcentralus.json
 │   ├── kubeconfig.northeurope.json
 │   ├── kubeconfig.southcentralus.json
 │   ├── kubeconfig.southeastasia.json
 │   ├── kubeconfig.southindia.json
 │   ├── kubeconfig.uksouth.json
 │   ├── kubeconfig.ukwest.json
 │   ├── kubeconfig.westcentralus.json
 │   ├── kubeconfig.westeurope.json
 │   ├── kubeconfig.westindia.json
 │   ├── kubeconfig.westus.json
 │   └── kubeconfig.westus2.json
 ├── kubectlClient.crt
 └── kubectlClient.key

2 directories, 35 files
ushio@DESKTOP-5T7P7BA:/mnt/c/Users/tsushi/Codes/k8s$
Deploy the cluster to Azure. If you don't have Azure CLI 2.0 preview, please install it. This is an example to deploy with the japaneast region.
 $ az login
$ az group create --name "k8sdev" --location "japaneast"
$ az group deployment create --name "k8sdeploy" --resource-group "k8sdev" --template-file "./_output/Kubernetes-11198844/azuredeploy.json" --parameters "@./_output/Kubernetes-11198844/azuredeploy.parameters.json"
Wait about 6-10 min. The cluster will be deployed unless you have some error for kubernetes.json.
2. Service Discovery
I guess the current Docker-based application is like this. I guessed only the web frontend should be exposed to the internet.
--> (Port 80) Web frontend --> (Port 8080) Order(API) -> (Port 20170) MongoDB
According to the HoL Document, we can deploy the PartsUnlimitedMRP by this command.
 docker run -d -p 27017:27017 --name mongodb -v /data/db:/data/db mongodb
docker run -d -p 8080:8080 --link mongodb:mongodb partsunlimitedmrp/orderservice
docker run -it -d --name web -p 80:8080 mypartsunlimitedmrp/web
This configuration uses ` --link` option. However, we can't define it in Kubernetes. Kubernetes deploy by a Pod. Also, one of the problems is How web front finds the IP address of orderservice. We need to sort out this issue.
When I read the code, I found the serverconfig.js which include the order service IP address.
serverconfig.js
var baseAddress = 'https://' + window.location.hostname + ':8080'
Obviously, it won't work. It requires the web front and order works on the same (VM)node. On the kubernetes world, we don't need care about which node the pod has been deployed.
I need to override this configuration. However, I need to change only for this file. Also, the PartsUnlimitedMRP is a public repository. I just play with this. In this case, it is not relevant to send a pull request for the project.
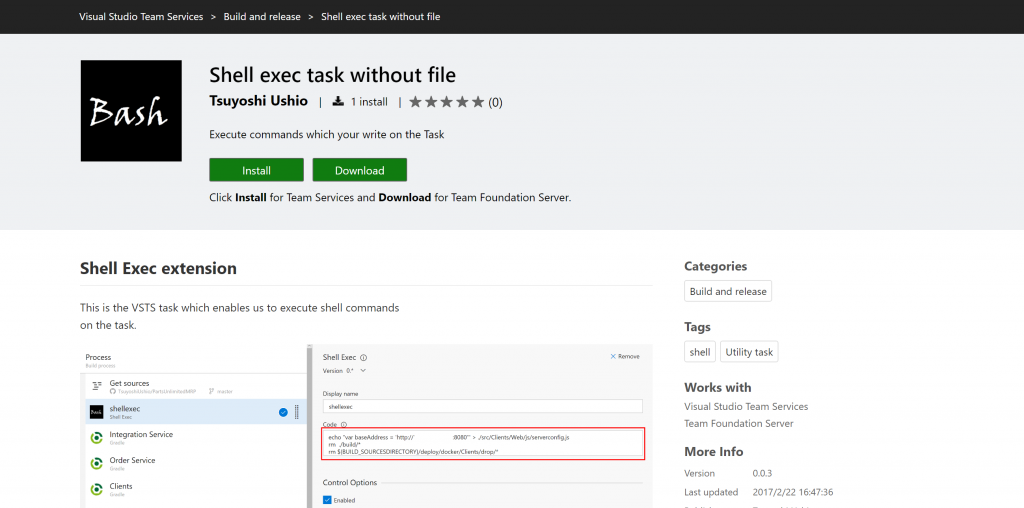
That is why I quickly develop a VSTS task which enables us to execute command without adding a file.
Now you can replace the IP address with the order service.
Using this task, I re-write this file this.
var baseAddress = 'https://order:8080'
I thought this should have worked. The kubernetes has a functionality of Service Discovery.
I already had a build pipeline. It builds docker images and push to the DockerHub(private).
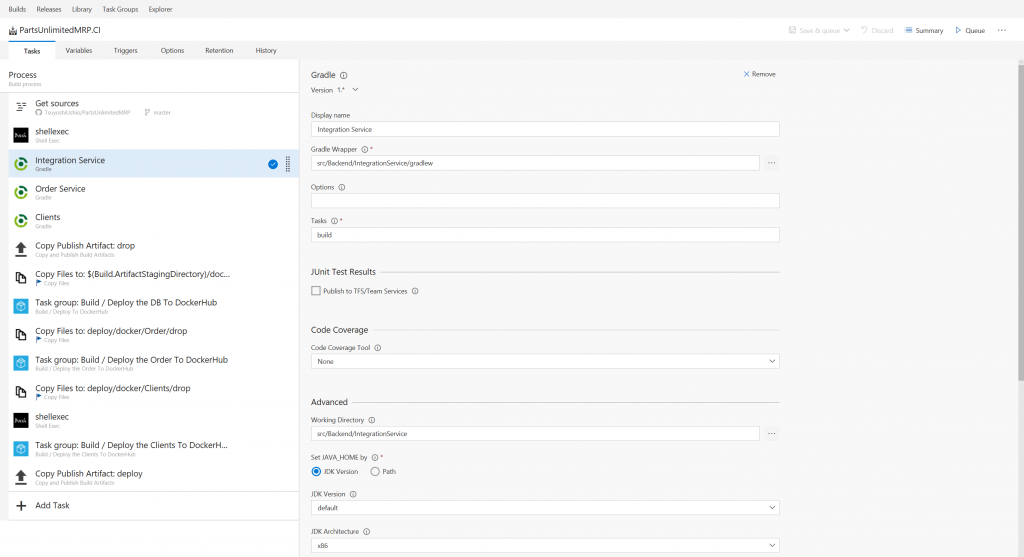
I'll write the whole configuration of Build pipeline for you.
GitHub:
https://github.com/Microsoft/PartsUnlimitedMRP.git
Shell Exec
Replace the DNS name for the order. Also, I remove some files. According to the repo, it already includes war/jars. It is confusing. I remove it before new build start. Also ` ./deploy/docker/Client/drop` has a file `PUT YOUR WAR FILE HERE`. It is just a direction. Remove it.
 Task: Shell Exec

Display Name: ShellExec
Code:
echo "var baseAddress = 'https://order:8080'" > ./src/Clients/Web/js/serverconfig.js
rm ./build/*
rm ${BUILD_SOURCESDIRECTORY}/deploy/docker/Clients/drop/*
Integration Service
NOTE: This time, I don't use Integration service. However, according to the document of PartsUnlimited,
I build this.
 Task: Gradle

Display name: Integration Service
Gradle Wrapper: src/Backend/IntegrationService/gradlew
Options:
Tasks: build
(Advanced)
Working Directory: src/Backend/IntegrationService
Set JAVA_HOME by: JDK Version
JDK version: default
JDK architecture: x86
Set GRADLE_OPTS: -Xmx1024m
Order Service
Build and Test Order Service. This builds the jar file.
 Task: Gradle

Display name: Order Service
Gradle Wrapper: src/Backend/OrderService/gradlew
Options:
Tasks: build test
(JUnit Test Results)
Publish To TFS/Team Services: check
Test Result Files: **/build/test-results/TEST-*.xml
(Advanced)
Working Directory: src/Backend/OrderService
Set JAVA_HOME by: JDK Version
JDK version: default
JDK architecture: x86
Set GRADLE_OPTS: -Xmx1024m
Clients
Build Web front. This builds war file.
 Task: Gradle

Display name: Clients
Gradle Wrapper: src/Clients/gradlew
Options:
Tasks: build
(Advanced)
Working Directory: src/Clients
Set JAVA_HOME by: JDK Version
JDK version: default
JDK architecture: x86
Set GRADLE_OPTS: -Xmx1024m
Copy and Publish Build Artifact: drop
Copy jar/war file into drop folder.
 Task: Copy Publish Artifact: drop

Display name: Copy Publish Artifact: drop
Copy Root: $(Build.SourcesDirectory)
Contents: **/build/libs/!(buildSrc)*.?ar
Artifact Name: drop
Artifact Type: server
Copy Files to: Copy Files to: $(Build.ArtifactStagingDirectory)/docker
This task copies the artifact into artifact directory.
 Task: Copy Files

Display name: Copy Files to: $(Build.ArtifactStagingDirectory)/docker
Source Folder: deploy/docker
Contents: **
Target Folder: $(Build.ArtifactStagingDirectory)/docker
(Advanced)
Clean Target Folder: check
Task group: Build / Deploy the DB to DockerHub
I'll explain it later.
Copy Files to: deploy/docker/Order/drop
Copy the jar file to the deploy/docker/Order/drop. According to the code,
You need to copy your jar file into deploy/docker/Order/drop folder.
The docker file for order will include the jar file.
This structure is not useful for automating the docker build. However, welcome to the legacy world.
It could happen in real world. I just follow and automate this procedure. When it works, we can refactor it.
 Task: Copy Files

Display name: Copy Files to: deploy/docker/Order/drop
Source Folder:
Contents: **/order*.jar
Target Folder: deploy/docker/Order/drop
(Advanced)
Flatten Folders: check
Unless flatten folders, order*.jar file will copy with the directory structure.
Task group: Build / Deploy the Order to DockerHub
I'll explain it later.
Copy Files to deploy/docker/Clients/drop
Copy war file into deploy/docker/Client/drop directory. The docker file also pack it on your web front image.
 Task: Copy Files

Display name: Copy Files to: deploy/docker/Clients/drop
Source Folder: $(Build.SourcesDirectory)
Contents: **/Clients/build/libs/mrp.war
Target Folder: deploy/docker/Clients/drop
Flatten Folders: check
Task group: Build / Deploy the Clients To DockerHub
I'll explain it later.
Copy Publish Artifact: deploy
This task share some script to the Release Management. I can remove these, however, at the first step, I just follow the instruction of the doc. I think we don't need it in the future.
 Task: Copy and Publish Build Artifacts

Display name: Copy Publish Artifact: deploy
Copy Root: $(Build.SourcesDirectory)
Contents:
**/deploy/SSH-MRP-Artifacts.ps1
**/deploy/deploy_mrp_app.sh
**/deploy/MongoRecords.js
Artifact Name: deploy
Artifact Type: Server
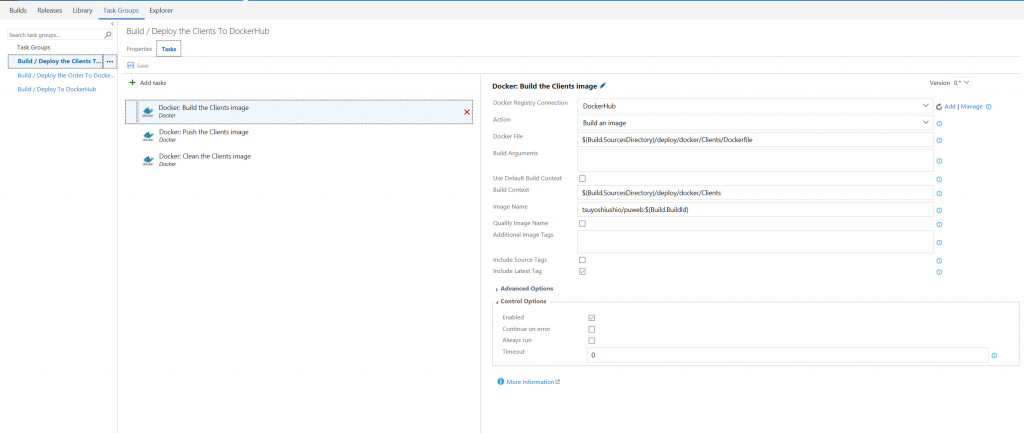
If you want to create a group by several task step, you can do it using Task Group feature. You can see the task group at the Task Group Tab. I'll show the detail of the task groups.
If you can't find the docker task, you can install it via the MarketPlace.
Docker Integration
Docker: Build the Clients image
This task builds a docker image. You need to add an Endpoint of DockerHub or Azure Container Registry. Just click the Add link. Then you can configure the endpoint. I just add my DockerHub account information.
I created an endpoint called `DockerHub`.
 Task: Docker

Docker Registry Connection: DockerHub
Action: Build an image
Docker File: $(Build.SourcesDirectory)/deploy/docker/Clients/Dockerfile
Build Content: $(Build.SourcesDirectory)/deploy/docker/Clients
Image Name: tsuyoshiushio/puweb:$(Build.BuildId)
Include Latest Tag: check
```
You need to check `Include Latest Tag`. Unless it, your image can't deploy
without specifying the version number.
Docker: Push the Clients image
 Task: Docker

Docker Registry Connection: DockerHub
Action: Push an image
Image Name: tsuyoshiushio/puweb:$(Build.BuildId)
Include Latest Tag: check
You also need `Include Latest Tag` for a push task.
Docker: Clean the Clients Image
Clean up
 Task: Docker

Docker Registry Connection: DockerHub
Action: Run a Docker command
Command: rmi -f tsuyoshiushio/puweb:$(Build.BuildId)
This is almost the same as 2.4.1. I'll show you a just difference.
Docker: Build the Order image
 Task: Docker

Docker Registry Connection: DockerHub
Action: Build an image
Docker File: $(Build.SourcesDirectory)/deploy/docker/Order/Dockerfile
Build Content: $(Build.SourcesDirectory)/deploy/docker/Order
Image Name: tsuyoshiushio/puorder:$(Build.BuildId)
Include Latest Tag: check
Docker: Push the Order image
 Task: Docker

Docker Registry Connection: DockerHub
Action: Push an image
Image Name: tsuyoshiushio/puorder:$(Build.BuildId)
Include Latest Tag: check
You also need `Include Latest Tag` for a push task.
Docker: Clean the Order Image
Clean up
 Task: Docker

Docker Registry Connection: DockerHub
Action: Run a Docker command
Command: rmi -f tsuyoshiushio/puorder:$(Build.BuildId)
This is almost the same as 2.4.1. I'll show you a just difference.
Docker: Build the DB image
 Task: Docker

Docker Registry Connection: DockerHub
Action: Build an image
Docker File: $(Build.SourcesDirectory)/deploy/docker/Database/Dockerfile
Build Content: $(Build.SourcesDirectory)/deploy/docker/Database
Image Name: tsuyoshiushio/pudb:$(Build.BuildId)
Include Latest Tag: check
Docker: Push the DB image
 Task: Docker

Docker Registry Connection: DockerHub
Action: Push an image
Image Name: tsuyoshiushio/pudb:$(Build.BuildId)
Include Latest Tag: check
You also need `Include Latest Tag` for a push task.
Docker: Clean the Clients Image
Clean up
 Task: Docker

Docker Registry Connection: DockerHub
Action: Run a Docker command
Command: rmi -f tsuyoshiushio/pudb:$(Build.BuildId)
Now you can ready for Continuous Integration! Also, we can build docker images by VSTS and push images to DockerHub(private).
Now you can experiment Kubernetes for Service Discovery.
You need to create `secret` if you want to connect private Docker repo. This is for DockerHub. It is similar to Azure Container Registry's procedure.
I use `mrp` namespace. However, if you don't like it. Please remove it.
kubectl create secret docker-registry mydockerhubkey --docker-server=https://index.docker.io/v1/ --docker-username={YOUR DOCKER HUB USERNAME} --docker-password={YOUR DOCKER HUB PASSWORD} --docker-email={YOUR E-MAIL} --namespace mrp
We can include containers on a pod. Also, we can create a separate pod for each container. If you include several containers on a pod, it helps to reduce the network access latency. Each container between a pod, they are deployed on the same node. Containers need to communicate localhost or pod name with a different port number.
PartsUnlimited requires Service Discovery for Order and Mongo container. Web Front and Order should be accessible from the internet. However, Mongo should be accessible only by Kubernetes cluster.
If you want to expose your pod, you need to create a service. If you create a service with ` --type LoadBalancer`
k8s automatically create L4 Load Balancer and external IP. If you want to access by a name from a k8s internal cluster, you also need to create a service for a pod without ` --type LoadBalancer`. In this case, you can access Mongo Pod via Mongo Service. You can ping it from other pods like this.
 $ ./kubectl exec busypod -i -t /bin/sh --namespace mrp
/ # ping mongo
PING mongo (10.244.3.25): 56 data bytes
64 bytes from 10.244.3.25: seq=0 ttl=64 time=0.121 ms
64 bytes from 10.244.3.25: seq=1 ttl=64 time=0.050 ms
64 bytes from 10.244.3.25: seq=2 ttl=64 time=0.066 ms
For these external services, you need to add DNS name for the IP. It should be a ReservedIP.
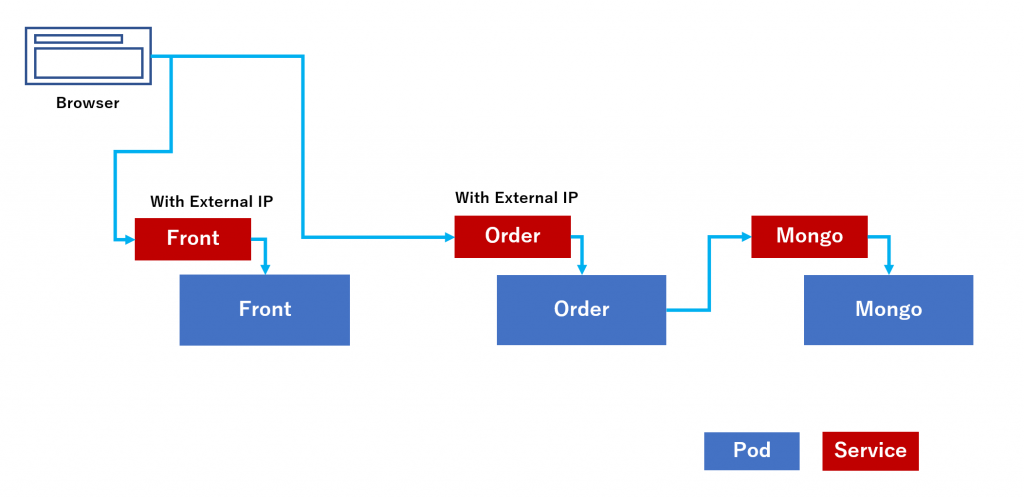
Let's deploy services and pods.
3. deployment
Kubernetes using YAML file to deploy resources. I share the whole YAML file via GitHub.
Journey to the Kubernetes cluster from Plain Docker environment
For the front web, you need to expose pod (include containers) to the internet.You can see the whole YAML file in here K8sJourney/partsunlimitedmrp.yaml.
The point is, you need to specify LoadBalancer for spec: type:. It will expose your service to the internet.
partsunlimitedmrp.yaml
 apiVersion: v1
kind: Service
metadata:
 name: "front"
 namespace: mrp
 labels:
 app: "front"
spec:
 selector:
 app: "front"
 type: LoadBalancer
 ports:
 - port: 80
 targetPort: 8080
 protocol: TCP
 name: http
You can see this code in here
In this YAML file, I download `tsuyoshiushio/puweb` images with a version from DockerHub. The version is ` ${BUILD_BUILDID} `.
This is the reserved environment variable of VSTS which is the build number.
You need to imagePullSecrets which I mentioned at 2.5. Prepare to get images from Private DockerHub. You need this to get private images from DockerHub or other private Docker repositories.
  :

spec:
 containers:
 - name: "front"
 image: index.docker.io/tsuyoshiushio/puweb:${BUILD_BUILDID}
 imagePullPolicy: Always
 ports:
 - containerPort: 8080

 :

 imagePullSecrets:
 - name: mydockerhubkey
You can see the whole YAML file in here.
  :
---
apiVersion: extensions/v1beta1
kind: Deployment
metadata:
 name: "order"
 namespace: mrp
spec:
 replicas: 1
 strategy:
 type: RollingUpdate
 template:
 metadata:
 labels:
 app: "order"
 spec:
 containers:
 - name: "order"
 env:
 - name: MONGO_PORT
 value: tcp://mongo:27017
 image: index.docker.io/tsuyoshiushio/puorder:${BUILD_BUILDID}
 imagePullPolicy: Always
 ports:
 - containerPort: 8080
 imagePullSecrets:
 - name: mydockerhubkey
Original Docker configuration is like this. They use ` --link` option to connect another container. But how can we implement ` --link` for Kubernetes.
 docker run -d -p 27017:27017 --name mongodb -v /data/db:/data/db mongodb
docker run -d -p 8080:8080 --link mongodb:mongodb partsunlimitedmrp/orderservice
When I read the PartsUnlimited, you can see some configuration related this.
PartsUnlimitedMRP/src/Backend/OrderService/src/main/resources/application.properties
 mongodb.host: localhost
mongodb.database: ordering
By default, it is for localhost. Oh no. Don't worry, I found this code, too.
PartsUnlimitedMRP/src/Backend/OrderService/src/main/java/smpl/ordering/OrderingConfiguration.java
  String mongoPort = System.getenv("MONGO_PORT"); // Anticipating use within a docker container.

if (!Utility.isNullOrEmpty(mongoPort))
 {
 URL portUrl = new URL(mongoPort.replace("tcp:", "http:"));
 mongoHost = portUrl.getHost();
 }
As you can see, they get Mongo Host and Mongo Port form `MONGO_PORT` environment variables. When you use ` --link` option, Docker automatically creates Environment Variables on the container. In this case, partsulimitedmrp/orderservice container has environment variables like below. You can see this article. Link environment variables (superseded).
NOTE: this environment variables strategy of Docker `--link` are not recommended now. It could happen for a legacy application.
 name_PORT
name_PORT_num_protocol
name_PORT_num_protocol_ADDR
name_PORT_num_protocol_PORT
name_PORT_num_protocol_PROTO
name_NAME
Using this Environment variables, OrderingConfiguration tries to connect mongo container. So that you need this section.
  env:
 - name: MONGO_PORT
 value: tcp://mongo:27017
Now you can see whole YAML file on the K8s Journey repo. Let's create release pipeline.
4. Release
Let's create a release pipeline by VSTS. It is so easy.
Put your YAML file on your VSTS private repository with kubectl binary. You can download a kubectl binary from Installing and Setting up kubectl. You can refer to the K8s Journey repo. You just include these files into your private repo. Don't forget `chmod +x kubectl`. Kubectl requires exec privilege for executing. You can use it on Linux machine or Bash on Ubuntu on Windows.
You can create mongo YAML. If you deploy it manually, this will be like this.
$ kubectl create -f partsunlimiteddb.yaml
Then you can see the results
 $ kubectl get pods --namespace mrp
NAME READY STATUS RESTARTS AGE
mongo-1566769523-41d02 1/1 Running 0 3d

$ ./kubectl get services --namespace mrp
NAME CLUSTER-IP EXTERNAL-IP PORT(S) AGE
mongo None <none> 27017/TCP,28017/TCP 3d
If you want to test something for Mongo container, you can deploy mongo client. If you are interested, I include the mongoclient yaml in here.
According to the direction of PartsUnlimited, we need to install initial data like this.
 #Run your docker images manually on the server
docker run -it -d --name db -p 27017:27017 -p 28017:28017 mypartsunlimitedmrp/db
docker run -it -d --name order -p 8080:8080 --link db:mongo mypartsunlimitedmrp/order
#Feed the database
docker exec db mongo ordering /tmp/MongoRecords.js
Let's do the same thing on the kubernetes. `kubectl` command support `exec` subcommand. mongo-1566769523-41d02 is the pod name. you can get it by `kubectl get pods`
$ docker exec mongo-1566769523-41d02 --namespace mrp -- mongo ordering /tmp/MongoRecords.js
You can use the same technique for debugging. If you have some problem, you can login to the container. If you have a problem, you can deploy pod then login into the container. It will help to solve a problem.
 $ kubectl exec mongo-1566769523-41d02 --namespace mrp -i -t /bin/bash
root@mongo-1566769523-41d02:/# ls
bin data entrypoint.sh home lib64 mnt proc run srv tmp var
boot dev etc lib media opt root sbin sys usr
Also, you can use `kubectl log` to see logs.
 $ kubectl logs mongo-1566769523-41d02 --namespace mrp
2017-02-20T03:44:17.211+0000 I CONTROL [main] ** WARNING: --rest is specified without --httpinterface,
2017-02-20T03:44:17.211+0000 I CONTROL [main] ** enabling http interface
2017-02-20T03:44:17.216+0000 I CONTROL [initandlisten] MongoDB starting : pid=1 port=27017 dbpath=/data/db 64-bit host=mongo-1566769523-41d02
 :
`kubectl describe pod` for detail status for a pod.
 $ kubectl describe pod mongo-1566769523-41d02 --namespace mrp
Name: mongo-1566769523-41d02
Namespace: mrp
Node: k8s-agentpool1-11198844-2/10.240.0.6
Start Time: Mon, 20 Feb 2017 12:44:13 +0900
Labels: app=mongo
 pod-template-hash=1566769523
 tier=mongo
Status: Running
IP: 10.244.3.25
Controllers: ReplicaSet/mongo-1566769523
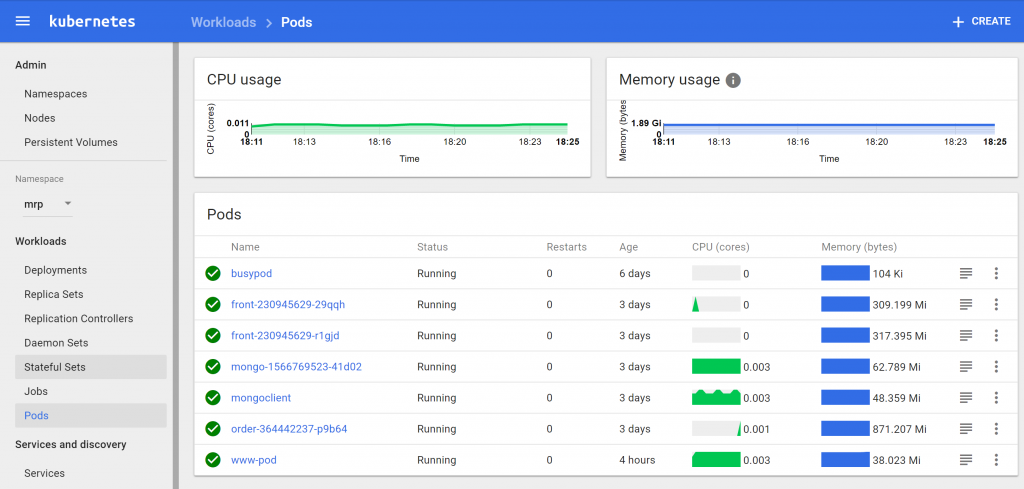
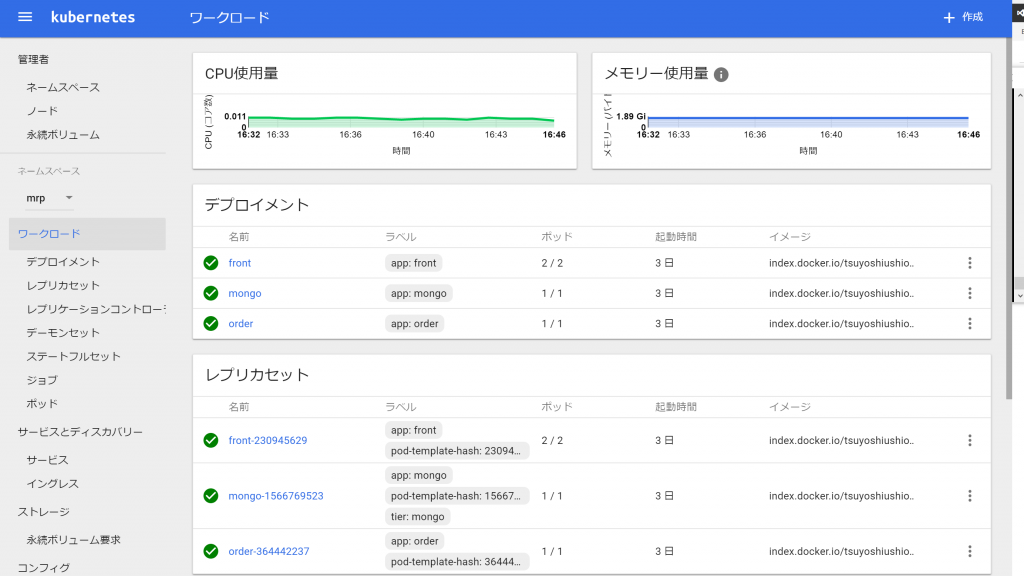
The most convenient tool will be the GUI based managed console.
$ kubectl proxy
Then access `https://localhost:8001/ui` You can see every information of kubernetes.
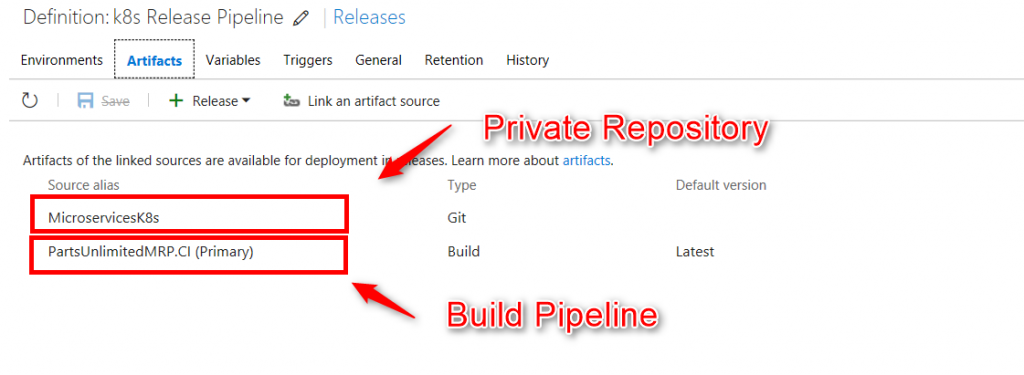
This release pipeline mainly links to the Build Pipeline. As you can see, this pipeline link several artifacts. One is the Build pipeline; the other is the VSTS private repository which includes YAML and kubectl binary.
Let's see the pipeline. I am pickup only for web front deployment. However, it is totally the same for order service.
I recommend separating the release pipeline. The deploy timing is not the same between web front and order.
I'll share the detail configuration.
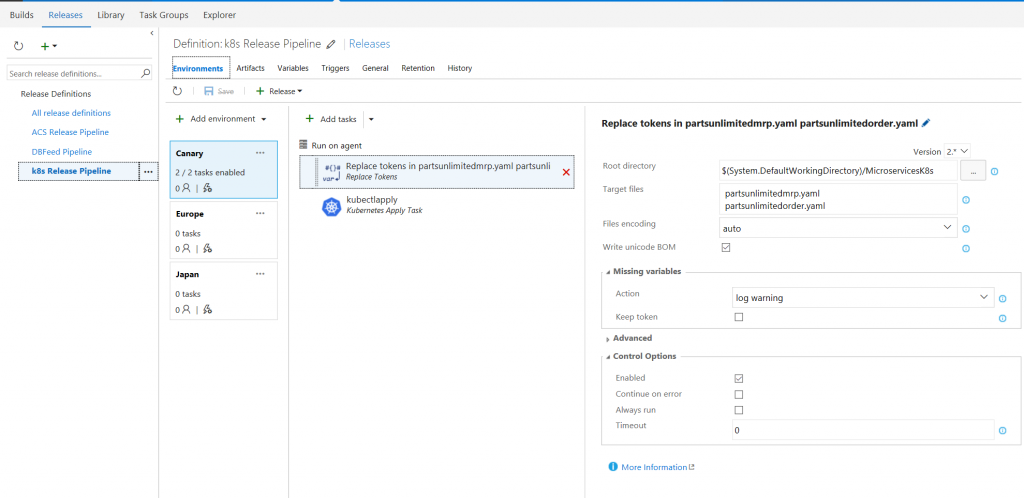
Replace tokens in partsunlimitedmrp.yaml
YAML file includes ` ${BUILD_BUILDID} ` This is not the kubernetes syntax. This is for Replace Tokens task.
YAML file is static. You can't use variables inside the YAML file. A lot of people re-write YAML files to fill it by environment variables. For this purpose, a lot of project uses Ansible. However, this usage is too small for Ansible. Instead, you can use Replace Tokens tasks. Or `kubectl set config` command.
This time, I use Replace Tokens task which you can find via Market Place.
If you link the release pipeline with a build pipeline, you can refer some build pipeline environment variables
like, build id like this.
image: index.docker.io/tsuyoshiushio/puorder:${BUILD_BUILDID}
You might want to tie the build artifacts and release artifacts. However, you use DockerHub, after you push it to the repository, how can you get the version? Using release management, you can get it from the version.
This case I use BUILD_BUILDID. When you fire Release, you can choose the build for deploy. It will automatically
change the version number(BUILD_BUILDID). This time `MicroservicesK8s` is my private repository. It is the same as the K8s Journey repo.
 Task: Replace Tokens

Root directory: $(System.DefaultWorkingDirectory)/MicroservicesK8s
Target files:
partsunlimitedmrp.yaml
partsunlimitedorder.yaml
File encoding: auto
Write unicode BOM: check
(Missing Variables)
Action: log warning
kubectlapply
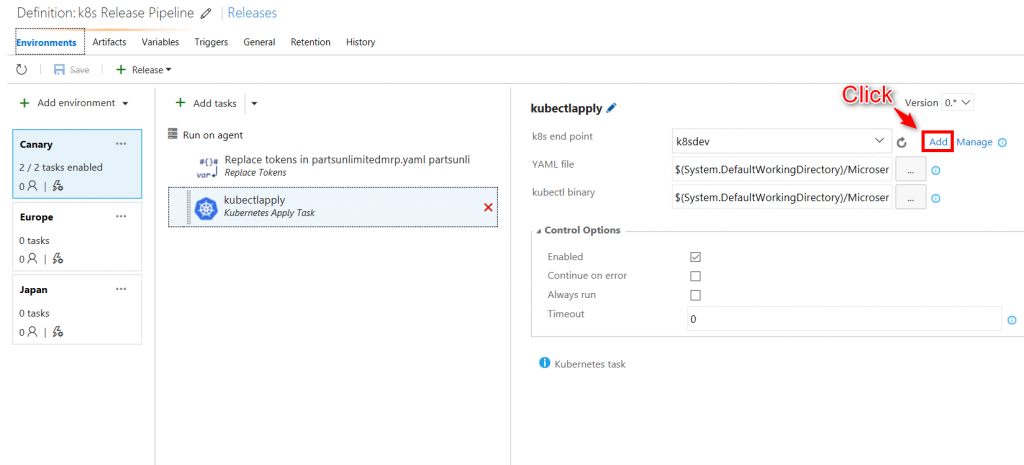
You can use `kubectl apply` command for Rolling update your container. I wrote a task of Kubernetes Task. You can find it via VSTS MarketPlace.
Before using Kubernetes Task, you need to set up k8s endpoint. You can see find the instruction in the link 5. How to use.
 Tasks: Kuberrnetes Apply Task

k8s end point: k8sdev
YAML file: $(System.DefaultWorkingDirectory)/MicroservicesK8s/partsunlimitedmrp.yaml
kubectl binary: $(System.DefaultWorkingDirectory)/MicroservicesK8s/kubectl
This task is just execute
$ kubectl apply -f $(System.DefaultWorkingDirectory)/MicroservicesK8s/partsunlimitedmrp.yaml
You can choose the yaml by the ` ... ` button.
5. Monitoring
Using OMS, you can easy to Monitor your container.
You can read and try Monitor an Azure Container Service cluster with Microsoft Operations Management Suite (OMS)
Just create OMS account and deploy YAML file for OMS. That's it. Just wait for 10 min, you can get the data.
You can monitor and log search by this solution.
Next step
If you want to have SSL offloading, you can use Nginx Ingress Controller. I tried and worked very well. :)
https://github.com/kubernetes/ingress/tree/master/examples/deployment/nginx https://github.com/kubernetes/contrib/blob/master/ingress/controllers/nginx/examples/tls/README.md
Reference
You can find a reat HoL for the continuous delivery for Kubernetes using VSTS by David Teser.
- Anonymous
February 27, 2017
You used Nginx Ingress Controller in Azure Container Services? How did you do it?I tried setup this in my acs environment, but i'm not had sucess- Anonymous
February 28, 2017
Yes. I did. The repo has been changed. I haven't tried new repo. however, you can see this. Just clone the repo and follow the instruction. Also, you'll need to expose your nginx-ingress-controller's pod using kubectl expose command with --type LoadBalancer option. https://github.com/kubernetes/ingress/tree/master/examples/deployment/nginx- Anonymous
February 28, 2017
I tried with your instructions.. The ingress controller was configured, and exposed.I used the files in this repository ( i got it this files in sample for udemy) https://github.com/julioarruda/teste, but my ingress do not bind ip adress, well is not found in curl for example...in this repo, have prints with my environment...Can i help me?- Anonymous
February 28, 2017
I wrote a blog for you. :) just expose it. https://blogs.technet.microsoft.com/livedevopsinjapan/2017/02/28/configure-nginx-ingress-controller-for-tls-termination-on-kubernetes-on-azure-2/
- Anonymous
- Anonymous
- Anonymous
- Anonymous
February 27, 2017
The comment has been removed- Anonymous
February 28, 2017
public key is not like this. If you generate by _Key Generator, push Actions > Generate then you'll see it on "Public key for pasting into Open SSH authorized keys file." text area. If you save the public key, you'll get the -- BEGIN SSH PUBLIC KEY -- ... format. ssh-rsa AAAAB3NzaC1yc2EAAAABJQAAAQEAvbOHcMwtSDFDFSHHHHGKDKKKkddsjv6uyQkdqR+/mhjnFi04iFCasdfasdfasdfasbaaabsdajm7SZREDmaSM6WbQmd/55Mvgjx+QUfkhMg52mtKrpKbRbdxs64hast+LVakdGUMJB0NNlpBXcwzGMx35zuEU/gfXpvX0Tx2ZX6UsiggPwqdNv7VX+5hdxkuvklDS8XIv+ICPDHZvHI+k5UlLGNZbKMSDFSDLLL4ozIo28m0VGWgG0+F5A47aerjz4ZREU/i4Z9R6OOZlHSfZaBiK0U7Q== rsa-key-20170228- Anonymous
February 28, 2017
Also, you can use Bash on Ubuntu on Windows. Then you can type ssh-keygen -t rsa then you can create public/private key pair.
- Anonymous
- Anonymous
