Note
Access to this page requires authorization. You can try signing in or changing directories.
Access to this page requires authorization. You can try changing directories.
This is Part 3 of my "VB Win10 Apps" series.
- Part 1: getting started
- Part 2: issues with common libraries - JSON.Net, SignalR, SharpDX, SQLite, LiveSDK
- > Part 3: design-time data in XAML
- Part 4: references
- Part 5: projects, targets, libraries
- Part 6: porting from 8.1 universal app to Win10
- Part 7: porting from phone8.1 to phone8.1 + Win10 using Shared Projects
- Part 8: getting started with win2d accelerated graphics
- Part ?: ... (please let me know what you'd like me to write about next!)
Source code for this blog post is available here: https://github.com/ljw1004/blog/tree/master/XAML-Databinding
Design-time data in XAML
What I'm writing about is an essential basic skill for writing XAML, and half the folks I speak to don't know about it, so I want to spell it out. I want to have "sample design-time data" while I'm designing my XAML, so I can get the layout right.
This skill has always been important. You could just about scrape by without knowing it in the past, since Win8.1 came with advanced templates that used this design-time-data trick already. But in Win10, we've removed all but the "Blank" template, so you're on your own.
Let's make it real. I have a data-structure which looks like this:
Public Class Patient
Public Property Name As String
Public Property Health As String
Public Property Thumbnail As String
End Class
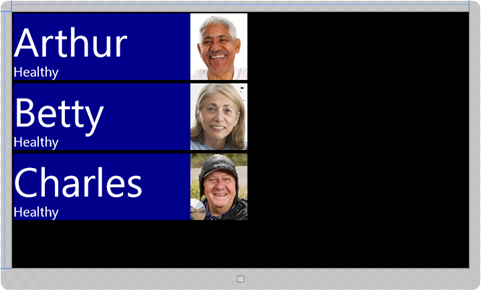
And I want my UI to show an index page, a list of patients, something like this:
Well I start by trying to write it with a XAML ListView inside the <Grid> of my MainPage.xaml:
<ListView x:Name="listview1" ItemsSource="{Binding}">
<ListView.ItemTemplate>
<DataTemplate>
<Grid Background="LightBlue">
<TextBlock VerticalAlignment="Top" Text="{Binding Name}"/>
<TextBlock VerticalAlignment="Bottom" Text="{Binding Health}"/>
<Image HorizontalAlignment="Right" Source="{Binding Thumbnail}"/>
</Grid>
</DataTemplate>
</ListView.ItemTemplate>
</ListView>
But I'm writing this blind! I don't know wither I've got it right! All I see in the designer is a big blank screen staring back at me. I need some design-time help. I need some design-time sample data.

Getting started
First, let's set up the project without design-time data:
1. File > New > VB > Windows > Blank App
2. Open MainPage.xaml and copy+paste the ListView XAML code from above inside the <Grid>...</Grid>. Explanation: the ItemsSource="{Binding}" directive tells it to look up listview1.DataContext, and use this as the ItemsSource, i.e. the list of objects that should be rendered. And the <ListView.ItemTemplate> says that each object should be rendered in this way.
3. Open MainPage.xaml.vb and copy+paste the definition of class "Patient" at the bottom of the file.
4. In MainPage.xaml.vb, inside "Class MainPage", add the following method. Explanation: here we're assigning a list to listview1.DataContext so it will display something.
Protected Overrides Sub OnNavigatedTo(e As NavigationEventArgs)
Dim d As New ObservableCollection(Of Patient)
d.Add(New Patient With {.Name = "Dawn", .Health = "Healthy",
.Thumbnail = https://tinyurl.com/mnelmpf})
listview1.DataContext = d
End Sub
Run this program now. You'll find that it got the XAML very wrong, so wrong that Dawn's mugshot fills the entire screen!
The solution: XAML design-time data
We're now going to make our design-time data. That'll let us fix up our XAML interactively.
1. Open MainPage.xaml.vb and add the following class to the bottom of the file. Explanation: this is an object which, when invoked by its parameterless constructor, will be populated with useful data. XAML generally requires parameterless constructors.
Public Class SamplePatientData : Inherits ObservableCollection(Of Patient)
Public Sub New()
Add(New Patient With {.Name = "Arthur", .Health = "Healthy",
.Thumbnail = "https://tinyurl.com/ldde88y"})
Add(New Patient With {.Name = "Betty", .Health = "Healthy",
.Thumbnail = "https://tinyurl.com/k95djeu"})
Add(New Patient With {.Name = "Charles", .Health = "Healthy",
.Thumbnail = "https://tinyurl.com/mqdj5n2"})
End Sub
End Class
2. Rebuild your project. Explanation: until you rebuild, the XAML designer won't have access to the class you just defined.
3. Open MainPage.xaml and add the following code just before <Grid...>. Explanation: you might think of XAML as a markup language, but it's really an object-instantantiation language. The following lines cause XAML to instantiate an instance of the "SamplePatientData" class via its parameterless constructor, and store it in the Page.Resources dictionary.
<Page.Resources>
<local:SamplePatientData x:Key="data1"/>
</Page.Resources>
4. In MainPage.xaml edit your <ListView...> as follows. Explanation: the "d:" means that this is a design-time-only attribute. So, at design-time, it looks up "data1" in the Page.Resources dictionary, and assigns it to listview1.DataContext.
<ListView x:Name="listview1" ItemsSource="{Binding}"
d:DataContext="{StaticResource data1}">
And there it is! Suddenly the XAML designed has become populated with sample data! And you can see that the XAML I wrote inside my ListView is pretty badly wrong... So let's fix it up:
5. In MainPage.xaml, edit your <ListView...> as follows. Explanation: I'm making some key size adjustments that will let the XAML layout engine position things sensibly.
<ListView x:Name="listview1" ItemsSource="{Binding}"
d:DataContext="{StaticResource data1}">
<ListView.ItemTemplate>
<DataTemplate>
<Grid Background="LightBlue" Width="200">
<TextBlock VerticalAlignment="Top" Text="{Binding Name}" FontSize="25"/>
<TextBlock VerticalAlignment="Bottom" Text="{Binding Health}"/>
<Image HorizontalAlignment="Right" Source="{Binding Thumbnail}" Width="40" Height="50"/>
</Grid>
</DataTemplate>
</ListView.ItemTemplate>
</ListView>
What this tutorial hasn't shown you is that, thanks to this sample-data trick, you also get XAML intellisense when you write "{Binding -- because the XAML code editor knows the type, and knows all its properties.
You can also use Blend to provide design-time data. But I've found the technique in this post to be the easiest way to get design-time data. It's a simple trick that will save you lots of hours on the XAML designer.
Comments
- Anonymous
June 05, 2015
How do we properly use JSON or XAML sample data in design time without code behind modification. None of the older samples seem to work with vs2015 RC.