Note
Access to this page requires authorization. You can try signing in or changing directories.
Access to this page requires authorization. You can try changing directories.
With the introduction of Always Encrypted, Microsoft’s SQL platform (SQL Server 2016 and SQL Azure DB) protects sensitive data in use (during transactions and computations) without requiring any significant re-work in your applications. In a typical scenario, a client application is set up with Always Encrypted enabled in the database connection string. This instructs the SQL client driver to transparently decrypt the data retrieved from encrypted columns and to transparently encrypt the data before inserting it into the encrypted columns. However, in addition to this general use case, there are scenarios, in which applications need to copy or move the encrypted data from one table to another table, but there is no business requirement to transform, or even look at the data during the migration. This scenario is quite common in Extract-Transform-Load (ETL) and data archival applications. In this article, we discuss this scenario in depth and provide the associated best practices.
Enabling Modifications of Encrypted Data
Our customers use the SQL platform to store volumes of high-valued data assets for their organization. With Always Encrypted, we want to deliver additional security while ensuring complete integrity of stored user data. To achieve this, in a regular workflow SQL Server/Azure SQL Database disallows an application to insert data directly into an encrypted column. If the application has not enabled Always Encrypted in the connection string, an insert statement targeting an encrypted column will fail. To insert a value into a column protected with Always Encrypted, the application must connect to the database with Always Encrypted enabled in the connection string and pass a plaintext value of the datatype configured for the target column. Subsequently, the SQL client driver encrypts the value and sends the ciphertext to the database. This ensures plaintext data is encrypted and stored appropriately.
Now, assume that you need to implement an application that copies data, which is already encrypted and stored in one table, to another table. When using the above workflow, the application would first need to retrieve and decrypt the data, and then encrypt and insert into the target table. There are two problems with this approach:
1. The data is unnecessarily exposed, assuming the application does not really need to see the data in plaintext.
2. It adds unnecessary computational overhead with encryption/decryption making data migration more expensive and time consuming.
The desired behavior is for the application to copy the data without ever decrypting it. To enable this scenario, Always Encrypted provides the “Allow Encrypted Value Modifications” switch that can be used to change the default/normal behavior of bulk insert operations targeting encrypted columns. When this switch is turned on (the default being off), the switch suppresses cryptographic metadata checks on the server, allowing an application to bulk insert values that are already encrypted and, in turn, to move encrypted data between databases without extra overhead or security risk.
There are two different implementations of this switch:
- The AllowEncryptedValueModification flag in the SQL Bulk Copy API shipped with the latest version of .NET (4.6.1)
- The ALLOW_ENCRYPTED_VALUE_MODIFICATIONS user option. When this option is turned on, cryptographic metadata checks are suppressed for any connection opened by a given user.
Caution: You should be very careful when using these options as improper usage can lead to data corruption. The associated risk is even greater for the user option (for reasons we discuss later in the article).
Note: the above switch affects only bulk insert operations. Cryptographic metadata checks are always enforced for normal (non-bulk) insert statements.
Prerequisites
To try the examples in this article, you need:
- SQL Server 2016 (CTP 3.0 or later) or a subscription in Azure.
- SQL Server Management Studio October 2015 preview – version 13.0.700.242, or later. You can either obtain SSMS as a standalone download as part of SQL Server 2016 Community Technology Preview (CTP) 3.0, or later.
- NET Framework 4.6.1 RC, if you want to try the C# code example using the new SQL Bulk Copy AllowEncryptedValueModifications API option.
We assume that in your SQL Server instance or in Azure SQL Database, you have an existing database, named ClinicEncrypted, that contains the Patients table with two encrypted columns: SSN and BirthDate, protected with a column master key that is a certificate stored in Windows Certificate Store. The Patients table schema is identical to what we used in the previous articles from the Always Encrypted blog series. That table should contain some data. You can create the database and generate the certificate following the instructions from the following article: Getting Started With Always Encrypted.
Step 1: Creating Target Schema
Before moving any data, you need create the target database ClinicEncryptedCopy and populate it with the necessary metadata for the column master key and the column encryption key (CMK and CEK). Next, you will need to create a Patients table in the database that shares an identical schema with the source.
1.1) Create Database
CREATE DATABASE ClinicEncryptedCopy;
1.2) Setup a Column Master Key
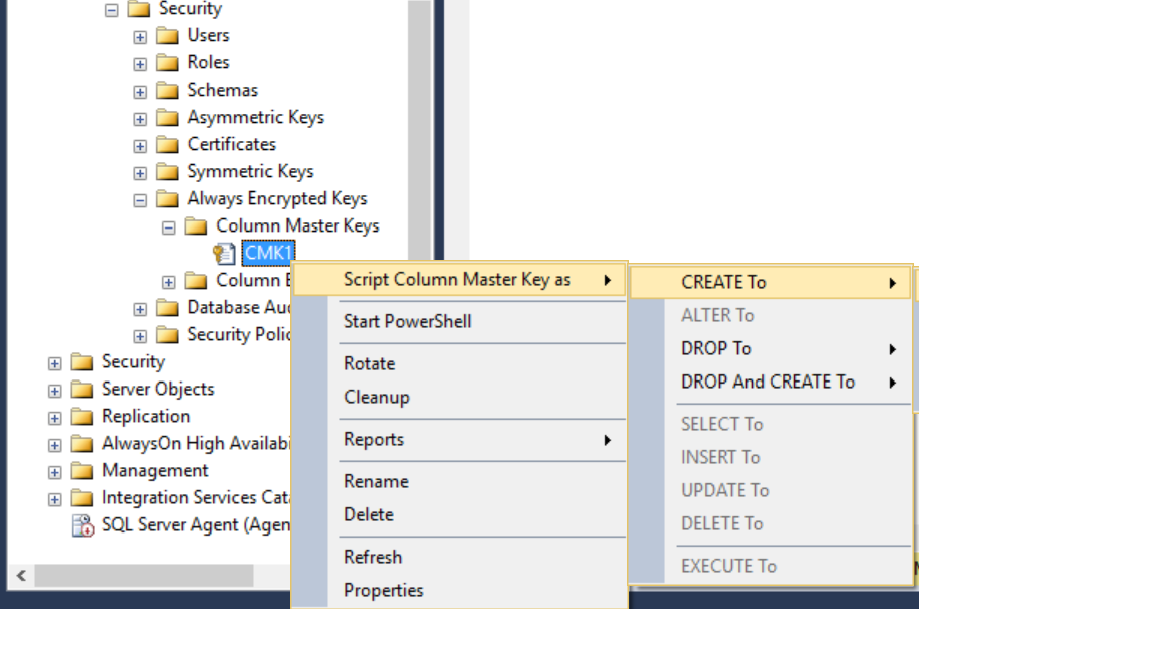
You will need to create identical column master key metadata in the target database as part of the setup. An easy way to do this is by using the SSMS “Script as” feature to generate the CREATE COLUMN MASTER KEY T-SQL statement for the source database (ClinicEncrypted) and then execute the generated statement against the target database (ClinicEncryptedCopy).
1.3) Setup Column Encryption Key
Similarly, you can set up column encrypted Key metadata in the target server using the “Script as” feature.

1.4) Setup Target table in the database
You can use the T-SQL script provided below to create the Patients table in the target database.
 CREATE TABLE [dbo].[Patients](
 [PatientId] [int] IDENTITY(1,1),
 [SSN] [char](11) COLLATE Latin1_General_BIN2
 ENCRYPTED WITH (ENCRYPTION_TYPE = DETERMINISTIC,
 ALGORITHM = 'AEAD_AES_256_CBC_HMAC_SHA_256',
 COLUMN_ENCRYPTION_KEY = CEK1) NOT NULL,
 [FirstName] [nvarchar](50) NULL,
 [LastName] [nvarchar](50) NULL,
 [MiddleName] [nvarchar](50) NULL,
 [StreetAddress] [nvarchar](50) NULL,
 [City] [nvarchar](50) NULL,
 [ZipCode] [char](5) NULL,
 [State] [char](2) NULL,
 [BirthDate] [date]
 ENCRYPTED WITH (ENCRYPTION_TYPE = RANDOMIZED,
 ALGORITHM = 'AEAD_AES_256_CBC_HMAC_SHA_256',
 COLUMN_ENCRYPTION_KEY = CEK1) NOT NULL
 PRIMARY KEY CLUSTERED ([PatientId] ASC) ON [PRIMARY]);
Note: Due to a known bug, using “Script as” to create a table in target database fails, because the T-SQL is generated with missing collation properties. (You might remember from previous articles, encrypted columns of string types, such as the SSN column, must use a BIN2 collation.) This is a known issue and will be addressed in a future release.
In case you are copying data to a different table in the same database, you can skip all the early steps and jump directly to Step 1.4. A different target table name (instead of Patients) would be used in this case as it shares the same user database.
Step 2: Moving Encrypted Data
We will demonstrate two alternative ways of copying data from the source to the target table:
- Using the AllowEncryptedValueModifications Bulk Copy API option. This method is recommended if you are developing a custom application for copying the data, or if you can modify the code of the existing application.
- Using the ALLOW_ENCRYPTED_VALUE_MODIFICATIONS user option. Use this method with legacy/existing data migration tools and applications.
2.1) Using AllowEncryptedValueModifications Bulk Copy API option
The below code demonstrates the use of the AllowEncryptedValueModifications option in the ADO.NET Bulk Copy API. Please, see SqlBulkCopyOptions for details.
using System;using System.Data.SqlClient; namespace AlwaysEncryptedBulkCopyExample{ class BulkCopyDemo { private static readonly string dataSource = @"SQLMACHINENAME\INSTANCENAME"; public static string GetConnectionString(string initialCatalog) { SqlConnectionStringBuilder builder = new SqlConnectionStringBuilder(); builder.DataSource = dataSource; builder.InitialCatalog = initialCatalog; builder.IntegratedSecurity = true; return builder.ConnectionString; } static void Main(string[] args) { string sourceConnectionString = GetConnectionString("ClinicEncrypted"); string targetConnectionString = GetConnectionString("ClinicEncryptedCopy"); using (SqlConnection sourceConnection = new SqlConnection(sourceConnectionString)) { sourceConnection.Open(); SqlCommand commandSourceData = new SqlCommand("SELECT * FROM dbo.Patients", sourceConnection); SqlDataReader reader = commandSourceData.ExecuteReader(); using (SqlBulkCopy bulkCopy = new SqlBulkCopy(targetConnectionString, SqlBulkCopyOptions.AllowEncryptedValueModifications)) { bulkCopy.DestinationTableName = "Patients"; try { // Write from the source to the destination. bulkCopy.WriteToServer(reader); } catch (Exception ex) { Console.WriteLine(ex.Message); } finally { reader.Close(); } } } } }} |
A couple of things to note about the above program:
-
- Always Encrypted is disabled for both the source and the target database connections. This ensures the client driver does not attempt to encrypt or decrypt any values, and instead it reads encrypted (varbinary) values from the source table and writes them to the target table.
- AllowEncryptedValueModifications is used for the target connection, to suppress cryptographic metadata checks and ensure inserting values, which are already encrypted, can succeed.
2.2) Moving Encrypted Data using ALLOW_ENCRYPTED_VALUE_MODIFICATIONS User Option
Very often, legacy tools or third-party applications (e.g. tools performing ETL workflows) are used to bulk-copy data. For all these applications, where a change to application code is not feasible, you can use the ALLOW_ENCRYPTED_VALUE_MODIFICATIONS user option. In the below example, we will demonstrate this scenario using bcp.exe.
2.2.1) In the target database, create a new database user for data copy operations and set the ALLOW_ENCRYPTED_VALUE_MODIFICATIONS option for the user.
CREATE USER BulkCopy FOR LOGIN BulkCopy WITH ALLOW_ENCRYPTED_VALUE_MODIFICATIONS = ON
Alternatively, you can use ALTER USER instead of CREATE USER to apply the switch to an existing user.
ALTER USER BulkCopy WITH ALLOW_ENCRYPTED_VALUE_MODIFICATIONS = ON
Next, you will also need to ensure that all the appropriate permissions are granted to the user for performing the bulk copy operations.
The following minimum permissions are required to be granted to the created user:
1) CONNECT for database login.
2) SELECT to read table contents.
3) VIEW ANY COLUMN MASTER KEY DEFINITION and VIEW ANY COLUMN ENCRYPTION KEY DEFINITION for exporting data from Always Encrypted enabled column.
4) INSERT permission for importing data.
2.2.2) Invoke bcp from Command Prompt / PowerShell and define an export format
bcp ClinicEncrypted.dbo.Patients format nul –U BulkCopy –P SecretPassword16 –f bcp.fmt
bcp will be prompt you to enter the file storage type, prefix length and filed terminators for every column. You can stick to the defaults or choose appropriate values for the fields.
2.2.3) Next, export the data from the source database.
bcp ClinicEncrypted.dbo.Patients out C:\Patients.dat -U BulkCopy –P SecretPassword16 -f bcp.fmt
Note: the resulting file will contain encrypted values from SSN and BirthDate columns.
2.2.4) Import the data to the target database.
bcp ClinicEncryptedCopy.dbo.Patients in E:\Patients.dat -U BulkCopy -f bcp.fmt
2.2.5) Finally, remove the user.
DELETE USER BulkCopy
Alternatively, set the option to OFF
ALTER USER BulkCopy WITH ALLOW_ENCRYPTED_VALUE_MODIFICATIONS = OFF
Step 3: Target Verification
You can now verify the result of bulk copy operation by attempting to decrypt the copied values in the SSN and BirthDate columns.
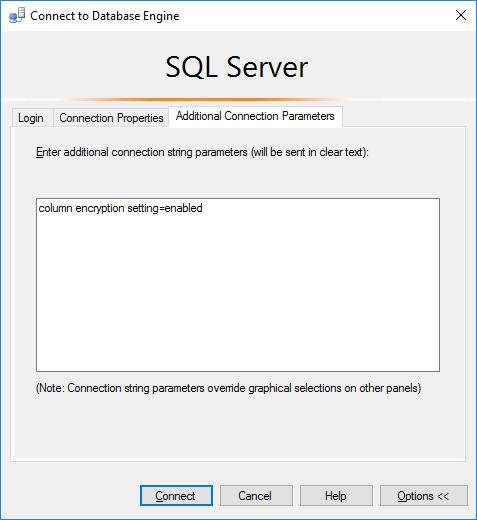
3.1) Using SSMS, connect to the target database with Column Encryption Setting = Enabled specified in the Additional Connection Parameters tab in the Connect to Server dialog.
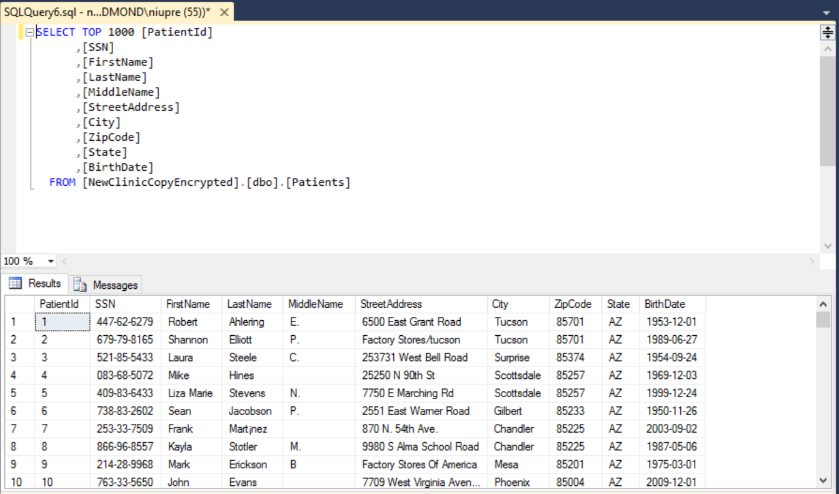
3.2) Run a query to retrieve all data in the Patients table. Assuming, the certificate used as the column master key in the database is deployed on the machine, on which SSMS is running, the query should succeed and you should see plaintext values in the SSN and BirthDate columns, and the values should be identical to what is stored in the source database.
What Can Go Wrong
You need to be extremely careful when using the AllowEncryptedValueModifications Bulk Copy API flag or the ALLOW_ENCRYPTED_VALUE_MODIFICATIONS user option. Suppressing cryptographic metadata checks means SQL Server/Azure SQL Database will allow your application to insert an arbitrary varbinary value into an encrypted column. You are responsible for making sure, the values your applications inserts to the target encrypted column are valid ciphertext values, generated using the algorithm, the encryption type and the column encryption key, specified in the schema for the target column.
Here are two examples of scenarios that illustrate how catastrophic the improper use of the switch suppressing cryptographic metadata checks can be.
Example 1
- When setting up the schema of the target table, you mistakenly associate the target column with an incorrect column encryption key (different from the key that was used to encrypt the values in the source column).
- You bulk-copy the data to the target table.
- When you try decrypt the data stored in the target column, decryption fails with the below error message.
Msg 0, Level 11, State 0, Line 0
Specified ciphertext has an invalid authentication tag.
Note: When encrypting a value, the SQL client driver computes an authentication tag (using the column encryption key specified for the column) and incorporates the tag into the ciphertext value. When decrypting a value, the driver first computes an authentication tag using the column encryption key specified for the column. If the computed authentication tag does not match the authentication tag that is embedded within the ciphertext value, the above error message is raised. In our scenario, the computed authentication tag and the tag embedded within the ciphertext value do not match, because they were produced using different column encryption keys.
Example 2
Consider an application that performs the following steps:
- The application connects to the target database with Always Encrypted disabled in the connection string and it suppresses the encryption metadata checks for the target database.
- As a result of an application misconfiguration, the application connects to the source database with Always Encrypted enabled in the connection string.
- The application performs a bulk copy operation of the table that contains an encrypted column of the varbinary data type, storing JPEG images. Because of the misconfiguration in step 2, the bulk copy operation retrieves plaintext values (instead of ciphertext) from the source column and it inserts them as encrypted values to the target column. The operation completes without errors, because the plaintext datatype of the source column is varbinary and it matches the encrypted type (varbinary) of the target column.
- You run another app that connects to the database with Always Encrypted enabled in the connection string and it tries to retrieve and display an image stored in the encrypted column. The SQL client fails when parsing what it expects to be the ciphertext of the image.
Note: the application may receive one of many ciphertext parsing errors, such as the below error.
Msg 0, Level 11, State 0, Line 10
The specified ciphertext's encryption algorithm version '43' does not match the expected encryption algorithm version '01'.
Here are a few guidelines you can follow to minimize or mitigate the risks, we described above.
- After your bulk copy operation, verify the copied data is correct by attempting to decrypt the data stored in encrypted columns in the target database.
- Keep the source table or a take a backup of the source database, before deleting the source table.
- If possible, use the AllowEncryptedValueModifications Bulk Copy API option, instead of the ALLOW_ENCRYPTED_VALUE_MODIFICATIONS user option. The user option affects all connections for a given user (and simply not just for the user’s current session) and thus its more prone to mistakes than the Bulk Copy API option.
- When using the ALLOW_ENCRYPTED_VALUE_MODIFICATIONS user option, set the option to ON only for a database user that is designated to bulk copy operations. Set the option to OFF after your bulk copy workload completes.
Wrapping Up
This concludes our deep dive into bulk-copying data protected with Always Encrypted. Please be extremely careful when using either method described in this article to ensure data integrity and avoid any data corruption mishaps. If you have any further questions or feedback about Always Encrypted, please let us know in the comments below.
Comments
- Anonymous
October 13, 2016
The comment has been removed - Anonymous
October 14, 2016
Hi, again.I managed to do the bulk copy process when I removed the user from the sysadmin role... which was odd.If anyone could clarify why this happened, I'd appreciate.Cheers!- Anonymous
November 01, 2016
Hi Gustavo,I'm a Program Manager in the SQL team at Microsoft. When a user, say joedoe, who is a member of the sysadmin role, logs on to SQL Server, user's effective identity is dbo, not joedoe. Since you set ALLOW_ENCRYPTED_VALUE_MODIFICATIONS=ON for the original user (joedoe in my example), not for the dbo, the bulk copy is failing if the user is in in the sysadmin role. If you want the user, who is a sysadmin, to be able to perform the bulk copy operation, you need to set ALLOW_ENCRYPTED_VALUE_MODIFICATIONS=ON for the dbo user. I hope that helps. Please, let me know, if you have any other questions.Thanks,Jakub
- Anonymous
- Anonymous
November 01, 2017
Hello,When trying to run the following ALTER USER BulkCopy with ALLOW_ENCRYPTED_VALUE_MODIFICATIONS = ONI get an "incorrect syntax near ON" message.Any ideas why? This is on a SQL 2016 Express server.ThanksDave