Note
Access to this page requires authorization. You can try signing in or changing directories.
Access to this page requires authorization. You can try changing directories.
Windows Azure allows the installation of many tools, toolkits and modules to run your application. The JAVA world has many flavours and one of them is the JONAS application server. A french J2EE open source application server, with a pretty big number of users, mainly in Europe and Asia. Jonas can be downloaded from https://wiki.jonas.ow2.org
As Jonas can be installed on Windows Server, there is no doubt that it can run on Windows Azure. There are different options to install a third party application on Azure. The best choice is to use a regular Azure Worker Role in order to benefit from the PaaS model; that is : elasticity, and auto update of the infrastructure.
To do so, we need to include Jonas into an empty Azure application package, and automate its installation at boot time of the machines running the Role. The best choice is to use a Worker Role, becauce we don't need IIS as Jonas comes with Tomcat, It has its own web server. We need to create an "easy" installation package that will run unattended, and we need to create a startup task to start the Jonas Installation and launch Jonas when the machine boots on.
Here are the steps to create a Jonas installation package for Azure :
- Download Jonas and the required components on your local machine
- Install Jonas and its components locally and zip the resulting directory
- Upload the Jonas zip file somewhere on your Azure Storage account (because it's pretty big and you don't want to include it into your application package)
- Create an Azure Project to describe how Jonas will be deployed on a Worker Role
- In this project, include some useful tools to download the zip file from the Azure Storage and unzip it
- Create a startup task to manage the Jonas installation and launch Jonas
- Configure the role to accept connections to the ports required by Jonas
- Deploy and enjoy
Now that we know the general steps of the installation process, let's dive into each one of them.
Step 1 : Download Jonas and it's required components on your local machine
The objective of this step if to create the big zip file containing all the necessary components to run Jonas. All the Jonas download instructions and prerequisites can be found here : https://jonas.ow2.org/JONAS_5_2_0/doc/doc-en/html/getting_started_guide.html#downloadid
- Download the SUN Java JDK (choose the 64bits version for Windows ) from : https://www.oracle.com/technetwork/java/javase/downloads/index-jdk5-jsp-142662.html
- Download ANT from https://ant.apache.org/bindownload.cgi (Choose the ZIP version)
- Download the BCEL library from : https://www.apache.org/dist/jakarta/bcel/binaries/ (Choose the ZIP version)
- Download the Jonas Installation package from : https://wiki.jonas.ow2.org/xwiki/bin/view/Main/Downloads (Choose the ZIP version)
Now that you have everything, let's start the installation.
Step 2 : Install all the components to create the Jonas zip file
On Azure roles, Jonas will be unzipped on the temporary C:\ drive. So locally, we'll try to install it on C: Be carefull to not use spaces in the directory names because Jonas does not like that and refuses to start in that case.
So let's choose the following directory and install everything in it : C:\ApplicationServer
- Start the JAVA installer and install the JDK and the JRE in the directory C:\ApplicationServer. You should get two subdirectories : jre and jdk
- Unzip the ANT zip file in the C:\ApplicationServer directory. The ANT directory name is a little bit complicated; so change it to : ant
- Open the BCEL zip file and browse it to find the bcel-x.x.jar file. Put this file into C:\ApplicationServer\ant\lib
- Unzip the Jonas folder into the C:\ApplicationServer directory and rename is something simpler like jonas
Then, it's a good idea to create a Jonas execution template. There is a jonas command to do so but it needs specific environment variables to be set. Here is a simple script to create the template. You just have to run iy in a command shell :
@echo off
SET ANT_HOME=C:\ApplicationServer\ant
SET APPLI_HOME=C:\ApplicationServer
SET JAVA_HOME=C:\ApplicationServer\jdk
SET JONAS_BASE=C:\ApplicationServer\jonas\my_jonas_base
SET JONAS_ROOT=C:\ApplicationServer\jonas
SET PATH=%PATH%;%JAVA_HOME%\bin;%ANT_HOME%\bin;%JONAS_ROOT%\bin
newjb
Now your done with the local installation. You should now have a C:\ApplicationServer looking like this :
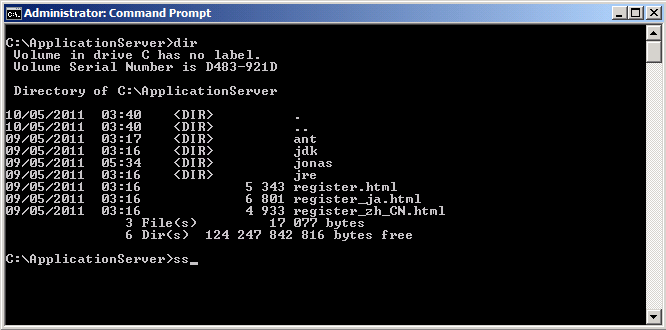
Last step of local installation is to zip the C:\ApplicationFolder and rename the resulting zip file to something easy like jonas.zip
Step 3 : Upload the Jonas.zip file to your Azure Storage account
Why doing this ? Because the zip file is pretty big, a little big more 350MB on my machine. So, even if the shortest way to handle the zip file is to include it in your Visual Studio project, you don't want the 350MB to be uploaded to Azure each time you publish your project to test it. It's much much more quicker to upload the file once for all onto a storage account and manage its retrieval on the role members at boot time using a startup task.
There are many way to do so. There is a very good free tool that can be downloaded from : https://azurestorageexplorer.codeplex.com/
Using that tool, it's very easy to download the zip file onto your Azure Storage account. Here is a screen shot of the tool, displaying the ZIP file within the blob co,tainer, and a Signed URL to access the file. For testing purpose, I recommend to not apply restricted security, and create a specific container for this purpose.

Now, you should have access to the zip file using an URL of the following format : https://<YourStorageAccountName>.blob.core.windows.net/jonas/jonasfull.zip
Step 4 : Create an Azure Project to describe how Jonas will be deployed in Azure
The objective of this step is to build the envelop that will describe the deployment process of Jonas onto Azure. Jonas is an application server, it does not need IIS locally installed on the server; so the Web Role is not a good choice. As everyone knows, it is best to select the worker role to benefit from the PaaS automation, so let's build our deployment project on top of a worker role. For that, you shoud have both Visual Studio and the Azure development kit installed on your machine. Start Visual Studio, and select File->New->Project.. Select C# and the Cloud template models. Choose "Windows Azure Project and a name for your project. Jonas could be a good name right ?
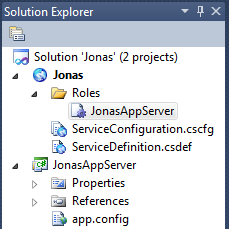
In the role selection window, add a Worker Role to your project, and rename it "JonasAppServer" and validate your project. You should have a project looking like that :
Step 5 : Add tools to manage the ZIP installation at startup of the role members
We need two tools to help us deploying the ZIP file locally on each member of our Worker Role : one tool to retrieve the ZIP file from the storage account, and another one to unzip the file. Fortunately, tools exist and are included in the Windows Azure Startkit for Java. So download the Startkit for Java from : https://wastarterkit4java.codeplex.com/ and unzip the content on the package somewhere on your disk. Find the two files called download.vbs and unzip.vbs that are located in the subdirectory WorkerRole1/approot/util/ and copy them into the JonasAppServer subdirectory of your Visual Studio Project :

Note : There is a startjonas.cmd file in this screen shot. We will create it during next step.
Now, back into Visual Studio, add the two .vbs files into the JonasAppServer project by rigth clicking on the project name, select Add->Existing Item and select the two files. Your project should now display the two .vbs files :

Note : Don't forget to configure the vbs files for been copied with the project into the destination. To do so, select each file and modify the "Copy to Output Directory" to "Copy Always" as in the following screenshot :

Step 6 : Create a startup task to manage the installation and launch of Jonas when the role members start
Two things have to be done here. First create the startup script that will be launched, then specify this file as a startup task.
So, first, the script itself. We have to create a cmd file that will :
- download the the zip file from the Azure Storage location
- unzip it (in c:\)
- set all necessary environment variables to start jonas
- finally start Jonas
Here is the cmd script :
@echo off
cscript /B /nologo download.vbs https://<Your storage account name here>.blob.core.windows.net/jonas/JonasFull.zip
cscript /B /nologo unzip.vbs JonasFull.zip c:\
SET ANT_HOME=C:\ApplicationServer\ant
SET APPLI_HOME=C:\ApplicationServer
SET JAVA_HOME=C:\ApplicationServer\jdk
SET JONAS_BASE=C:\ApplicationServer\jonas\my_jonas_base
SET JONAS_ROOT=C:\ApplicationServer\jonas
SET PATH=%PATH%;%JAVA_HOME%\bin;%ANT_HOME%\bin;%JONAS_ROOT%\bin
jonas start
Now we need to modify the project to specify this startup task. In Visual Studio, just open the ServiceDefinition.csdef file to add a <Startup> section pointing to the startjonas.cmd file, as described below :
<? xml version="1.0" encoding="utf-8" ?>
<ServiceDefinition name="Jonas" xmlns="https://schemas.microsoft.com/ServiceHosting/2008/10/ServiceDefinition">
<WorkerRole name="JonasAppServer">
<Imports>
<Import moduleName="Diagnostics" />
<Import moduleName="RemoteAccess" />
<Import moduleName="RemoteForwarder" />
</Imports>
<Endpoints>
<InputEndpoint name="jonas" protocol="tcp" port="9000" localPort="9000" />
<InputEndpoint name="web" protocol="http" port="80" localPort="80" />
</Endpoints>
< Startup><TaskcommandLine="startjonas.cmd"executionContext="elevated"taskType="background"/>
</Startup
>
</WorkerRole>
</ServiceDefinition>
Note : don't worry if your <Endpoints> section doesn't look like above, we'll modify that in the next section.
Step 7 : Configure the role to accept connections on port 9000 (and 80)
Two things have to be done to open port 9000. Role configuration and onStart method modification.
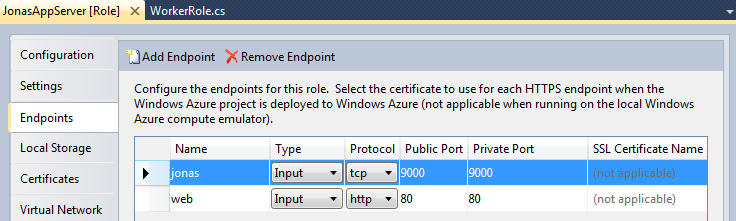
Within the Jonas Azure project, double click on the "JonasAppServer" to open the configuration assistant

Within the configuration assitant, select the "Endpoints" tab and add a new TCP input port on 9000 forwarded locally to the same port :
Now we need the worker role executable to listen to the ports, in order for Jonas to receive the traffic on these ports. To do so, we need to modify the OnStart method of the Worker Role, to open and listen to ports 80 and 9000. Here is the final code of the WorkerRole.cs file (modification of the OnStart method and add of a using pragma) :
using System;
using System.Collections.Generic;
using System.Diagnostics;
using System.Linq;
using System.Net;
using System.Net.Sockets;
using System.Threading;
using Microsoft.WindowsAzure;
using Microsoft.WindowsAzure.Diagnostics;
using Microsoft.WindowsAzure.ServiceRuntime;
using Microsoft.WindowsAzure.StorageClient;
namespace JonasAppServer
{
public class WorkerRole : RoleEntryPoint
{
public override void Run()
{
// This is a sample worker implementation. Replace with your logic.
Trace.WriteLine("JonasAppServer entry point called", "Information");
while (true )
{
Thread.Sleep(10000);
Trace.WriteLine("Working", "Information");
}
}
public override bool OnStart()
{
// Set the maximum number of concurrent connections
ServicePointManager.DefaultConnectionLimit = 60;
// For information on handling configuration changes // see the MSDN topic at https://go.microsoft.com/fwlink/?LinkId=166357.
TcpListener jonasListener = newTcpListener(RoleEnvironment.CurrentRoleInstance.InstanceEndpoints["jonas"].IPEndpoint);
jonasListener.Start();TcpListener webListener = newTcpListener(RoleEnvironment.CurrentRoleInstance.InstanceEndpoints["web"].IPEndpoint);
webListener.Start();returnbase
.OnStart() ;
}
}
}
Step 8 : Deploy and Enjoy
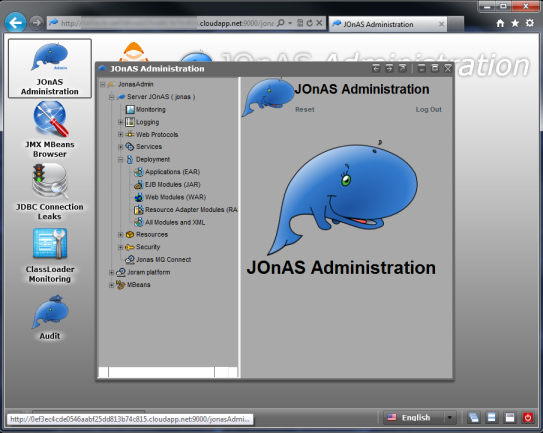
Now we just need to create a new service within our Azure Subscription and deploy the project into it. I recommend to configure a remote desktop, to validate that everything starts correctly, and also for debugging purpose and access to the Jonas logs locally on the machines.
After the deployment process is finished, you should be able to open your browser and point it to port 9000 of your Jonas Azure service. The default Jonas logon is jonas/jonas so take care to quickly change this password as well as the other Jonas admin passwords, and delete the accounts you don't need. After Jonas login, you should see something like this :