Note
Access to this page requires authorization. You can try signing in or changing directories.
Access to this page requires authorization. You can try changing directories.
Use incident cases to track incident ownership, severity, status, classification, tasks, comments, activity history, custom fields, and resolution details.
Note
Incident cases are in preview and are the recommended experience for managing incidents in the Microsoft Defender portal. The legacy incident experience remains available during this preview.
For an overview of Case Management, see Case management in the Microsoft Defender portal.
Prerequisites
Before you begin, make sure you have one of the following Microsoft Defender unified RBAC permissions:
- To view incident cases: Security Data Read.
- To view and manage incident cases: Security Data Manage.
Incident case permissions and scoping follow the same permissions model as the legacy incident experience.
For more information, see Microsoft Defender unified role-based access control (RBAC).
Access the Manage case pane
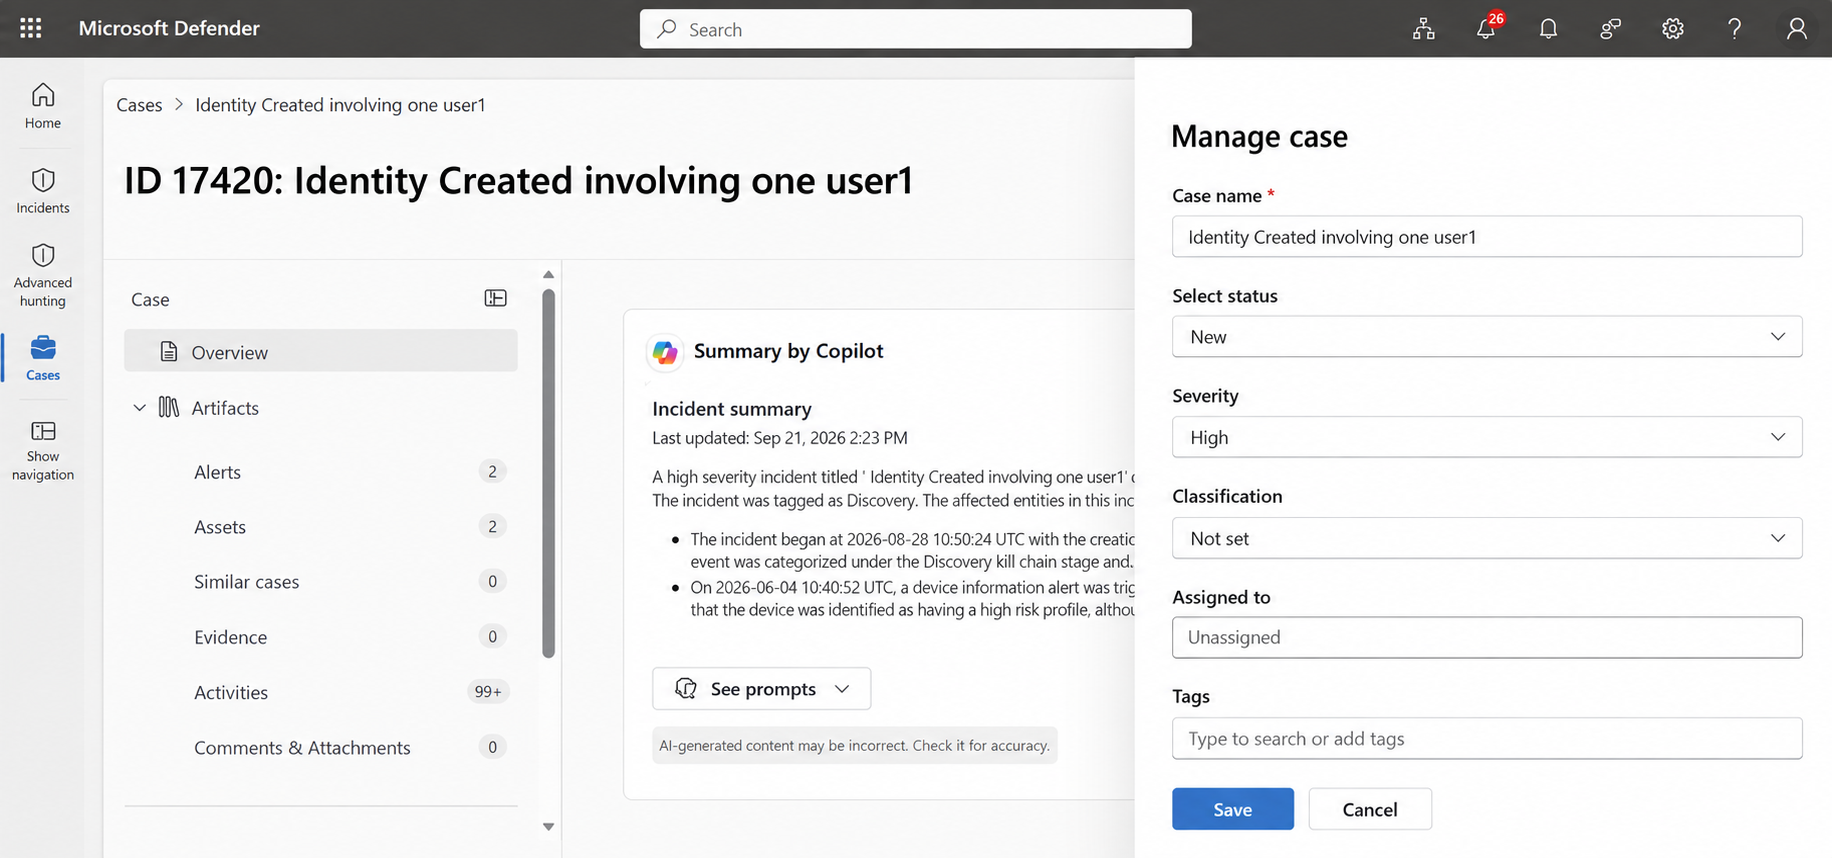
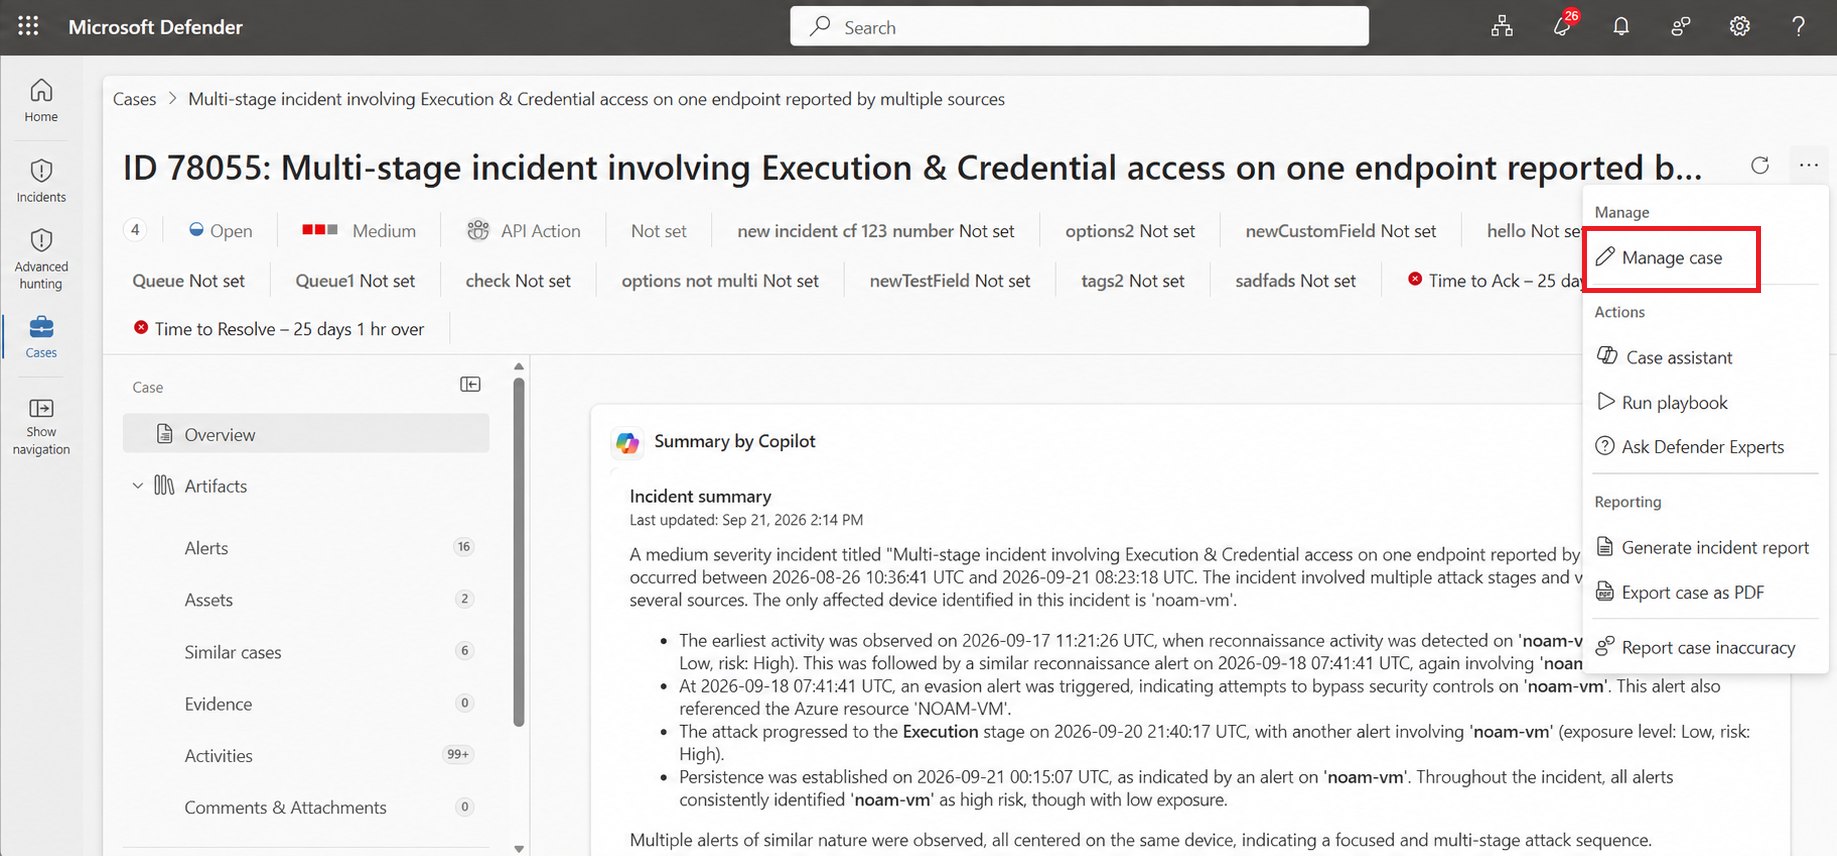
Most incident case management tasks are available from the Manage case pane.
To access the Manage case pane:
Sign in to the Microsoft Defender portal.
Select Cases.
Select Incident.
Select the relevant incident case.
Select the three-dot menu.
Select Manage case.
Update the fields you need.
Select Save.
Available fields can vary by tenant configuration and preview scope.
Assign an incident case to an owner
Assign an incident case to an owner to track responsibility and support handoff between analysts or teams.
To assign an owner:
Sign in to the Microsoft Defender portal.
Select Cases.
Select Incident.
Select the relevant incident case.
Select Manage case.
In Assigned to field, select the user or group you want to assign the incident case to.
To remove an existing assignment, clear the current value.
Select Save.
Assigning ownership of an incident case also applies ownership to the related incident workflow.
Change incident case severity
Severity helps analysts understand the impact of the incident case and prioritize response.
To change severity:
Sign in to the Microsoft Defender portal.
Select Cases.
Select Incident.
Select the relevant incident case.
Select Manage case.
In Severity, select the severity value.
Select Save.
Change incident case status
Use status to track where the incident case is in the response lifecycle.
To change status:
Sign in to the Microsoft Defender portal.
Select Cases.
Select Incident.
Select the relevant incident case.
Select Manage case.
In Status, select the status value.
Select Save.
Add or update custom fields
Custom fields are configured by admins in case templates. Use custom fields to capture organization-specific information required by your security operations process.
To update custom fields:
Sign in to the Microsoft Defender portal.
Select Cases.
Select Incident.
Select the relevant incident case.
Select Manage case.
Update the custom fields that apply to your workflow.
Select Save.
For more information about configuring custom fields, see Configure case templates in the Microsoft Defender portal.
Set or update the due date and time
Use the due date and time to track response expectations for the incident case.
To update the due date and time:
Sign in to the Microsoft Defender portal.
Select Cases.
Select Incident.
Select the relevant incident case.
Select Manage case.
In Due date, select the required date.
In Due time, select the required time.
Select Save.
If your organization uses SLA policies, the due date and time might be affected by the SLA policy configured for incident cases.
For more information, see Configure case templates in the Microsoft Defender portal.
Add or update tags
Use tags to add context to an incident case and help analysts filter, group, or identify related work.
Incident cases support both system tags and custom tags. Analysts can create custom tags from the incident case UI.
When tags are added, removed, or updated on an incident case, the tag changes are synced to the related incident.
To add or update tags:
Sign in to the Microsoft Defender portal.
Select Cases.
Select Incident.
Select the relevant incident case.
Select Manage case.
In Tags, add or remove tags as needed.
Select Save.
Resolve or close an incident case
Resolve or close an incident case when investigation and response work is complete.
To resolve or close an incident case:
Sign in to the Microsoft Defender portal.
Select Cases.
Select Incident.
Select the relevant incident case.
Select Manage case.
Change the status to the resolved or closed status used by your organization.
If needed, update the Classification field.
Add resolution notes or closing notes to document the outcome.
Select Save.
When you resolve or close an incident case, the status change is synced to the related incident. Related alerts keep their own status and aren't automatically resolved when the incident case is resolved or closed.
Classification, determination, and closing notes are stored on both the incident case and the related incident.
Specify classification or determination
Use classification and determination to document the outcome of the investigation.
To specify classification or determination:
Sign in to the Microsoft Defender portal.
Select Cases.
Select Incident.
Select the relevant incident case.
Select Manage case.
In Classification, select the appropriate classification.
If a determination field is available, select the appropriate determination.
Select Save.
Classifying incident cases helps your team document investigation outcomes and improve future detection and response processes.
Add comments and attachments
Use comments to document investigation progress, decisions, handoffs, and resolution details. You can also attach relevant files when you add a comment.
To add a comment:
Sign in to the Microsoft Defender portal.
Select Cases.
Select Incident.
Select the relevant incident case.
Select Comments & Attachments.
On the Comments tab, enter your comment.
Use the formatting options as needed.
To attach a file, select the attachment icon, and then select the file.
Select Send.
The comment is added to the incident case activity history. Any files you attach are also available from the Attachments tab.
If a file with the same name already exists in the case, select Rename to add it as a separate file, or Link existing to use the file that's already attached.
Add an attachment without a comment
To add a file without adding a comment:
Select Comments & Attachments.
Select the Attachments tab.
Select Upload.
Select the file that you want to attach.
The file is added to the incident case attachments list. From the Attachments tab, you can also view attachment details, download files, or remove attachments.
Manage incident case tasks
Use tasks to break incident response work into smaller action items, assign ownership, track progress, and document outcomes.
For step-by-step guidance, see Manage incident case tasks in the Microsoft Defender portal.
Work with agentic sessions in an incident case
You can run supported agentic playbooks from an incident case. Running an agentic playbook creates an agent session that's associated with the case, so you can track agent progress and review session outputs from the case experience.
Agentic sessions are supported only for customers with access to Project Perception. For more information, see What is Project Perception?.
Start an agentic session
To start an agentic session from an incident case:
Sign in to the Microsoft Defender portal.
Select Cases.
Select Incident.
Select the relevant incident case.
Select the three-dot menu.
Under Actions, select Run agentic playbook.
Select the agentic playbook you want to run.
Review the required inputs.
Select Start session.
The agent session is associated with the incident case and its status is available from the case experience.
Track agent session status
To track agent sessions associated with incident cases:
Sign in to the Microsoft Defender portal.
Select Cases.
Select Incident.
Add the Agent sessions status column to the cases list, if it isn't already displayed.
Review Agent sessions status for the relevant incident case.
You can also use Agent sessions status as a filter to find incident cases based on their associated agent sessions.
To view the session status from an incident case:
Sign in to the Microsoft Defender portal.
Select Cases.
Select Incident.
Select the relevant incident case.
Review the agent session status in the case side pane.
Select View session to open the associated agent session.
Review an agent session from an incident case
Agent sessions associated with an incident case are available from the case experience. You can select a session to review outputs generated by the agents, such as investigation notes, summaries, and reports.
To review an agent session:
Sign in to the Microsoft Defender portal.
Select Cases.
Select Incident.
Select the relevant incident case.
Select the relevant agent session.
Review the session outputs.
Select Open session.
The agent session opens as an overlay over the case experience. From the session, you can review the session summary, agent activity, inputs, outputs, session details, and conversation.
Investigate an incident case
Incident cases include incident investigation context such as attack story, alerts, assets, investigations, evidence, activities, and response actions.
For detailed investigation guidance, see Investigate incident cases in the Microsoft Defender portal.
Merge incident cases
Incident cases can be merged when multiple incident cases represent the same attack, investigation, or related activity and should be handled together.
For more information, see Merge and split incident cases in the Microsoft Defender portal.
For step-by-step guidance, see Merge incident cases manually in the Microsoft Defender portal.
Incident case notifications
Existing incident email notification rules apply to incident cases. Notifications can be triggered by incident case updates such as assignment, status change, severity change, and resolution.
Related content
- Case management in the Microsoft Defender portal
- Prioritize incident cases in the Microsoft Defender portal
- Investigate incident cases in the Microsoft Defender portal
- Manage incident case tasks in the Microsoft Defender portal
- Move alerts from one incident case to another in the Microsoft Defender portal
- Merge and split incident cases in the Microsoft Defender portal
- Configure case templates in the Microsoft Defender portal