Events
Mar 17, 9 PM - Mar 21, 10 AM
Join the meetup series to build scalable AI solutions based on real-world use cases with fellow developers and experts.
Register nowThis browser is no longer supported.
Upgrade to Microsoft Edge to take advantage of the latest features, security updates, and technical support.
This article covers how to get started using the packages provided as part of the .NET MAUI Community Toolkit project.
The toolkit is available as a set of NuGet packages that can be added to any existing or new project using Visual Studio.
Open an existing project, or create a new project as per the .NET MAUI setup documentation
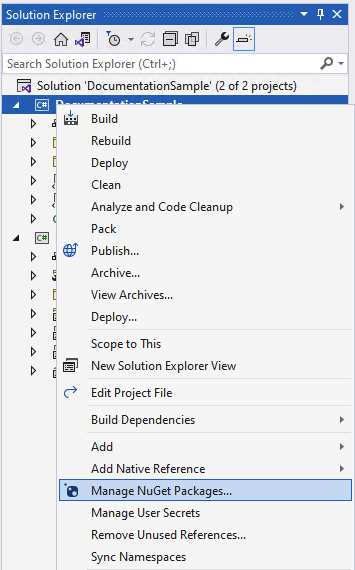
In the Solution Explorer panel, right click on your project name and select Manage NuGet Packages. Search for CommunityToolkit.Maui, and choose the desired NuGet Package from the list.

Choose the toolkit(s) that are most appropriate for your needs from the options below:
This package enables you to display a map in your .NET MAUI Windows application.
Important
Bing Maps has stopped giving out new API keys that are needed for this control to work. We are currently deciding if we should update this control to use the WinUI control that uses Azure Maps or that we will wait for the official .NET MAUI first-party implementation for this. For the time being that means you cannot use this control if you do not already have a Bing Maps API key. Bing Maps as a whole will be discontinued entirely on June 30th, 2025.
Package name: CommunityToolkit.Maui.Maps
Package url: https://www.nuget.org/packages/CommunityToolkit.Maui.Maps
First the using statement needs to be added to the top of your MauiProgram.cs file
using CommunityToolkit.Maui.Maps;
In order to use the Map correctly the .UseMauiCommunityToolkitMaps method must be called on the MauiAppBuilder class when bootstrapping an application the MauiProgram.cs file. This method expects a valid Bing Maps API key which you can obtain through the Bing Maps Portal.
The following example shows how to perform this.
var builder = MauiApp.CreateBuilder();
builder
    .UseMauiApp<App>()
    .UseMauiCommunityToolkitMaps("YOUR_API_KEY")
When using the .NET MAUI Community Toolkit Map for Windows and the regular .NET MAUI Maps together, you will need to make sure that each initialization call is only made for the relevant platform. The following example shows how to do this.
var builder = MauiApp.CreateBuilder();
builder
    .UseMauiApp<App>()
#if ANDROID || IOS
    .UseMauiMaps()
#elif WINDOWS
    .UseMauiCommunityToolkitMaps("YOUR_API_KEY")
#endif
For more information on how to initialize the map on iOS and Android, as well as how to work with the map control API, see the .NET MAUI Maps documentation.
MauiProgram.cs:var builder = MauiApp.CreateBuilder();
builder.UseMauiApp<App>();
builder.UseMauiCommunityToolkit();
4.1. For advanced settings set CommunityToolkit.Maui.Options:
builder.UseMauiCommunityToolkit(options =>
{
    options.SetShouldSuppressExceptionsInConverters(false);
    options.SetShouldSuppressExceptionsInBehaviors(false);
    options.SetShouldSuppressExceptionsInAnimations(false);
});
The .NET MAUI Community Toolkit GitHub Repository contains the source code for a sample application that is designed to show how you can use the toolkit to build a .NET MAUI application. Please note that you will be required to clone or download the repository and compile the source code in order to run the sample application.
We recommend developers who are new to .NET MAUI to visit the .NET MAUI documentation.
Visit the .NET MAUI Community Toolkit GitHub Repository to see the current source code, what is coming next, and clone the repository. Community contributions are welcome!
.NET MAUI Community Toolkit feedback
.NET MAUI Community Toolkit is an open source project. Select a link to provide feedback:
Events
Mar 17, 9 PM - Mar 21, 10 AM
Join the meetup series to build scalable AI solutions based on real-world use cases with fellow developers and experts.
Register nowTraining
Module
Create a cross-platform app with .NET MAUI - Training
Learn how to use Visual Studio with .NET MAUI (Multi-platform Application User Interface) to create a cross-platform app.