Import data with Power Query
![]() Microsoft Cloud for Sustainability
Microsoft Cloud for Sustainability
The Power Query guided experience is the most comprehensive ingestion approach available within Microsoft Sustainability Manager. It allows you to import data for multiple entities through multiple sources, all through a single import. You can add one or many entities throughout the ingestion flow along with detailed guidance to ensure that the ingestion is successful.
This flow separates the data transformation and mapping steps to allow different users to transform and map data during ingestion. It also allows you to transform and map data within the same ingestion flow. The mapping experience also includes intelligent logic to identify the correct data model entities using attribute information from the data transformation queries.
The steps in this section help you to use the Power Query experience within Sustainability Manager.
Step 1: Start the Power Query experience
To access the new Power Query experience, select Data imports under Data management in the Data area of the left navigation.
Select Power Query Guided Experience. A new navigation screen opens where you can select the entities for import.
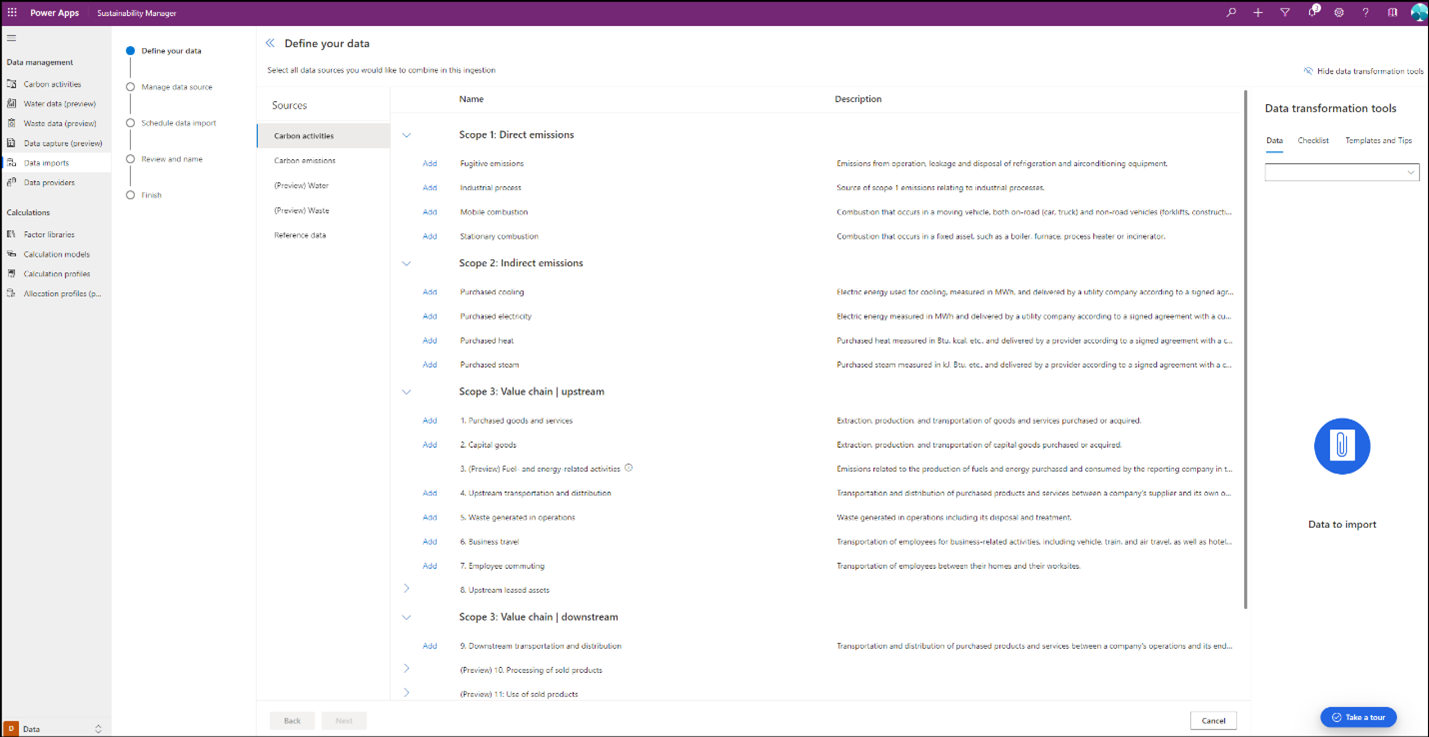
Sustainability Manager has now created a shopping cart experience where all the available entities are broken down into the following categories.
- Carbon Activities
- Carbon Emissions
- Water
- Waste
- Reference Data
Select any of these data categories to view a list of all their entities you can import.

Step 2: Add entities
You can add one or more entities within the same data import. Select the Add button before each entity in the shopping cart on the right. You can also add entities across categories within the same import.

A checkmark indicates each selected entity in the shopping cart. You can remove entities from the shopping cart by selecting the X next to them.
You can also view any imported data for each of these entities by selecting View next to the entity name. A new window displays all the data that has already been imported into Sustainability Manager.
The shopping cart experience is provided under a separate navigation on the right called Data transformation tools. These tools appear in three tabs. Each tab is available throughout the import experience, but you can hide them if needed by selecting Hide data transformation tools on the top right. Each tab helps guide you to successfully import data.
Data
The Data tab provides a list of all the entities added to the data import along with a drop-down of all the entities available for import within Sustainability Manager. Select the dropdown to list the entities. Select an entity to add it to the data import. This tool gives you the option to add entities in case you forgot to make the selection in the first step.

Checklist
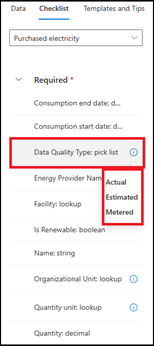
The Checklist tab provides a list of all the entities with the entities from the import shown first. After you select any entity, you'll see a list of all the required and optional attributes for successful import. This tool provides you with a quick reference to ensure all the required attributes are being imported from the data source for the import to be successful.

The checklist also provides more information on each of the attributes, for example if it's a lookup or pick list. You can get more details on some of these attributes by selecting information icon next to them.
For some attributes, it opens a new window with available information.
Note
The Checklist tab only provides information on the attributes associated with the selected entity, so you can't use it to add more entities to your data import from the dropdown, which is only available through the Data tab. However, you can select Add on the main navigation screen to add more entities with any of the three tabs selected under Data transformation tools. You can only see the list of entities selected for import in the Data tab.
Templates and tips
The Templates and tips tab provides you with the option to download and use simplified Excel templates within the Power Query experience. The dedicated templates experience detailed in Import data with Excel templates is used for a one-time import and provides guidance for successfully importing data into Sustainability Manager. However, the templates within Power Query only include the entities and attributes that you can download through the Power Query experience, add the data, and create a Power Query connection.
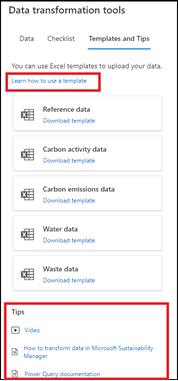
This tab includes guidance on how to use these templates within the Power Query experience. It also includes videos and documentation on how to transform data in Sustainability Manager, along with detailed documentation on Power Query. All this information helps address your needs depending on experience level, both on sustainability entities and Power Platform expertise. The option to include templates in the Power Query experience provides flexibility if you find it difficult to use Power Query transformation tools even with the provided information.
Step 3: Choose a data source
After you add all the entities to the shopping cart, select Next to choose the data source. A list displays of all the Power Query connectors that you can use to import data.
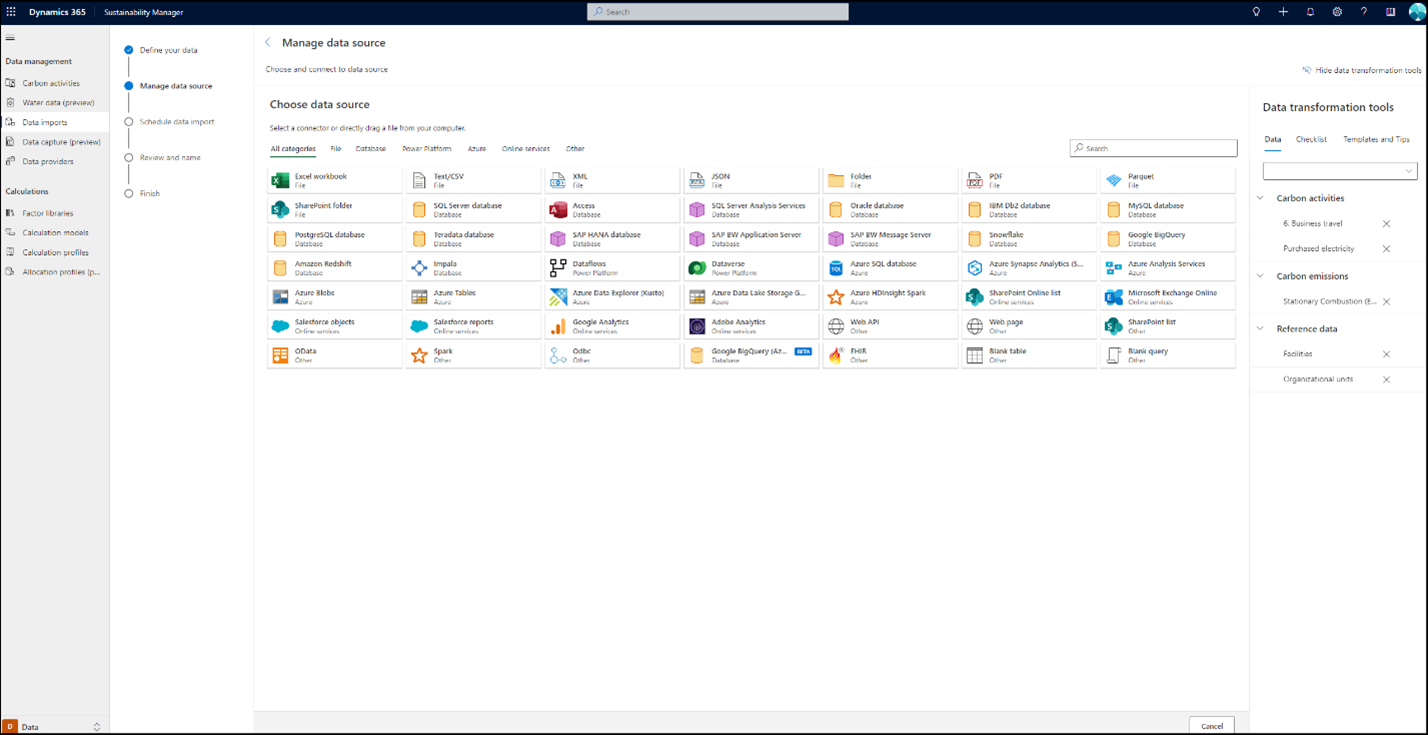
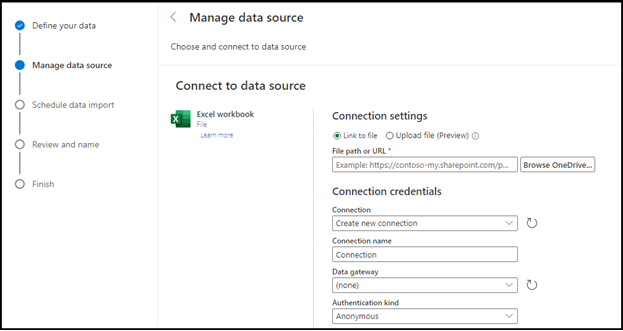
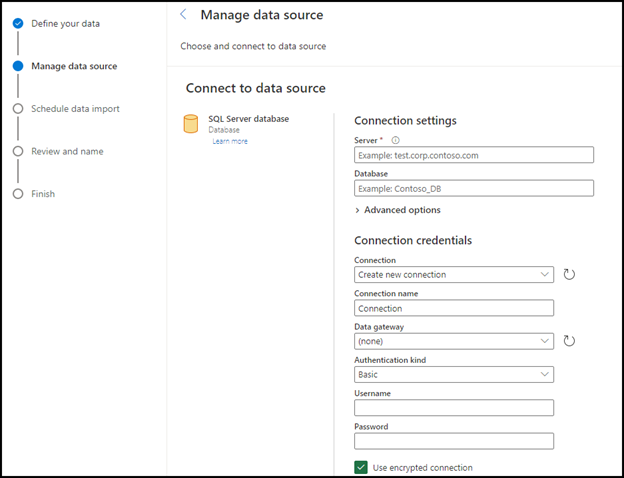
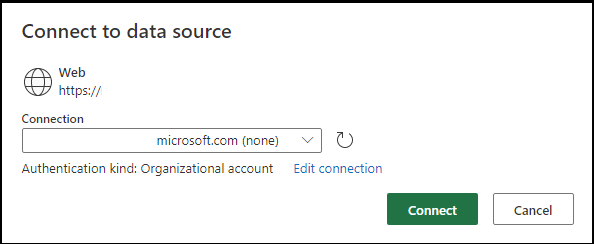
Select the data source to get to the Connection settings page. Depending on the source selected, you might need to authenticate with your credentials and establish a connection with the data source.
Example of an Excel data source:
Example of an SQL database:
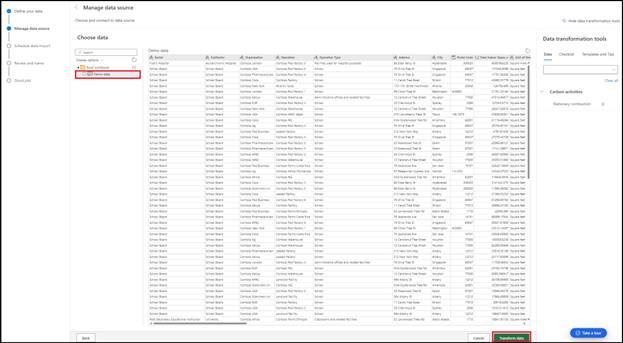
Select the data source, and then select Next at the bottom of the screen. Select the tab on the left navigation to preview the data set, and then select Transform data.
Step 4: Transform data
The following example using sample data illustrates the guided experience to transform data using Power Query.
The data file we're using to extract data for stationary combustion doesn't contain column headers and naming conventions as defined in the Sustainability Manager data model. It's also not clear whether all the required reference data is in the system to successfully import the stationary combustion data. All dependency data can now be checked and be imported through the same data import if it's not already in the system.
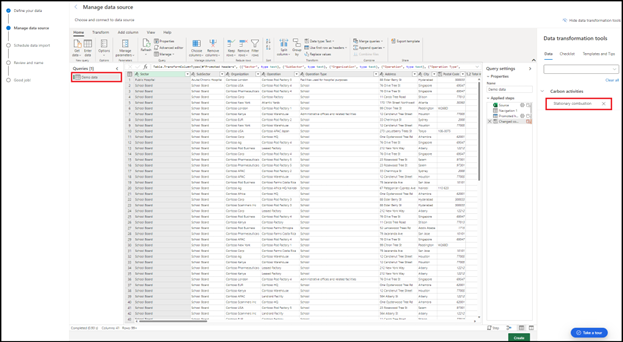
Add Queries: First, add queries to transform the source data. To ensure the source data is intact, we recommend that you create a copy of the source data query. Select the demo data query, press CTRL+C, and then press CTRL+V to create a new query and rename it to stationary combustion.
Review Data Attributes: Select the Checklist tab in Data transformation tools, select the dropdown menu, and then select stationary combustion under Recent data modules. A list displays of all the required attributes to successfully import data, along with the optional attributes for this entity. Recent data modules in the checklist dropdown always provides the list of all the entities in the shopping cart that you selected within a data import.
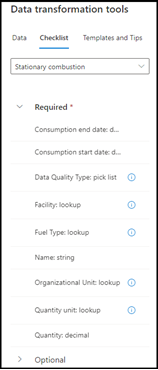
The checklist indicates that there are other entities that must be already in the system or need to be imported along with other attributes that include dates, pick list, and lookup. The following instructions show how to add each of these dependent entities and attributes.
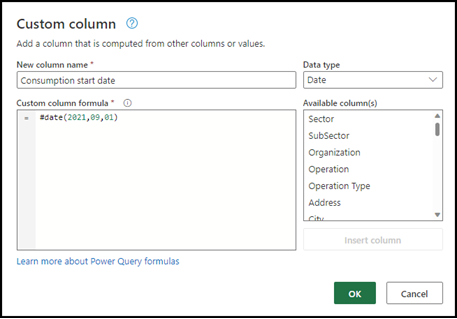
Consumption Start/End Dates: The data set doesn't include consumption start and end dates, which are required attributes for stationary combustion. To add these attributes, select Add column on the top, and then select Custom column. In the window, update New column name to Consumption start date, select the date data type from the dropdown, add #date(2021,09,01) under Custom column formula, and then select OK. Repeat this step to add a column for Consumption end date in the same format (year, month, date). This step adds the columns for these two required attributes. To copy the column, select Duplicate column, and then select Replace values to change any of the values in it.
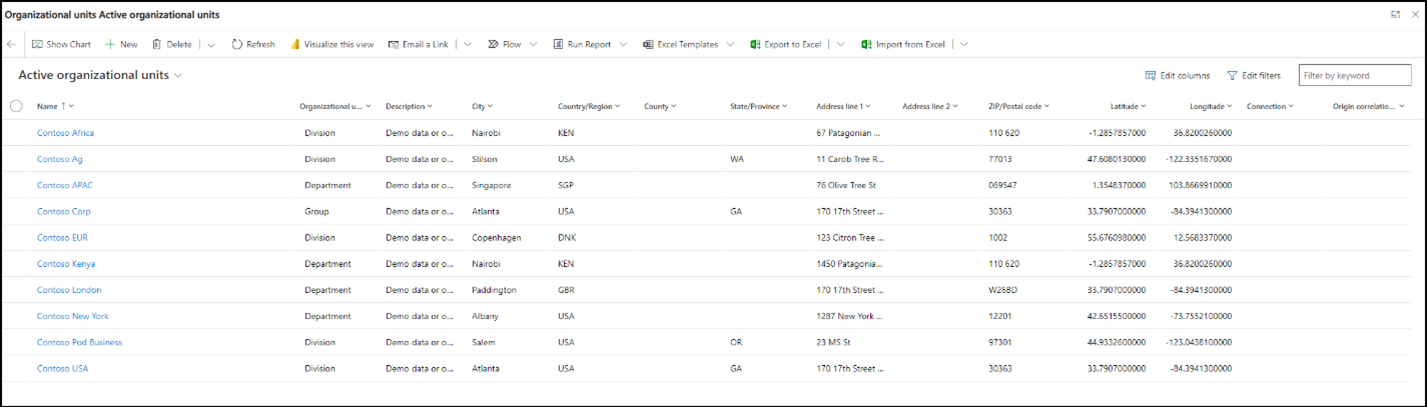
Facility: Select the information icon next to the facility to get a list of all the facilities currently in the system. For this data set, it looks like all the facilities are already in the system and are listed under the column titled Operation. Change the column header to Facility.
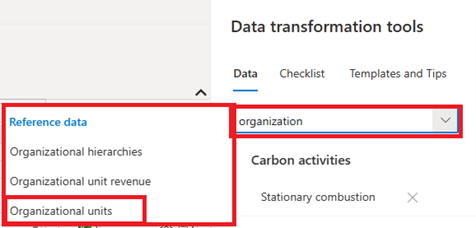
Organizational Unit: To add Organizational unit to this import, go to the Data tab under Data transformation tools and enter Organization in the dropdown. This action shows you the Organizational unit entity under reference data. Select it to add it to the shopping cart.
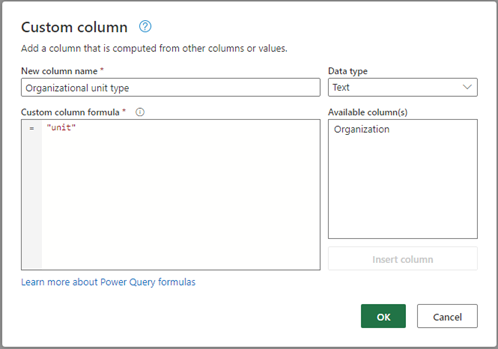
Create a new query by copying the demo data query on the left side and renaming it to Org unit. The organizational unit checklist indicates that the required attributes include name and the organizational unit type. Select Choose columns at the top, uncheck Select all, and then select organization to show only the organization column. To add organization type, select Add column at the top, select Custom column to open a new window, and then change New column name to Organizational unit type. Select data type text from the dropdown, add "Division" in double quotes under Custom column formula, and then select OK.
This action adds the organizational unit type column to the query. Rename the organization column to Name as defined within the data model. Be sure to check for duplicates. Right click on the Name column header, right click, and select Remove duplicates.
Data Quality Type: Data Quality Type is a pick list that can be one of three options. To add this attribute, select the stationary combustion query, select Add column at the top, and then select Custom column. In a new window, New column name updates Data quality type. In the dropdown, select data type as text, add “Metered” within double quotes under Custom column formula, and then select OK. This action adds the Data quality type column to the query.
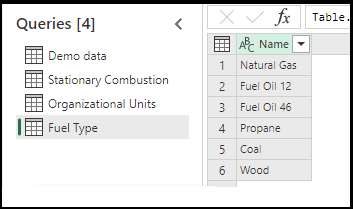
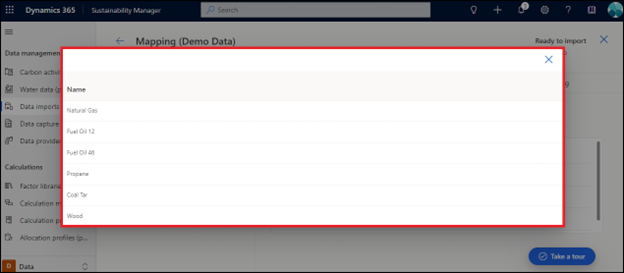
Fuel Type: For Fuel Type, the easiest method is to create an Excel workbook and add the source fuel types in a single column. While you can use Power Query to extract this information from the source file, you would need a certain level of Power Platform expertise that may not be ideal for a small subset of data. For this example, we created an Excel file that lists the fuel types from the data source. To import this file, select Get data at the top, which adds it to the list of already created queries. Select Use first row as headers to ensure that the new query uses the first row as a header.
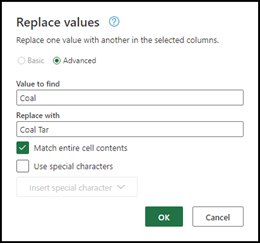
The fuel type in the data source needs to match exactly to how it's described within the Sustainability Manager data model. Select the information icon next to the fuel type under the checklist to see the complete list and naming convention. In this data set, Coal needs to be updated to Coal Tar. Select the cell with Coal, right click, select Rename, replace Coal with Coal Tar, and then select OK.
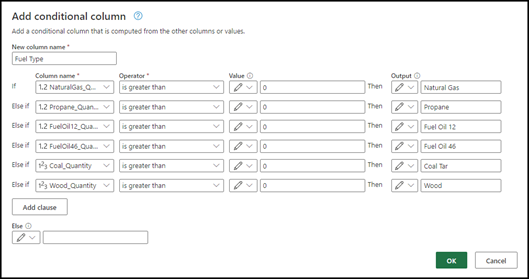
The demo data uses a different naming convention for the fuel types, so we must align them with the fuel types described in the data model. We need to add a conditional column available in Power Query. Select the stationary combustion query, select Add column at the top, and then select Conditional Column. Update the column name to Fuel Type, and then select the first fuel from the data source using the dropdown under column name to apply a condition. In this example, if any of the source fuel types has a value greater than 0, then we select the appropriate fuel type matching our data model that we uploaded earlier. Continue adding the clauses for all the six fuel types in the demo data. Select OK to add a fuel type column with these conditions to the stationary combustion query.
Name: The data set doesn't include a Name column, which is also a required attribute for stationary combustion. You can rename any of the columns in the stationary combustion query or add a custom column and a unique name. Add a custom column titled Name, with Stationary Combustion as the text.
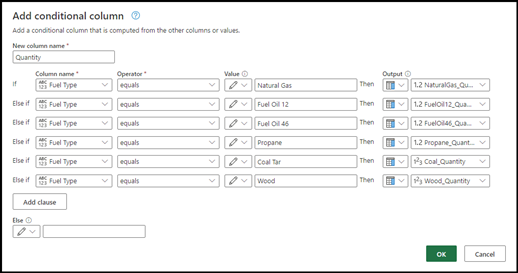
Quantity and Quantity Unit: Quantity and Quantity Unit are required fields for stationary combustion, so we have to add them to the query. Select Add column at the top, and then select Conditional Column. Update the column name to Quantity, and then select Fuel Type under the column name to apply a condition. In this example, we're matching the fuel type quantity to the quantity in the demo data. Enter each of the fuel types. Under the Output dropdown, select Use values in a column to select the corresponding fuel type in the next dropdown. Continue adding the clauses for all six fuel types in the demo data. Select OK to add a Quantity column with these conditions to the stationary combustion query.
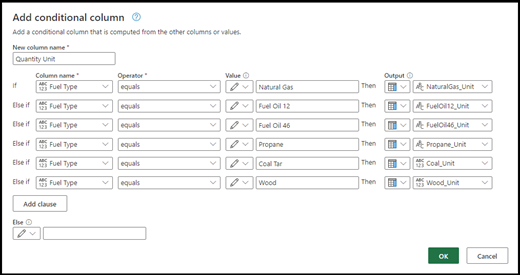
Repeat these steps to add a column for quantity unit.
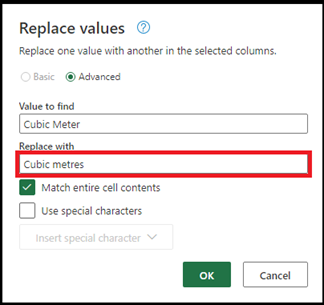
Verify Units: For import to be successful, the units in the data source must match the units defined within the Sustainability Manager data model. To verify the naming convention, select the Information outline icon next the quantity unit in the entity checklist. A new window opens for all the units and their naming convention. To update the units for the demo data:
- Select the dropdown next to the Quantity Unit header.
- Select Load more to provide a list of all the units within that column.
- Right click the first unit and select Replace values.
- Enter the unit’s data model name and select OK.
Repeat this step for all the units in the data.
Cleaning Data: It's important to ensure that none of the records have empty cells in the query. To check and remove them, select any of the Fuel Quantity column header dropdowns, and then select Remove empty. Repeat this step for all the Fuel Quantity columns. Repeat the same step for the column named Quantity Unit.
Finalize Queries: The last step is to select the required attributes for stationary combustion and finalize the query. Select Choose Columns on the top navigation window, uncheck Select all and the select all the required attributes. To verify that all the attributes are available and selected in the query, refer to the checklist under Data transformation tools. After selecting, select OK.
Remove Demo Data: Before transforming the queries, remove the original demo data query.
Step 5: Create a data import
After the queries have been created and transformed, select Create at the bottom of the page to create your data import.
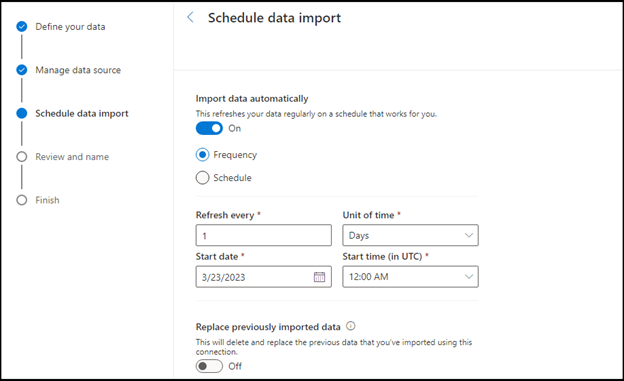
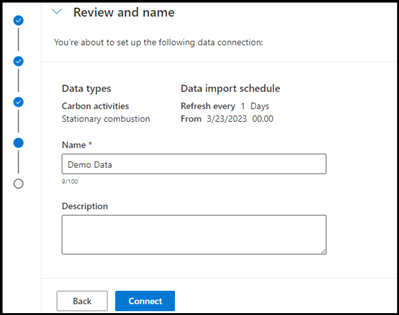
Schedule data import: This page provides an option to define a recurring schedule for data refresh from the connected source that can be turned off using a toggle. The refresh can be automatic at a defined frequency or on a defined schedule. You can also choose to replace previously imported data. After selecting an option, select Next.
Review and name: Enter a name for the data import along with a description (optional), and then select Connect.
A data import is created for this data set. The data doesn't appear in Sustainability Manager until it's mapped to the data model entities. You can continue with the mapping after the transformation completes, or you or another user can complete the mapping later.

Select Done to go to the Data imports page or select **Map fields to map your data.
Step 6: Map data
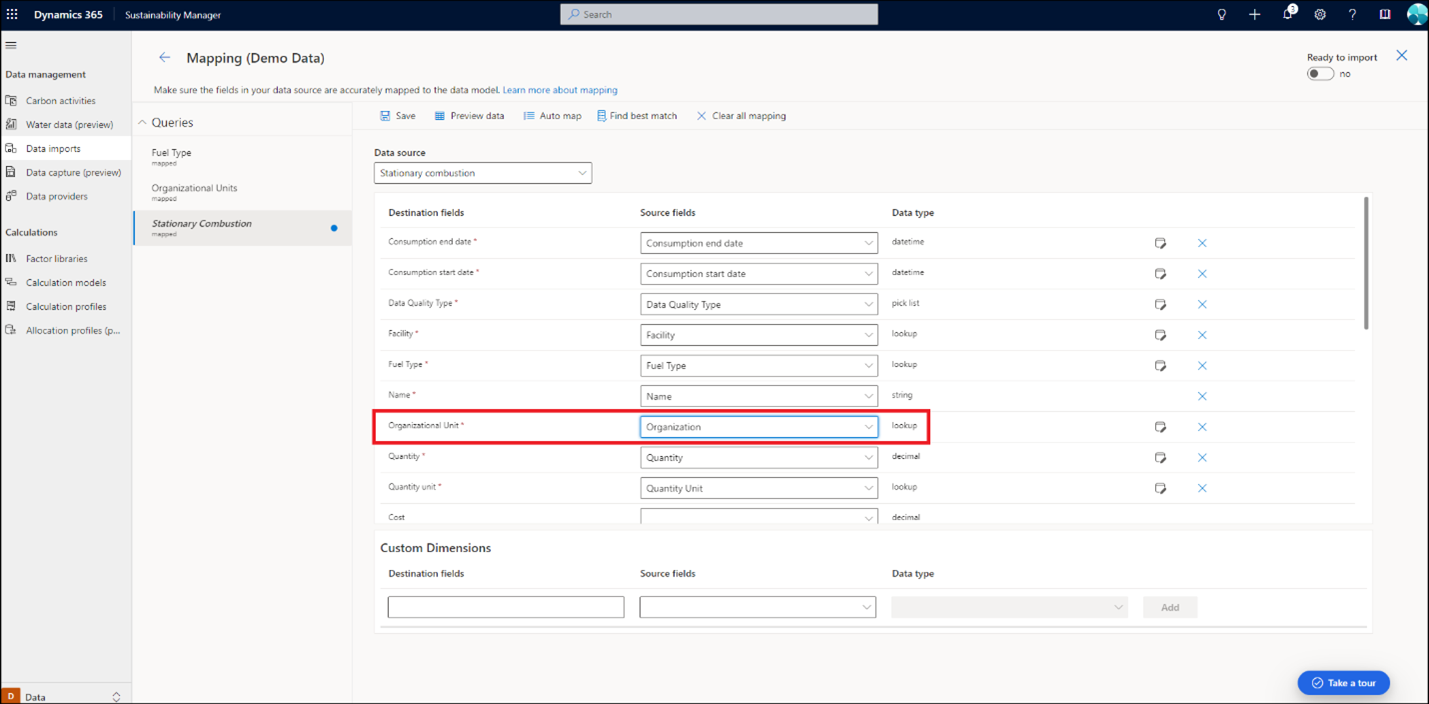
The mapping experience provides more guidance, logic to map entities and attributes, ability to preview mapped data, and intelligence to identify entities that match data from the queries.
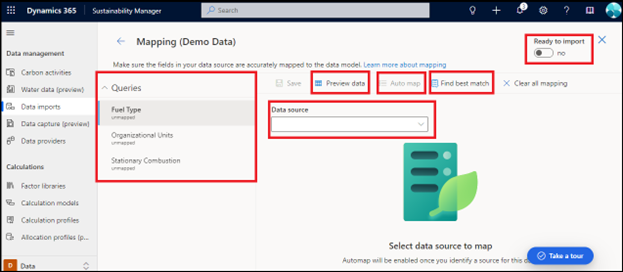
The Mapping page contains the following components:
Queries: All the queries generated in the data transformation step. A blue dot next to a query indicates that the mapping is incomplete, has to be reviewed, and hasn't been saved.
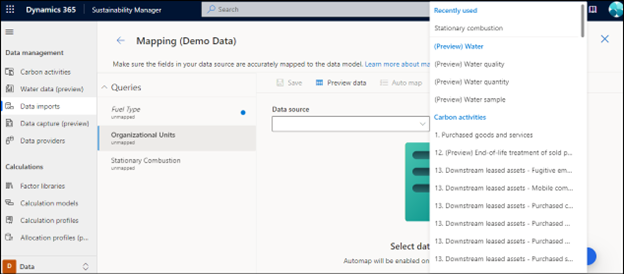
Data Source: This dropdown provides a list of all the entities available that can be mapped to the selected queries. The entities selected during the import steps earlier are always shown at the top of the dropdown under Recently used.
Preview Data: After a query is mapped to an entity, a preview of mapped data is generated for you to review the mapping before it's saved.
Auto map: Auto map lets you map the data to a query if you know what entity the query is for. It analyzes partial words and partial word matches. Select a query in the left navigation, select the appropriate entity from the data source dropdown, and then select Auto map to map the fields.
Find Best Match: You can map queries to the data model entities even with partial or incomplete information. The logic compares percentage match for all the required attributes in the query first, then for the optional attributes, then matching the query name with the sustainability data definition, and finally, any of the added or selected data definitions during import. Select the query on the left side, and then select Find best match to map the source fields to the correct data model entity. Another validation check within mapping experience is when the fields aren't an exact match and require your validation before the mapping is saved. Those fields are highlighted in blue, indicating that they must be checked before the mapping is saved.
Ready to import: You can import multiple entities through a single import, which requires multiple queries that must be mapped within the data import. The mapping is done individually for each query to ensure that the source fields can be reviewed and mapped accurately. If the import worker runs before the mapping is complete, import errors occur. The mapping experience includes a dedicated toggle that is turned on after the mapping is complete. This step ensures that the import doesn't run until the mapping is complete, eliminating any ingestion errors that can arise from incomplete mapping.
For the demo data, select each of the queries and complete the mapping using Auto map or Find best match. Review the source fields during each mapping. After verifying, save the mapping and toggle Ready to import to On. Go to the Data imports screen to see the status of the added data import.
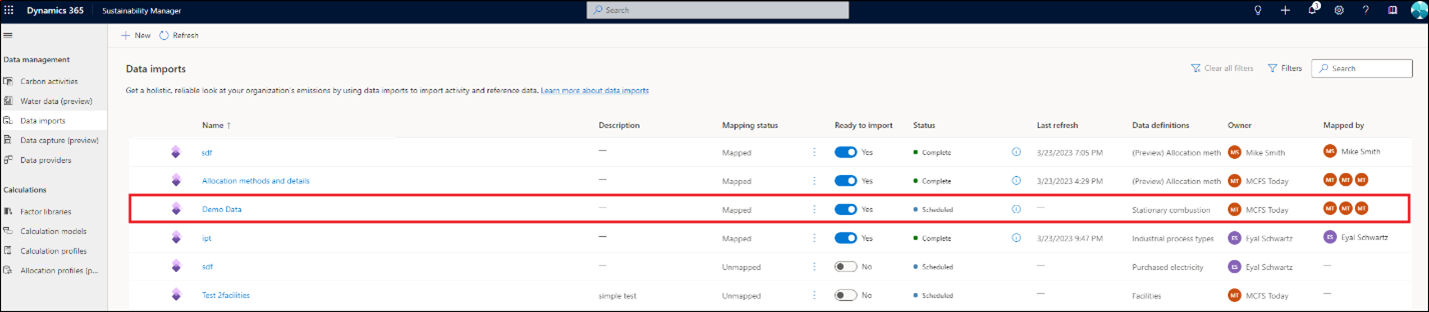
The Data imports page updates and includes the following details for each import:
- Name of the data import.
- Description if added by the user.
- Mapping status to indicate the import is mapped or unmapped.
- Toggle for Ready to import.
- Status of the data import.
- Last refresh including date and time of refresh.
- Data definition of the entity or entities being imported.
- Owner of data import.
- Owner of the mapping step.
You can edit import and mapping separately.

Edit a Power Query import
Sustainability Manager lets you update or edit a previous import and make changes to the source file, entities, scheduled refresh, or import name. Follow these steps to edit an existing import.
In the left navigation, under Data management, select Data imports.
Select the data import that you want to edit.
Select Edit import at the top of the page. The Define your data page appears with the option to add data entities to the import.

Add or change entities and select Next.
Select Configure connection.

Select the credentials, and then select Connect.
If you want to change the import type or the source file, select Get data in the top navigation. You're returned to the Connect to data source page, where you can repeat the previous steps. You can also edit and transform data in the existing queries using Power Query features.


More documentation on how to use Power Query is available within Templates and tips under Data transformation tools.
If you plan to update only the data refresh schedule, select Create at the bottom of the page. You can then update the data refresh, import name, or description. When you've finished, select Connect.
Select Done if no mapping update is required. If mapping needs to be updated, select Map fields to go to the mapping screen.
Select the queries that must be remapped and follow the previous mapping steps. After the mapping is complete, save the mapping and set the Ready to import toggle to Yes.
The import is now updated in the data imports page.
If only mapping needs to be updated, go to the mapping page from the Data imports page by selecting Edit mapping in the top navigation.
Import custom dimensions
Importing custom dimensions is an integral part of the new import experience and only available via the Power Query experience.
The following steps are the preferred workflow for ingesting custom dimensions:
- Define new columns in your source data.
- Transform into homogeneous form so that it can be processed in calculations and reports.
- Create and map to custom dimensions.
- Refer to custom dimensions in calculations and analysis.
This section focuses on import and mapping. To learn more about custom dimensions, go to Custom dimensions.
To ingest custom dimensions, define more attributes (columns) in your data source such as Excel or database that you want to ingest.
Example of additional data:
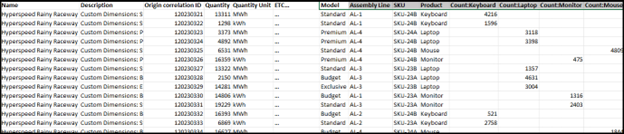
In the Power Query experience, transform the data, potentially with multiple queries so that the data is consistent and valid for calculations (if needed). For example, here we transform a heterogeneous data set into multiple homogeneous ones.
Pre-transformation query:
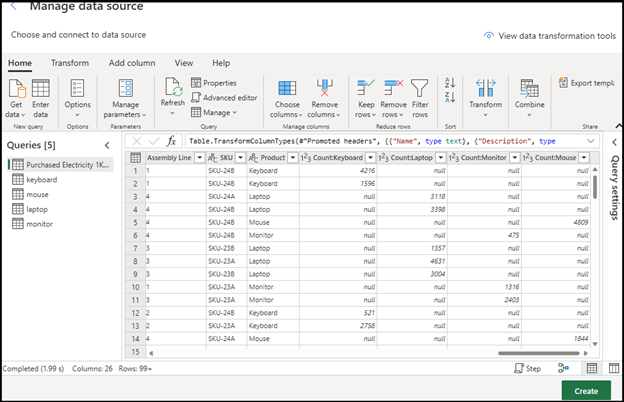
Post transformation query:

Mapping
Follow the steps to detect and map the data model entity attributes. Review all mappings and ensure that no custom dimension is mapped to standard or incorrect custom dimension destination field.
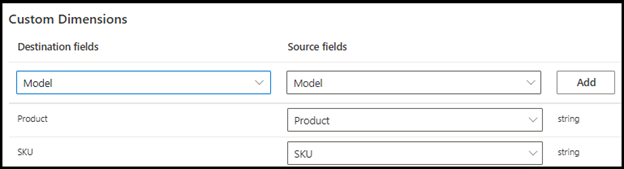
In the Custom Dimensions section:
- Source fields: select from the dropdown a source field from your original data.
- Destination fields:
- If custom dimension already exists in the dropdown, select it, and select Add.
- If it isn't available, enter a name to map into, select type, and select Add.
You can also create the dimensions in the Custom dimensions management settings before mapping so that they're available to select in the dropdown control.
Add existing custom dimension:
Add a new custom dimension:

See also
- Overview of data import
- Incremental data refresh
- Change data import connection ownership (preview)
- Import data with Excel templates
- Import data with Power Query
- Import data with data provider connectors
- Import data manually
- Error handling
- Considerations and FAQ
- Integration


