このチュートリアルでは、Postman を設定して使用し、HTTP を使用して Azure Communication Services に対して要求を行います。 このチュートリアルを終了すると、Communication Services と Postman を使用してショート メッセージ サービス (SMS) メッセージが正常に送信されます。 その後、Postman を使用して、Communication Services の他の API を調べることができます。
このチュートリアルでは、以下の内容を学習します。
- Postman をダウンロードします。
- HTTP 要求に署名するように Postman を設定します。
- Communication Services SMS API に対してメッセージを送信する要求を行います。
Prerequisites
- アクティブなサブスクリプションが含まれる Azure アカウント。 Azure サブスクリプションがない場合は、無料のアカウントを作成できます。 無料アカウントでは 200 ドル分の Azure クレジットが提供され、さまざまな組み合わせのサービスをお試しいただけます。
- アクティブな Communication Services リソースと接続文字列。 リソースがない場合は、「Communication Services リソースを作成する」を参照してください。
- SMS メッセージを送信できる Communication Services の電話番号。 電話番号を取得するには、「電話番号を 取得する」を参照してください。
Postman をダウンロードしてインストールする
Postman は、任意の HTTP API に対して API 要求を行うことができるデスクトップ アプリケーションです。 Postman は、API のテストと探索に一般的に使用されます。 このチュートリアルでは、 Postman Web サイトから最新のデスクトップ バージョンをダウンロードします。 Postman には Windows、Mac、Linux 用のバージョンがあるため、お使いのオペレーティング システムに適したバージョンをダウンロードしてください。
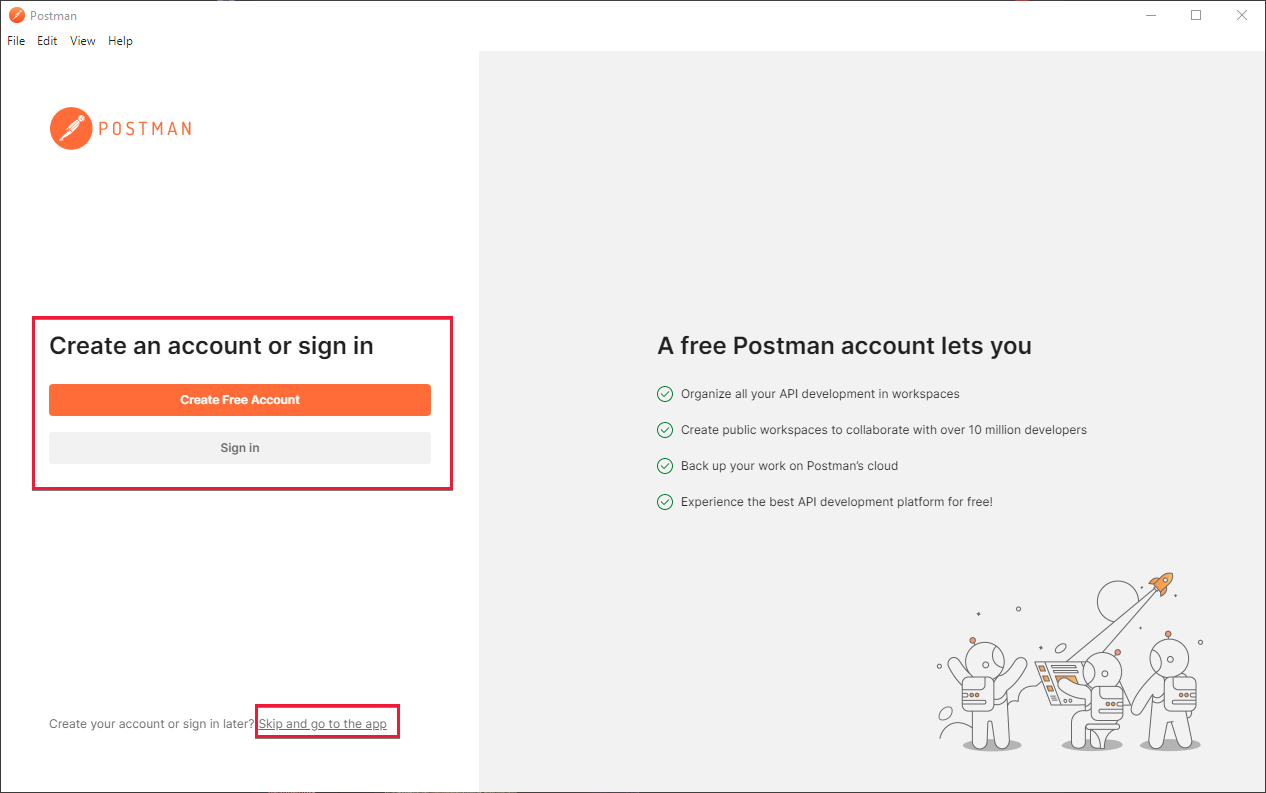
ダウンロードが完了したら、アプリケーションを開きます。 スタート画面で、サインインまたは Postman アカウントの作成を求められます。 アカウントの作成は省略可能であり、[スキップ] を選択して アプリに移動することでスキップできます。 アカウントを作成すると、API 要求の設定が Postman に保存されます。 その後、他のコンピューターで要求を取得できます。

アカウントを作成するか、手順をスキップすると、Postman のメイン画面が表示されます。
Postman コレクションを作成して構成する
Postman は、さまざまな方法で要求を整理できます。 このチュートリアルでは、Postman コレクションを作成します。 このタスクを実行するには、アプリケーションの左側にある [コレクション] を選択します。
![[コレクション] タブが強調表示されている Postman のメイン画面を示すスクリーンショット。](media/postman/collections-tab.png)
[ 新しいコレクションの作成 ] を選択して、コレクションの作成プロセスを開始します。 Postman の中央領域に新しいタブが開き、コレクションに名前を付けます。 ここでは、コレクションの名前は Azure Communication Services です。

コレクションを作成して名前を付けたら、それを構成する準備が整います。
コレクション変数を追加する
認証を処理し、要求を容易にするには、新しく作成された Communication Services コレクション内に 2 つのコレクション変数を指定します。 これらの変数は、コレクション内のすべての要求で使用できます。 変数の作成を開始するには、[ 変数 ] タブを選択します。
![Communication Services の [変数] タブを持つ Postman を示すスクリーンショット。](media/postman/variable-stab.png)
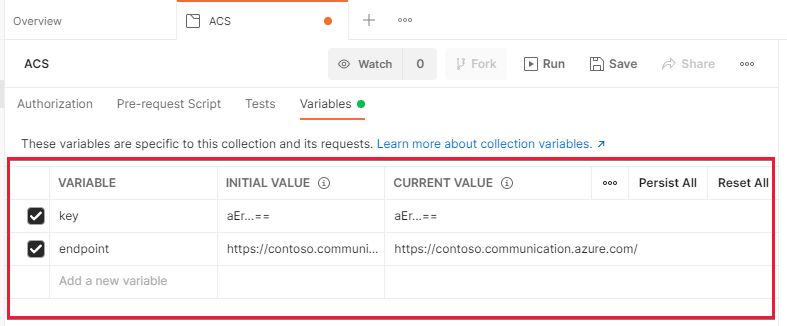
[コレクション] タブで 2 つの変数を作成します。
-
key: この変数は、Azure portal の Communication Services キー ページのキーのいずれかである必要があります。 たとえば
oW...A==です。 -
endpoint: この変数は、 キー ページの Communication Services エンドポイントである必要があります。 末尾のスラッシュを必ず削除してください。 たとえば
https://contoso.communication.azure.comです。
[ 変数 ] タブの [ 初期値] 列にこれらの値を入力します。 右上隅にある [ すべて永続化 ] を選択します。 正しく構成されている場合、Postman ウィンドウは次の図のようになります。

変数の詳細については、 Postman のドキュメントを参照してください。
事前要求スクリプトを作成する
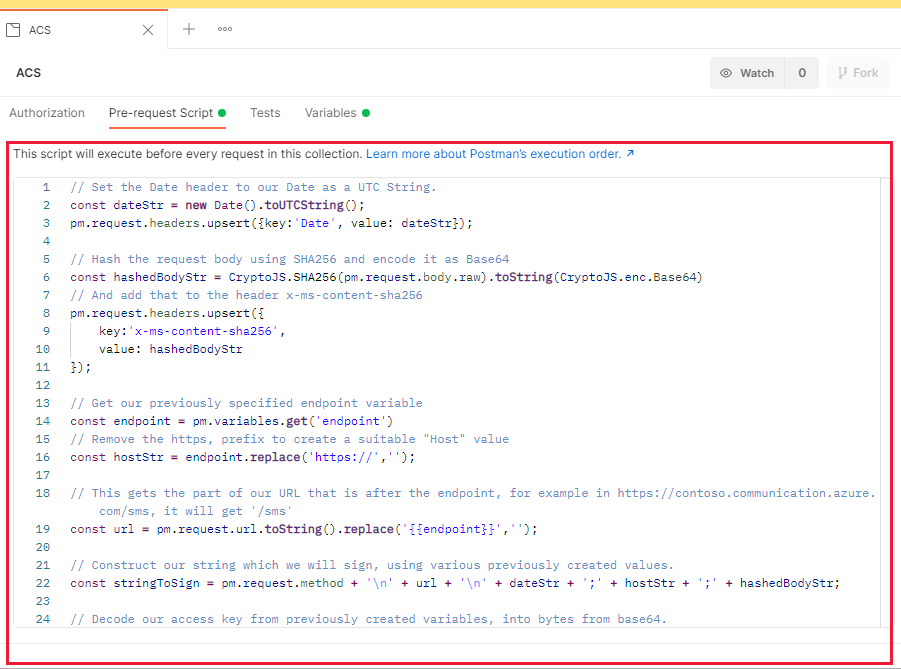
次の手順では、Postman で事前要求スクリプトを作成します。 Postman の各要求の前に、事前要求スクリプトが実行されます。 あなたのために要求パラメーターを修正または変更できます。 このスクリプトを使用して HTTP 要求に署名し、Communication Services が HTTP 要求を承認できるようにします。 署名要件の詳細については、 認証に関するガイドを参照してください。
コレクション内の任意の要求で実行されるように、このスクリプトをコレクションに作成します。 この手順を実行するには、[コレクション] タブ で [ 事前要求スクリプト] を選択します。
![Communication Services コレクションの [事前要求スクリプト] タブを持つ Postman を示すスクリーンショット。](media/postman/start-pre-request-script.png)
次に、テキスト領域に入力して、事前要求スクリプトを作成します。 この手順は、貼り付ける前に Visual Studio Code などの完全なコード エディターで記述する方が簡単な場合があります。 このチュートリアルでは、スクリプト プロセスの各部分について説明します。 スクリプトを Postman にコピーして開始する場合は、最後までスキップします。 それではスクリプトの記述を始めます。
事前要求スクリプトを記述する
最初の手順では、協定世界時 (UTC) 文字列を作成し、それを Date HTTP ヘッダーに追加します。 この文字列を変数に格納して、後で署名するときに使用します。
// Set the Date header to our Date as a UTC String.
const dateStr = new Date().toUTCString();
pm.request.headers.upsert({key:'Date', value: dateStr});
次に、SHA 256 を使用して要求本文をハッシュし、 x-ms-content-sha256 ヘッダーに配置します。 Postman には、グローバルにハッシュと署名を行う 標準ライブラリ がいくつか含まれているため、それらをインストールしたり、必須にしたりする必要はありません。
// Hash the request body by using SHA256 and encode it as Base64
const hashedBodyStr = CryptoJS.SHA256(pm.request.body.raw).toString(CryptoJS.enc.Base64)
// And add that to the header x-ms-content-sha256
pm.request.headers.upsert({
    key:'x-ms-content-sha256',
    value: hashedBodyStr
});
HTTP ホスト ヘッダーの値を識別するには、以前に指定したエンドポイント変数を使用します。 Host ヘッダーは、このスクリプトが処理されるまで設定されません。
// Get our previously specified endpoint variable.
const endpoint = pm.variables.get('endpoint')
// Remove the https prefix to create a suitable "Host" value.
const hostStr = endpoint.replace('https://','');
この情報を使用して、HTTP 要求に署名する文字列を作成できるようになりました。 文字列は、以前に作成された複数の値で構成されます。
// This gets the part of our URL that is after the endpoint, for example, in https://contoso.communication.azure.com/sms, it will get '/sms'.
const url = pm.request.url.toString().replace('{{endpoint}}','');

// Construct our string, which we'll sign, by using various previously created values.
const stringToSign = pm.request.method + '\n' + url + '\n' + dateStr + ';' + hostStr + ';' + hashedBodyStr;
最後に、Communication Services キーを使用してこの文字列に署名します。 その後、そのキーを Authorization ヘッダーの要求に追加します。
// Decode our access key from previously created variables into bytes from Base64.
const key = CryptoJS.enc.Base64.parse(pm.variables.get('key'));
// Sign our previously calculated string with HMAC 256 and our key. Convert it to Base64.
const signature = CryptoJS.HmacSHA256(stringToSign, key).toString(CryptoJS.enc.Base64);

// Add our final signature in Base64 to the authorization header of the request.
pm.request.headers.upsert({
    key:'Authorization',
    value: "HMAC-SHA256 SignedHeaders=date;host;x-ms-content-sha256&Signature=" + signature
});
最後の事前要求スクリプト
最終的な事前要求スクリプトは、次の例のようになります。
// Set the Date header to our Date as a UTC String.
const dateStr = new Date().toUTCString();
pm.request.headers.upsert({key:'Date', value: dateStr});

// Hash the request body by using SHA256 and encode it as Base64.
const hashedBodyStr = CryptoJS.SHA256(pm.request.body.raw).toString(CryptoJS.enc.Base64)
// And add that to the header x-ms-content-sha256.
pm.request.headers.upsert({
    key:'x-ms-content-sha256',
    value: hashedBodyStr
});

// Get our previously specified endpoint variable.
const endpoint = pm.variables.get('endpoint')
// Remove the https prefix to create a suitable "Host" value.
const hostStr = endpoint.replace('https://','');

// This gets the part of our URL that is after the endpoint, for example, in https://contoso.communication.azure.com/sms, it will get '/sms'.
const url = pm.request.url.toString().replace('{{endpoint}}','');

// Construct our string, which we'll sign, by using various previously created values.
const stringToSign = pm.request.method + '\n' + url + '\n' + dateStr + ';' + hostStr + ';' + hashedBodyStr;

// Decode our access key from previously created variables into bytes from Base64.
const key = CryptoJS.enc.Base64.parse(pm.variables.get('key'));
// Sign our previously calculated string with HMAC 256 and our key. Convert it to Base64.
const signature = CryptoJS.HmacSHA256(stringToSign, key).toString(CryptoJS.enc.Base64);

// Add our final signature in Base64 to the authorization header of the request.
pm.request.headers.upsert({
    key:'Authorization',
    value: "HMAC-SHA256 SignedHeaders=date;host;x-ms-content-sha256&Signature=" + signature
});
[事前要求スクリプト] タブのテキスト領域に、この最終的 なスクリプト を入力するか貼り付けます。

入力した後、Ctrl キーを押しながら S キーを押すか 、[保存] を選択してスクリプトをコレクションに保存します。
![Postman prerequest スクリプトの [保存] ボタンを示すスクリーンショット。](media/postman/save-pre-request-script.png)
Postman で要求を作成する
すべてが設定されたので、Postman で Communication Services 要求を作成する準備ができました。 開始するには、Communication Services コレクションの横にあるプラス記号 (+) を選択します。

Postman で要求用の新しいタブを作成しました。次に、それを構成する必要があります。 SMS Send API に対して要求を行うので、詳細についてこちらの API のドキュメントを参照してください。 Postman リクエストを構成しましょう。
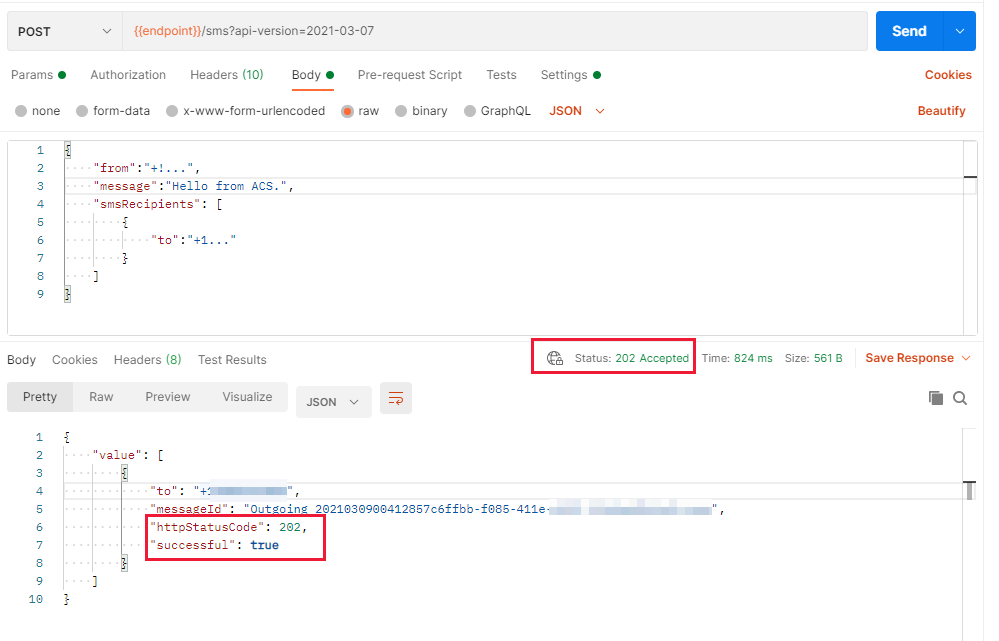
開始するには、要求の種類を POST に設定し、要求 URL フィールドに {{endpoint}}/sms?api-version=2021-03-07 を入力します。 この URL は、以前に作成した endpoint 変数を使用して、Communication Services リソースに自動的に送信します。

要求の [Body] タブで、[raw] を選びます。 右側のドロップダウン リストで、[JSON] を選択 します。

JSON 形式で情報を送受信するように要求を構成しました。
テキスト領域に、次の形式で要求本文を入力します。
{
    "from":"<Your Azure Communication Services Telephone Number>",
    "message":"<The message you'd like to send>",
    "smsRecipients": [
        {
            "to":"<The number you'd like to send the message to>"
        }
    ]
}
from値については、前述のように Communication Services ポータルで電話番号を取得する必要があります。 スペースと国コードのプレフィックスなしで入力します。 たとえば +15555551234 です。
messageは送信したいものを自由に選べますが、Hello from Azure Communication Servicesは良い例です。
to値は、SMS メッセージを受信できるように、アクセス権を持つ電話である必要があります。 自分の携帯電話を使用することをお勧めします。
この要求を、前に作成した Communication Services コレクションに保存します。 この手順により、以前に作成した変数と事前要求スクリプトが確実に取得されます。 要求領域の右上にある [保存] を 選択します。
![Postman 要求の [保存] ボタンを示すスクリーンショット。](media/postman/postman-save.png)
表示されるダイアログで、要求を呼び出す内容と保存する場所が表示されます。 任意の名前を付けることができますが、ダイアログの下半分で Communication Services コレクションを選択してください。
![Communication Services コレクションが選択された [Postman Save Request]\(Postman の保存要求\) ダイアログを示すスクリーンショット。](media/postman/postman-save-to-acs.png)
要求を送信する
すべてが設定されたので、要求を送信し、電話で SMS メッセージを受け取ることができます。 この手順を実行するには、要求が選択されていることを確認し、[ 送信] を選択します。
![[送信] ボタンが強調表示された Postman 要求を示すスクリーンショット。](media/postman/postman-send.png)
すべてが正常に完了した場合は、Communication Services からの応答が表示されます。これは 202 状態コードです。

to値で指定した番号を所有する携帯電話も SMS メッセージを受信しました。 これで、Communication Services と通信して SMS メッセージを送信できる機能的な Postman 構成が作成されました。