Use Confluent Connectors in Azure (preview)
Confluent Cloud offers a solution designed to help developers connect their Confluent clusters to popular data sources and sinks. This solution is available in Azure using the Confluent Connectors feature.
Note
Currently, Apache Kafka® & Apache Flink® on Confluent Cloud™ - An Azure Native ISV Service only supports Confluent Connectors for Azure Blob Storage, including source and sink connectors.
In this guide, you learn how to connect an instance of Apache Kafka & Apache Flink on Confluent Cloud to Azure Blob Storage.
- An Azure account with an active subscription. Create an account for free
- An Azure Blob Storage resource.
- A Confluent organization created on Azure Native ISV Services
- The Azure subscription Owner or subscription Contributor role is required. If necessary, contact your subscription administrator to assign you one of these roles.
- A configured environment, cluster, and topic inside the confluent organization. If you don't have one already, go to Confluent to create these constructs.
Follow these steps to create a sink connector for Azure Blob Storage.
Open your Confluent organization and select Confluent > Confluent Connectors (Preview) from the left menu.
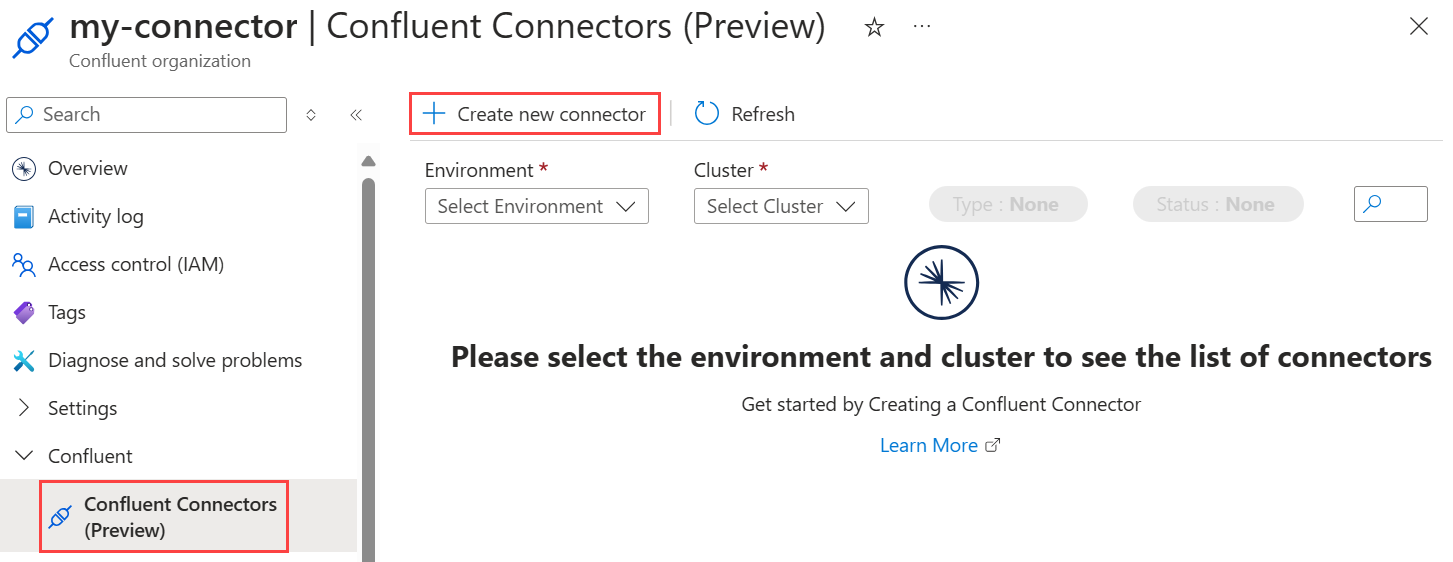
Select Create new connector. A connector pane opens up on the right hand side. Select or enter the following information under Create a new connector.
Set the basic settings below, then select Next.
| Setting | Example value | Description |
|---|---|---|
| Connector Type | Sink | A sink connector pulls data from Kafka topics and pushes it into an external database or system for storage or further processing. |
| Connector Class | Azure Blob Storage Sink | Select the Azure service you want to connect. Azure Blob Storage is currently the only available option. |
| Connector name | blob-sink-connector | Enter a name for your connector. |
| Environment | env1 | Select the environment where you would like to create this connector. |
| Cluster | cluster1 | Select the cluster where you would like to create this connector. |
| Topics | topic_1 | Select one or more topics from where the data needs to be pulled. If there are no topics in the cluster in the selected cluster, create one by selecting new topic, which will open the Confluent website. |
| Subscription | My subscription | Select the Azure subscription for the Azure Blob Storage where the data needs to be pushed. |
| Storage Account | storageaccount1 | Select the storage account where the data needs to be pushed. If needed, select Create new to create a new storage account. |
| Container | container1 | Select the container within the storage account where the data needs to be pushed. If needed, create a new container. |

Configure the authentication of your Kafka cluster via API keys. Create New is selected by default, which means that API keys will be automatically generated and configured when the connector is created. Proceed to the next tab.

| Setting | Example value | Description |
|---|---|---|
| Input Data Format | JSON | Select an input Kafka record data format type among the following options: AVRO, JSON, string, Protobuf. |
| Output Data Format | JSON | Select an output data format among the following options: AVRO, JSON, string, Protobuf. |
| Time interval | Hourly | Select the time interval in which you would like the data to be grouped. Choose between hourly and daily. |
| Flush size | 1000 | Optionally enter a flush size. Default flush size is 1000. |
| Number of tasks | 1 | Optionally enter the maximum number of tasks you would like your connector to support simultaneously. Default is 1. |

Select Review + create to continue.
Review the listed settings for your new connector to ensure that the details are good to go. Once done, select Create to begin the connector deployment.
A notification is displayed on the top right, calling out the status of the deployment. Once it shows "created", refresh the Confluent Connectors (Preview) page. You can now see the new connector tile on this page.
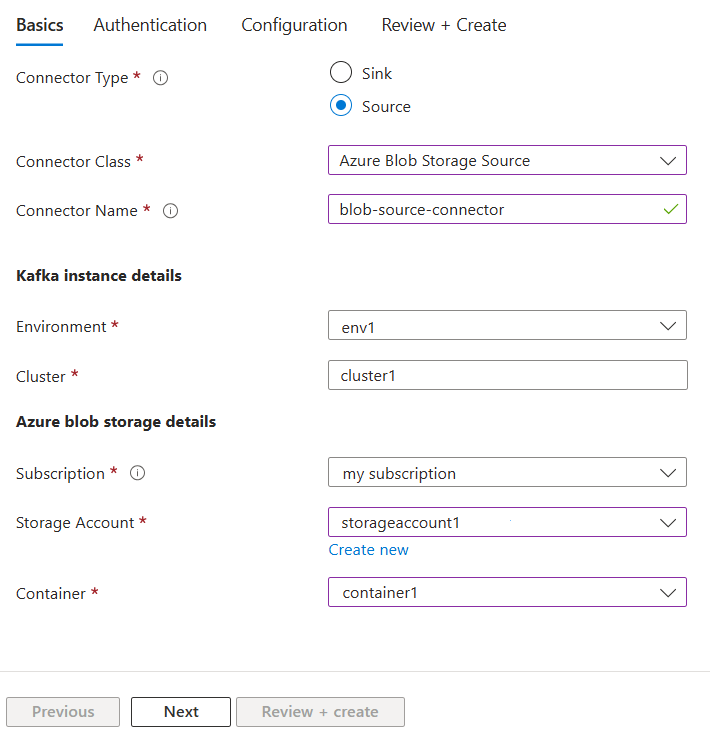
Open your Confluent organization and select Confluent > Confluent Connectors (Preview) from the left menu.
Select Create new connector. A connector pane opens up on the right hand side. Select or enter the following information under Create a new connector.
Set the basic settings below, then select Next.
| Setting | Example value | Description |
|---|---|---|
| Connector Type | Source | A source connector pulls data from an external database or system and pushes it into Kafka topics. |
| Connector Class | Azure Blob Storage | Select the Azure service you want to connect. Azure Blob Storage is currently the only available option. |
| Connector name | blob-source-connector | Enter a name for your connector. |
| Environment | env1 | Select the environment where you would like to create this connector. |
| Cluster | cluster1 | Select the cluster where you would like to create this connector. |
| Subscription | My subscription | Select the Azure subscription for the Azure Blob Storage where the data needs to be pulled. |
| Storage Account | storageaccount1 | Select the storage account where the data needs to be pulled. If needed, select Create new to create a new storage account. |
| Container | container1 | Select the container within the storage account where the data needs to be pushed. If needed, create a new container. |
Configure the authentication of your Kafka cluster via API keys. Create New is selected by default, which means that API keys will be automatically generated and configured when the connector is created. Proceed to the next tab.
| Setting | Example value | Description |
|---|---|---|
| Input Data Format | JSON | Select an input Kafka record data format type among the following options: AVRO, JSON, string, Protobuf. |
| Output Data Format | JSON | Select an output data format among the following options: AVRO, JSON, string, Protobuf. |
| Topic name and regex | my-topic:.*\.json+ |
Configure the topic name and the regex pattern of your messages to ensure they are mapped. For example, *my-topic:.*\.json+ moves all the files ending with .json into my-topic. |
| Number of tasks | 1 | Optionally enter the maximum number of tasks you would like your connector to support simultaneously. Default is 1. |

Select Review + create to continue.
Review the listed settings for your new connector to ensure that the details are good to go. Once done, select Create to begin the connector deployment.
A notification is displayed on the top right, calling out the status of the deployment. Once it shows completed, refresh the Confluent Connectors page. You can now see the new connector tile on this page.
Open your Confluent organization and select Confluent > Confluent Connectors from the left menu.
Select your Environment and Cluster from the dropdown menu. The Azure portal now displays the list of Azure connectors in the respective environment and cluster. The following optional actions are available:
- Filter connectors by Type (Source or Sink) and Status (Running, Failed, **Provisioning, or Paused).
- Search for a connector by entering a name in the search bar on the right hand side.

To learn more about a connector, select the connector tile, which opens the Confluent UI. On this page, you can see the connector health, throughput and other stats, edit, and delete the connector.

For help with troubleshooting, see Troubleshooting Apache Kafka & Apache Flink on Confluent Cloud solutions.
Get started with Apache Kafka & Apache Flink on Confluent Cloud - An Azure Native ISV Service on