Note
Access to this page requires authorization. You can try signing in or changing directories.
Access to this page requires authorization. You can try changing directories.
Applies to: ![]() SQL Server 2019 (15.x) and later - Windows only
SQL Server 2019 (15.x) and later - Windows only
This tutorial teaches you how to get started with Always Encrypted with secure enclaves in SQL Server. It will show you:
- How to create a basic environment for testing and evaluating Always Encrypted with secure enclaves with no attestation configured for enclaves.
- How to encrypt data in-place and issue rich confidential queries against encrypted columns using SQL Server Management Studio (SSMS).
If you want to learn how to set up Always Encrypted with secure enclaves using Host Guardian Service for enclave attestation, see Tutorial: Getting started using Always Encrypted with secure enclaves in SQL Server with attestation using HGS
The computer hosting your SQL Server instance (referred to as SQL Server computer) needs to meet the following requirements:
- SQL Server 2019 (15.x) or later.
- Windows 10 or later, Windows Server 2019 or later.
- CPU support for virtualization technologies:
- Intel VT-x with Extended Page Tables.
- AMD-V with Rapid Virtualization Indexing.
- If you're running SQL Server in a VM:
- In Azure, use a Generation 2 VM size (recommended) or use a Generation 1 VM size with nested virtualization enabled. Check the individual VM sizes documentation to determine which Generation 1 VM sizes support nested virtualization.
- On Hyper-V 2016 or later (outside of Azure), make sure your VM is a Generation 2 VM (recommended) or that it's a Generation 1 VM with nested virtualization enabled. For more information, see Should I create a generation 1 or 2 virtual machine in Hyper-V? and Configure nested virtualization.
- On VMware vSphere 6.7 or later, enable Virtualization Based Security support for the VM as described in the VMware documentation.
- Other hypervisors and public clouds may support nested virtualization capabilities that enable Always Encrypted with VBS Enclaves as well. Check your virtualization solution's documentation for compatibility and configuration instructions.
- The latest version of SQL Server Management Studio (SSMS). As an alternative, you can install SSMS on another machine.
Warning
In production environments, running SSMS or other key management tools on the SQL Server computer may reduce the security benefits of using Always Encrypted. In general, running such tools on a different machine is recommended. For more information, see Security Considerations for Key Management.
Sign in to your SQL Server computer as an administrator, open an elevated Windows PowerShell console, and run msinfo32.exe. Check if VBS is running. If VBS is running, skip the remaining steps in this section and go to the next section.

Enable VBS by running the following cmdlet in the PowerShell session.
Set-ItemProperty -Path HKLM:\SYSTEM\CurrentControlSet\Control\DeviceGuard -Name EnableVirtualizationBasedSecurity -Value 1If your SQL Server computer is a virtual machine, a physical machine that doesn't support UEFI Secure Boot, or a physical machine not equipped with an IOMMU, you need to remove the VBS requirement for platform security features. Remove the requirement for Secure Boot and IOMMU by running the following command on your SQL Server computer in an elevated PowerShell console:
Set-ItemProperty -Path HKLM:\SYSTEM\CurrentControlSet\Control\DeviceGuard -Name RequirePlatformSecurityFeatures -Value 0Restart the SQL Server computer again to get VBS to come online.
Restart-ComputerRepeat step 1 to check if VBS is running.
In this step, you'll enable the functionality of Always Encrypted using enclaves in your SQL Server instance.
Using SSMS, connect to your SQL Server instance as sysadmin without Always Encrypted enabled for the database connection.
Start SSMS.
In the Connect to Server dialog, specify your server name, select an authentication method and specify your credentials.
Select Options >> and select the Always Encrypted tab.
Make sure the Enable Always Encrypted (column encryption) checkbox is not selected.
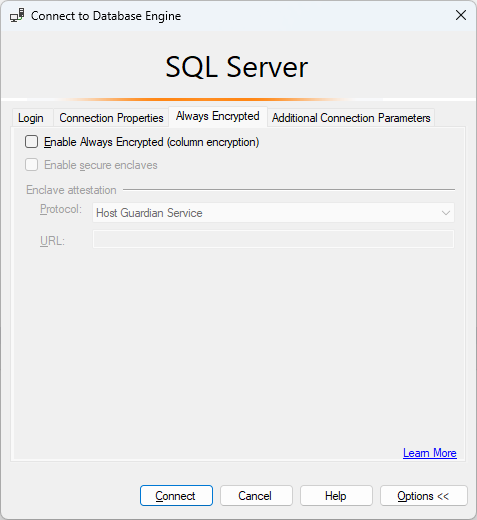
Select Connect.
Open a new query window, and execute the below statement to set the secure enclave type to virtualization based security (VBS).
EXEC sys.sp_configure 'column encryption enclave type', 1;
RECONFIGURE;
Restart your SQL Server instance for the previous change to take effect. You can restart the instance in SSMS by right-clicking on it in Object Explorer and selecting Restart. Once the instance restarts, reconnect to it.
Confirm the secure enclave is now loaded by running the following query:
SELECT [name], [value], [value_in_use] FROM sys.configurations
WHERE [name] = 'column encryption enclave type';
The query should return the following result:
name value value_in_use column encryption enclave type 1 1
In this step, you'll create a database with some sample data, which you'll encrypt later.
Using the SSMS instance from the previous step, execute the below statement in a query window to create a new database, named ContosoHR.
CREATE DATABASE [ContosoHR];Create a new table, named Employees.
USE [ContosoHR];
GO

CREATE SCHEMA [HR];
GO

CREATE TABLE [HR].[Employees]
(
    [EmployeeID] [int] IDENTITY(1,1) NOT NULL,
    [SSN] [char](11) NOT NULL,
    [FirstName] [nvarchar](50) NOT NULL,
    [LastName] [nvarchar](50) NOT NULL,
    [Salary] [money] NOT NULL
) ON [PRIMARY];
Add a few employee records to the Employees table.
USE [ContosoHR];
GO

INSERT INTO [HR].[Employees]
        ([SSN]
        ,[FirstName]
        ,[LastName]
        ,[Salary])
    VALUES
        ('795-73-9838'
        , N'Catherine'
        , N'Abel'
        , $31692);

INSERT INTO [HR].[Employees]
        ([SSN]
        ,[FirstName]
        ,[LastName]
        ,[Salary])
    VALUES
        ('990-00-6818'
        , N'Kim'
        , N'Abercrombie'
        , $55415);
In this step, you'll create a column master key and a column encryption key that allow enclave computations.
Using the SSMS instance from the previous step, in Object Explorer, expand your database and navigate to Security > Always Encrypted Keys.
Provision a new enclave-enabled column master key:
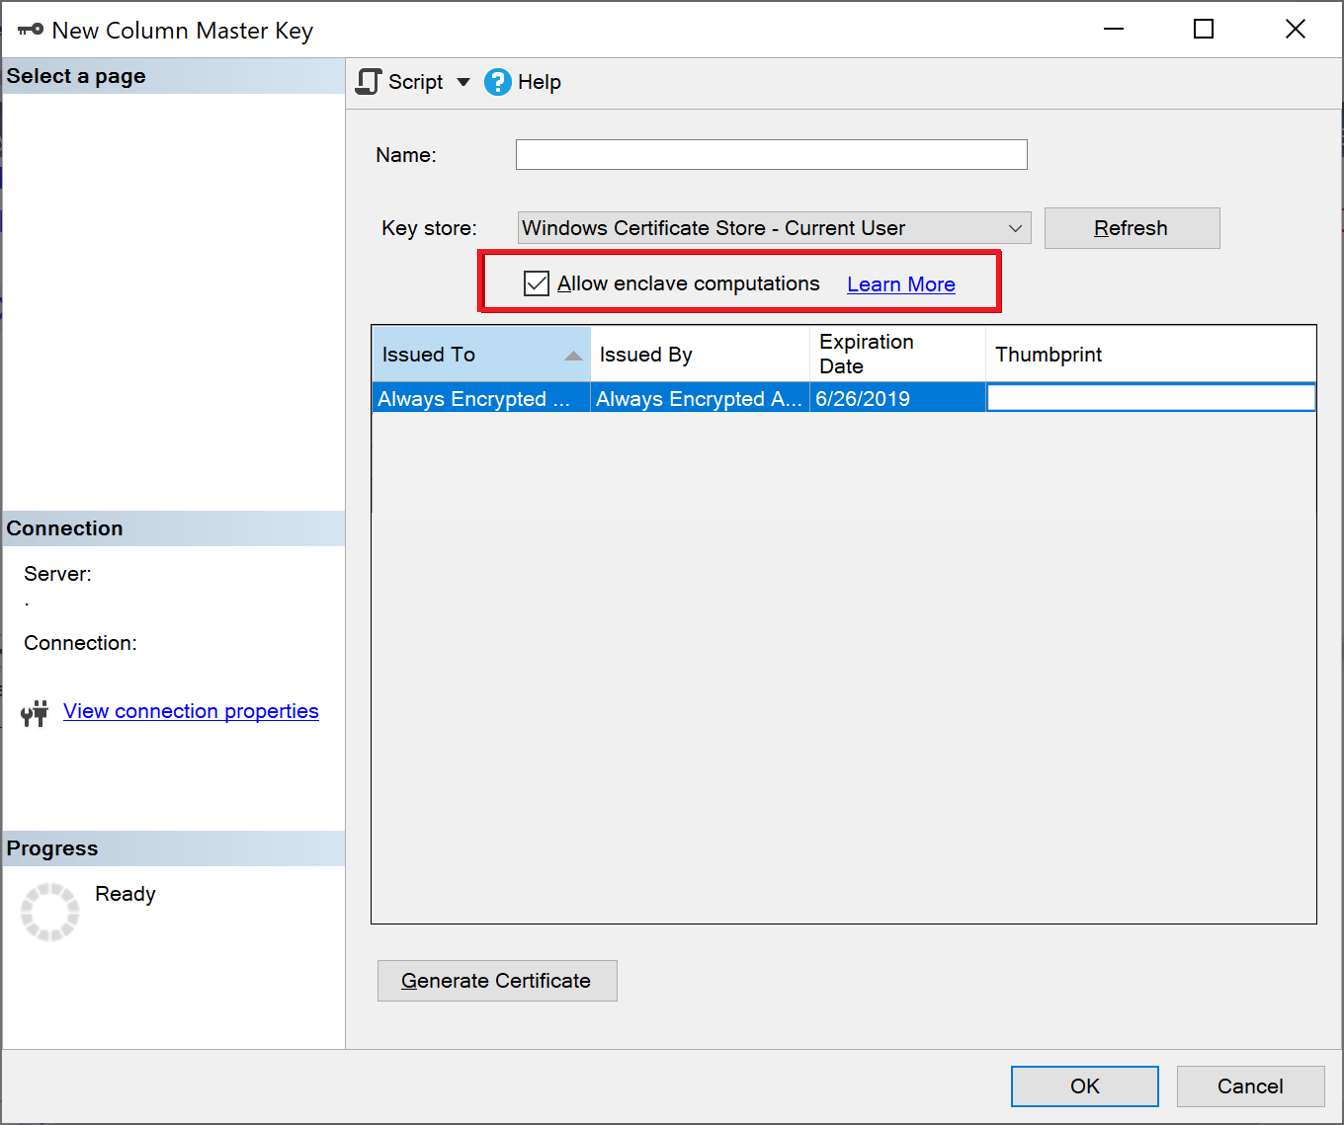
Right-click Always Encrypted Keys and select New Column Master Key....
Select your column master key name: CMK1.
Make sure you select either Windows Certificate Store (Current User or Local Machine) or Azure Key Vault.
Select Allow enclave computations.
If you selected Azure Key Vault, sign in to Azure and select your key vault. For more information on how to create a key vault for Always Encrypted, see Manage your key vaults from Azure portal.
Select your certificate or Azure Key Value key if it already exists, or select the Generate Certificate button to create a new one.
Select OK.
Create a new enclave-enabled column encryption key:
- Right-click Always Encrypted Keys and select New Column Encryption Key.
- Enter a name for the new column encryption key: CEK1.
- In the Column master key dropdown, select the column master key you created in the previous steps.
- Select OK.
In this step, you'll encrypt the data stored in the SSN and Salary columns inside the server-side enclave, and then test a SELECT query on the data.
Open a new SSMS instance and connect to your SQL Server instance with Always Encrypted enabled for the database connection.
Start a new instance of SSMS.
In the Connect to Server dialog, specify your server name, select an authentication method and specify your credentials.
Select Options >> and select the Always Encrypted tab.
Select the Enable Always Encrypted (column encryption) checkbox.
Select Enable secure enclaves.
Set Protocol to None.
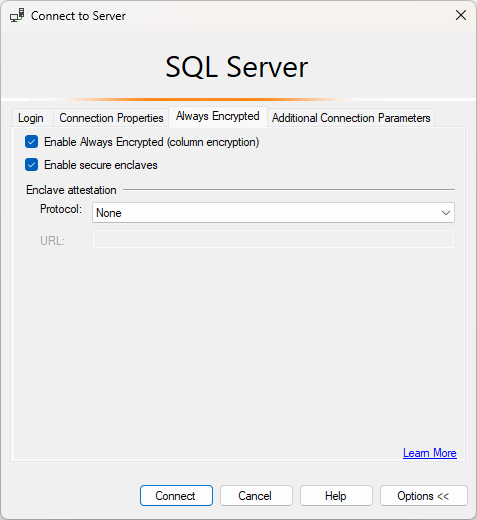
Select Connect.
If you're prompted to enable Parameterization for Always Encrypted queries, select Enable.
Using the same SSMS instance (with Always Encrypted enabled), open a new query window and encrypt the SSN and Salary columns by running the below queries.
USE [ContosoHR];
GO

ALTER TABLE [HR].[Employees]
ALTER COLUMN [SSN] [char] (11) COLLATE Latin1_General_BIN2
ENCRYPTED WITH (COLUMN_ENCRYPTION_KEY = [CEK1], ENCRYPTION_TYPE = Randomized, ALGORITHM = 'AEAD_AES_256_CBC_HMAC_SHA_256') NOT NULL
WITH
(ONLINE = ON);

ALTER TABLE [HR].[Employees]
ALTER COLUMN [Salary] [money]
ENCRYPTED WITH (COLUMN_ENCRYPTION_KEY = [CEK1], ENCRYPTION_TYPE = Randomized, ALGORITHM = 'AEAD_AES_256_CBC_HMAC_SHA_256') NOT NULL
WITH
(ONLINE = ON);

ALTER DATABASE SCOPED CONFIGURATION CLEAR PROCEDURE_CACHE;
Note
Notice the ALTER DATABASE SCOPED CONFIGURATION CLEAR PROCEDURE_CACHE statement to clear the query plan cache for the database in the above script. After you have altered the table, you need to clear the plans for all batches and stored procedures that access the table, to refresh parameters encryption information.
To verify the SSN and Salary columns are now encrypted, open a new query window in the SSMS instance without Always Encrypted enabled for the database connection and execute the below statement. The query window should return encrypted values in the SSN and Salary columns. If you execute the same query using the SSMS instance with Always Encrypted enabled, you should see the data decrypted.
SELECT * FROM [HR].[Employees];
Now, you can run rich queries against the encrypted columns. Some query processing will be performed inside your server-side enclave.
In the SSMS instance with Always Encrypted enabled, make sure Parameterization for Always Encrypted is also enabled.
- Select Tools from the main menu of SSMS.
- Select Options....
- Navigate to Query Execution > SQL Server > Advanced.
- Ensure that Enable Parameterization for Always Encrypted is checked.
- Select OK.
Open a new query window, paste in and execute the below query. The query should return plaintext values and rows meeting the specified search criteria.
DECLARE @SSNPattern [char](11) = '%6818';
DECLARE @MinSalary [money] = $1000;
SELECT * FROM [HR].[Employees]
WHERE SSN LIKE @SSNPattern AND [Salary] >= @MinSalary;
Try the same query again in the SSMS instance that doesn't have Always Encrypted enabled, and note the failure that occurs.
After completing this tutorial, you can go to one of the following tutorials: