Set up events
Important
Fundraising and Engagement is being retired. Support for Fundraising and Engagement will end at 11:59 PM Pacific Time on December 31, 2026. For more information, go to What’s new in Fundraising and Engagement.
Every event needs an event setup record, which is the foundation of event management and includes the following elements:
- General tab
- Event Venue tab
- Event Components tab
- Preferences tab
- Event Revenue tab
- Administration tab
- Related menu
The Event Setup record is also the first point for generating a new registration package to register event attendees by using the event registration process flow.
To work with event setup records, follow these steps:
- At the bottom of the navigation pane, select Events from the Change area menu.
- Under Setup, select Event Setup.

| # | Field | Value |
|---|---|---|
| 1 | Internal Display Name | Descriptive display name that identifies this record internally. |
| 2 | Display Name | Descriptive display name that identifies this record externally. |
| 3 | Campaign | This field represents the Campaign this event record is related to. |
| 4 | Appeal | This field represents the Appeal this event record is related to. |
| 5 | Package | This field represents the Package this event record is related to. |
| 6 | Designation | The designation this event. |
| 7 | Proposed Start | This field represents the estimated start date of the event. |
| 8 | Proposed End | This field represents the estimated end date of the event. |
| 9 | Currency | The field is a lookup to select the currency for the event. |
| 10 | Budget Allocated | This field represents the budget assigned to the event. |
| 11 | Event Type | This field represents the type of event. |
| 12 | Capacity | This field represents the number of tickets available for the event. |
| 13 | Goal | This field represents the expected revenue goal for the event. |
| 14 | Total Registrations | A calculated field that shows the number of registrations completed for this event. |
| 15 | Configuration Record | The configuration record assigned to this event for processing event package registrations. |

- Venue: A lookup to the Organization to identify where the event is taking place.
- Address 1: Street 1/2/3: These fields allow you to include up to three lines for the event venue address.
- Address 1: City: This field represents the city where the event is taking place.
- Address 1: State/Province: This field represents the state where the event is taking place.
- Address 1: ZIP/Postal Code: This field represents the zip code where the event is taking place.
In this section, the key components of the event are created: disclaimers, sponsors, tickets, products and donations. Only the components you add here appear in the registration process when you register donors for the event.

The event disclaimer makes sure each attendee acknowledges any information they need to know before they attend the event (for example, accessibility at the venue). To buy a registration package, the donor must agree to the disclaimer.
To add a disclaimer, use the menu inside the Disclaimer component:
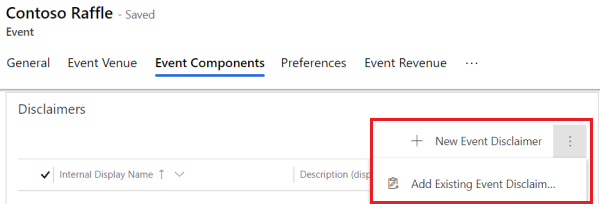
To create a new disclaimer, select New Event Disclaimer. A new Event Disclaimer record opens.

- Internal Display Name: A descriptive display name that identifies this record internally.
- Description (displayed on event registration): A descriptive display name that displays on the event registration process.
When both fields have values, save the record.
To use an existing disclaimer, select the menu to the right of New Event Disclaimer, then select Add existing event disclaimer. Search for and select the disclaimer you want, and then select Add.
The Sponsors record is used to offer a chance for participants to pay to be a Sponsor for the event to help facilitate the execution of the event (for example, gold level sponsorships with a commitment level of $1,000).
To add a sponsorship, in the Sponsors component, do one of the following:

To create a new sponsorship, select New Event Sponsorship. A new Event Sponsorship record opens.

You only need to fill out some of the fields on the General tab for now. Later, as donors buy the sponsorship, other values automatically calculate, and the Additional Information tab shows a timeline.
# Field Description 1 Internal Display Name Required. Enter a descriptive name to identify the sponsorship internally, such as in lookup fields. 2 Description Required. Enter a descriptive name to show in the event registration process. 3 Price per Sponsorship Required. Enter the amount to add to the total cost of a registration package for each sponsorship. 4 Quantity Enter the total number of available sponsorships. After this number is sold, the sponsorship won't be available for purchase during the registration process. If you leave this blank, any number of sponsorships can be sold. 5 Amount (Tax) Enter the tax amount for the sponsorship. 6 Amount (Tax Deductible) Enter the receiptable amount for the sponsorship. 7 Amount (Non-Tax Deductible) Enter the nonreceiptable amount for the sponsorship. 8 Sponsorships Available Read-only. Shows how many of these sponsorships are still available to purchase during event registration. This field updates automatically. 9 $ Sponsorships Sold Read-only. Represents the dollar amount of sponsorship sold during the event. This read-only field is calculated automatically. 10 Sponsorships Sold Read-only. Represents the quantity of sponsorships sold during the event. This field is updated automatically. When all the required fields are completed, select Save & Close on the action pane.
To add an existing sponsorship, select the menu next to New Event Sponsorship, then select Add Existing Event Sponsorship. Search for and select the disclaimer you want, and then select Add.
Each event ticket record represents tickets a donor can buy during event registration. Registration of an event ticket maintains availability of the seats and tables included in the sale.
Note
By default, each ticket must include the name of the attendee who will use the ticket to gain entry to the event. The configuration record used for the event controls this requirement with the setting Mandate Names, on the Event Configuration tab under REGISTRATION DETAILS. If you don't want each ticket to require the attendee's name, use a configuration record that has Mandate Names set to No. For more information, go to Configure Fundraising and Engagement: Registration details.
To create a new ticket, do the following steps:
On the Event Components tab, in the Tickets component, select New Event Ticket.
On the General tab of the new Event Ticket record, fill in the fields as follows:

# Field Value 1 Internal Display Name A descriptive display name that identifies this record internally. 2 Description A descriptive display name that displays on the event registration process. 3 Price Per ticket The amount for the ticket. 4 Event A link to the event for which the tickets are purchased. 5 Quantity The total number of available tickets. 6 Max Spots per Package The maximum number of tickets that can be purchased through a single registration package. 7 Amount (Tax Deductible) This field represents the receiptable amount for the ticket. 8 Amount (Non-Tax Deductible) This field represents the nonreceiptable amount for the ticket. 9 Amount (Tax) This field represents the tax amount for the ticket. 10 Registrations Per Ticket This field represents the number of registrations that a single ticket can have. The minimum amount must be greater than zero. 11 Tickets Available READ-ONLY. The total number of tickets remaining. This field updates automatically. 12 $ Tickets Sold READ-ONLY. This field represents the dollar amount for the tickets sold for the event. This field updates automatically. 13 Table Ticket? Set to Yes to create a corresponding event table record for assigning Registrations. When all required fields are completed, you can save the record.
The Products component gives the ability to offer a product for sale in relation to the event, if appropriate such as an event t-shirt.
To create a new product:
On the Event Components tab, in the Products component, select New Event Product.
A New Event Product record opens and displays the General tab. Fill in the fields as follows:
Field Value Internal Display Name A descriptive display name that identifies this record internally. Description A descriptive display name that displays on the event registration process. Price per Product The price for the product detail. Quantity The total number of this product that is available. Max Products per Registration The maximum number of this product a donor can buy per registration. Amount (Tax Deductible) This field represents the receiptable amount for the product. Amount (Non-Tax Deductible) This field represents the nonreceiptable amount for the product. Amount (Tax) This field represents the tax amount for the product. Products Available READ-ONLY. This field represents the quantity of products remaining during the event. This field updates automatically. Products Sold READ-ONLY. This field represents the quantity of products sold during the event. This field updates automatically. $ Products Sold READ-ONLY. This field represents the value of products sold during the event. This field updates automatically.
The Donation component gives the ability to offer a donation in relation to the event. The Donation is a set amount available to registrants and is added to their registration package.
To create a new donation, follow these steps:
On the Event Components tab, in the Donations component, select New Event Donation.
On the Event Donation form, complete the required fields.

# Field Value 1 Internal Display Name A descriptive display name that identifies this record internally. 2 Amount This field represents the amount that is charged for the donation when an event package is completed. 3 Description A description to display on the event registration process.
On the *Preferences tab, you can create, edit and add preferences to an existing event. Preferences can be assigned to the registrants during the registration process.
Select the arrow next to an available preference to add it to the event.
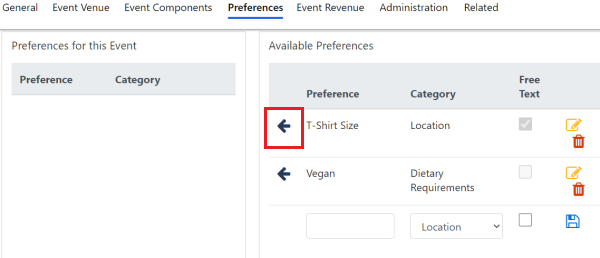
If you don't see the preference you want, fill in the new row at the bottom of the Available Preferences, then select Save this preference (the disk icon). Then, add the new preference to the event.
To edit an existing available preference, select Edit this preference (the editing icon), and update the required information. Then, select Save this preference (the disk icon).
To delete an existing available preference, select Delete this preference (the trash can icon) and remove the required information.
In this section, you can see the revenue summary of the event. All fields located in this section are calculated automatically.

- #Sponsorships: The number of sponsorships acquired on this event.
- $ Sponsorship: The total dollar amount of sponsorships acquired on this event.
- # Tickets: The number of tickets acquired on this event.
- $ Tickets: The total dollar amount for tickets acquired on this event.
- # Products: The number of products acquired on this event.
- $ Products: The total dollar amount for products acquired on this event.
- # Donations: The number of donations acquired on this event.
- $ Donations: The total dollar amount for donations acquired on this event.
- # Packages: The number of packages acquired on this event.
- $ Packages: The total dollar amount for packages acquired on this event.
- $ Total Revenue: The total revenue of this event. This field is the sum of $ Sponsorship, $ Tickets, $ Products, $ Donations, $ Packages.
After you save the event setup record, you can register donors.
- Open the event setup record.
- On the action pane, select New Registration, then follow the steps in Register a donor.
Note
You can't add a new donor during the registration process. If the donor isn't in the solution yet, add a contact record for them, and then create their registration.
Overview: Fundraising and Engagement events
Overview of Fundraising and Engagement
Configure Fundraising and Engagement