Create and manage device identities
Create a device identity for your device to connect to Azure IoT Hub. This article introduces key tasks for managing a device identity including registering the device, collecting its connection information, and then deleting or disabling a device at the end of its lifecycle.
An IoT hub in your Azure subscription. If you don't have a hub yet, you can follow the steps in Create an IoT hub.
Depending on which tool you use, either have access to the Azure portal or install the Azure CLI.
If your IoT hub is managed with role-based access control (RBAC), then you need Read/Write/Delete Device/Module permissions for the steps in this article. Those permissions are included in IoT Hub Registry Contributor role.
Devices use two different types of certificates to connect to IoT Hub. When preparing your device, make sure you have all the proper certificates created and added to the device before connecting.
- Public root certificates: All devices need a copy of the public root certificates that IoT Hub, IoT Central, and Device Provisioning Service use to authorize connections.
- Authentication certificates: X.509 certificates are the recommended method for authenticating a device identity.
Azure IoT devices use TLS to verify the authenticity of the IoT hub or DPS endpoint they're connecting to. Each device needs a copy of the root certificate that IoT Hub and DPS use. We recommend that all devices include the following root CAs in their trusted certificate store:
- DigiCert Global G2 root CA
- Microsoft RSA root CA 2017
For more information about IoT Hub's recommended certificate practices, see TLS support.
If you use X.509 certificate authentication for your devices, make sure your certificates are ready before registering a device:
For CA-signed certificates, the tutorial Create and upload certificates for testing provides a good introduction for how to create CA-signed certificates and upload them to IoT Hub. After completing that tutorial, you're ready to register a device with X.509 CA signed authentication.
For self-signed certificates, you need two device certificates (a primary and a secondary certificate) on the device and thumbprints for both to upload to IoT Hub. One way to retrieve the thumbprint from a certificate is with the following OpenSSL command:
openssl x509 -in <certificate filename>.pem -text -fingerprint
In this section, you create a device identity in the identity registry in your IoT hub. A device can't connect to a hub unless it has a device identity.
The IoT Hub identity registry only stores device identities to enable secure access to the IoT hub. It stores device IDs and keys to use as security credentials, and an enabled/disabled flag that you can use to disable access for an individual device.
When you register a device, you choose its authentication method. IoT Hub supports three methods for device authentication:
Symmetric key - This option is easiest for quickstart scenarios.
When you register a device, you can provide keys or IoT Hub will generate keys for you. Both the device and the IoT hub have a copy of the symmetric key that can be compared when the device connects.
X.509 self-signed
If your device has a self-signed X.509 certificate, then you need to give IoT Hub a version of the certificate for authentication. When you register a device, you upload a certificate thumbprint, which is a hash of the device's X.509 certificate. When the device connects, it presents its certificate and the IoT hub can validate it against the hash it knows. For more information, see Authenticate identities with X.509 certificates.
X.509 CA signed - This option is recommended for production scenarios.
If your device has a CA-signed X.509 certificate, then you upload a root or intermediate certificate authority (CA) certificate in the signing chain to IoT Hub before you register the device. The device has an X.509 certificate with the verified X.509 CA in its certificate chain of trust. When the device connects, it presents its full certificate chain and the IoT hub can validate it because it knows the X.509 CA. Multiple devices can authenticate against the same verified X.509 CA. For more information, see Authenticate identities with X.509 certificates.
Create a device identity in your IoT hub.
In the Azure portal, navigate to your IoT hub.
Select Device management > Devices.
Select Add Device to add a device in your IoT hub.

In Create a device, provide the information for your new device identity:
Parameter Dependent parameter Value Device ID Provide a name for your new device. Authentication type Select either Symmetric key, X.509 self-signed, or X.509 CA signed. Auto-generate keys For Symmetric key authentication, check this box to have IoT Hub generate keys for your device. Or, uncheck this box and provide primary and secondary keys for your device. Primary thumbprint and Secondary thumbprint For X.509 self-signed authentication, provide the thumbprint hash from the device's primary and secondary certificates. Important
The device ID may be visible in the logs collected for customer support and troubleshooting, so make sure to avoid any sensitive information while naming it.
Select Save.

For samples and test scenarios, the most common connection method is to use symmetric key authentication and connect with a device connection string. A device connection string contains the name of the IoT hub, the name of the device, and the device's authentication information.
For information about other methods for connecting devices, particularly for X.509 authentication, refer to the Azure IoT Hub device SDKs.
Use the following steps to retrieve a device connection string.
The Azure portal provides device connection strings only for devices that use symmetric key authentication.
In the Azure portal, navigate to your IoT hub.
Select Device management > Devices.
Select your device from the list in the Devices pane.
Copy the value of Primary connection string.
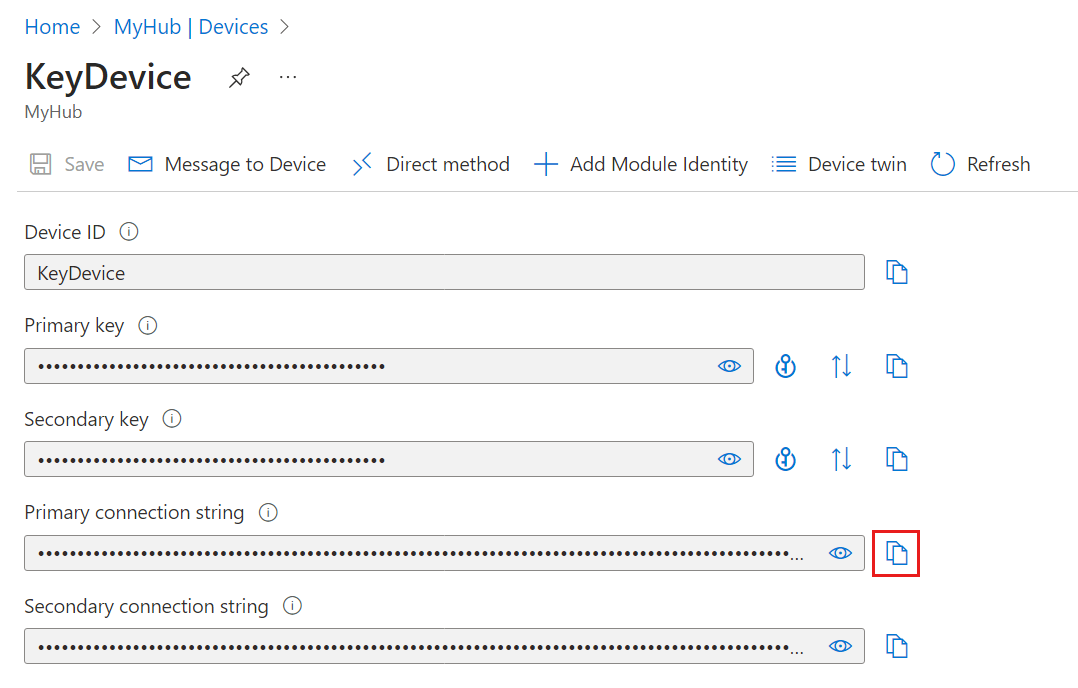
By default, the keys and connection strings are masked because they're sensitive information. If you click the eye icon, they're revealed. It's not necessary to reveal them to copy them with the copy button.
Devices with symmetric key authentication have a device connection string with the following pattern:
HostName=<IOT_HUB_NAME>;DeviceId=<DEVICE_NAME>;SharedAccessKey=<PRIMARY_OR_SECONDARY_KEY>
Devices with X.509 authentication, either self-signed or CA-signed, usually don't use device connection strings for authentication. When they do, their connection strings take the following pattern:
HostName=<IOT_HUB_NAME>;DeviceId=<DEVICE_NAME>;x509=true
If you want to keep a device in your IoT hub's identity registry, but want to prevent it from connecting then you can change its status to disabled.
In the Azure portal, navigate to your IoT hub.
Select Device management > Devices.
Select your device from the list in the Devices pane.
On the device details page, you can disable or delete the device registration.
To prevent a device from connecting, set the Enable connection to IoT Hub parameter to Disable.

To completely remove a device from your IoT hub's identity registry, select Delete.

You can use other tools or interfaces to manage the IoT Hub identity registry, including:
PowerShell commands: Refer to the Az.IotHub command set to learn how to manage device identities.
Visual Studio Code: The Azure IoT Hub extension for Visual Studio Code includes identity registry capabilities.
REST API: Refer to the IoT Hub Service APIs to learn how to manage device identities.