Linux support is available in Visual Studio 2017 and later. To see the documentation for these versions, set the Version drop-down located above the table of contents to Visual Studio 2017 or Visual Studio 2019.
This topic describes how to add a Linux configuration to a CMake project that targets either a remote Linux system or Windows Subsystem for Linux (WSL). It continues the series that began with Create a Linux CMake project in Visual Studio. If you're using MSBuild, instead, see Configure a Linux MSBuild Project in Visual Studio
Add a Linux configuration
A configuration can be used to target different platforms (Windows, WSL, a remote system) with the same source code. A configuration is also used to set your compilers, pass environment variables, and customize how CMake is invoked. The CMakeSettings.json file specifies some or all of the properties listed in Customize CMake settings, plus other properties that control the build settings on the remote Linux machine.
To change the default CMake settings in Visual Studio 2017, choose CMake > Change CMake Settings > CMakeLists.txt from the main menu. Or, right-click CMakeLists.txt in Solution Explorer and choose Change CMake Settings. Visual Studio then creates a new CMakeSettings.json file in your root project folder. To make changes, open the file and modify it directly. For more information, see Customize CMake settings.
The default configuration for Linux-Debug in Visual Studio 2017 (and Visual Studio 2019 version 16.0) looks like this:
{
  "configurations": [
    {
      "name": "Linux-Debug",
      "generator": "Unix Makefiles",
      "remoteMachineName": "${defaultRemoteMachineName}",
      "configurationType": "Debug",
      "remoteCMakeListsRoot": "/var/tmp/src/${workspaceHash}/${name}",
      "cmakeExecutable": "/usr/local/bin/cmake",
      "buildRoot": "${env.USERPROFILE}\\CMakeBuilds\\${workspaceHash}\\build\\${name}",
      "installRoot": "${env.USERPROFILE}\\CMakeBuilds\\${workspaceHash}\\install\\${name}",
      "remoteBuildRoot": "/var/tmp/build/${workspaceHash}/build/${name}",
      "remoteInstallRoot": "/var/tmp/build/${workspaceHash}/install/${name}",
      "remoteCopySources": true,
      "remoteCopySourcesOutputVerbosity": "Normal",
      "remoteCopySourcesConcurrentCopies": "10",
      "remoteCopySourcesMethod": "rsync",
      "remoteCopySourcesExclusionList": [
        ".vs",
        ".git"
      ],
      "rsyncCommandArgs": "-t --delete --delete-excluded",
      "remoteCopyBuildOutput": false,
      "cmakeCommandArgs": "",
      "buildCommandArgs": "",
      "ctestCommandArgs": "",
      "inheritEnvironments": [
        "linux_x64"
      ]
    }
  ]
}
To change the default CMake settings in Visual Studio 2019 or later, from the main toolbar, open the Configuration dropdown and choose Manage Configurations.

This command opens the CMake Settings Editor, which you can use to edit the CMakeSettings.json file in your root project folder. You can also open the file with the JSON editor by clicking the Edit JSON button in the upper-right of the CMake Settings dialog. For more information, see Customize CMake Settings.
The default Linux-Debug configuration in Visual Studio 2019 version 16.1, and later, looks like this:
{
  "configurations": [
    {
      "name": "Linux-GCC-Debug",
      "generator": "Ninja",
      "configurationType": "Debug",
      "cmakeExecutable": "cmake",
      "remoteCopySourcesExclusionList": [ ".vs", ".git", "out" ],
      "cmakeCommandArgs": "",
      "buildCommandArgs": "",
      "ctestCommandArgs": "",
      "inheritEnvironments": [ "linux_x64" ],
      "remoteMachineName": "${defaultRemoteMachineName}",
      "remoteCMakeListsRoot": "$HOME/.vs/${projectDirName}/${workspaceHash}/src",
      "remoteBuildRoot": "$HOME/.vs/${projectDirName}/${workspaceHash}/out/build/${name}",
      "remoteInstallRoot": "$HOME/.vs/${projectDirName}/${workspaceHash}/out/install/${name}",
      "remoteCopySources": true,
      "rsyncCommandArgs": "-t --delete --delete-excluded",
      "remoteCopyBuildOutput": false,
      "remoteCopySourcesMethod": "rsync",
      "variables": []
    }
  ]
}
In Visual Studio 2019 version 16.6 or later, Ninja is the default generator for configurations targeting a remote system or WSL, as opposed to Unix Makefiles. For more information, see this post on the C++ Team Blog.
For more information about these settings, see CMakeSettings.json reference.
When you do a build:
- If you're targeting a remote system, Visual Studio chooses the first remote system in the list under Tools > Options > Cross Platform > Connection Manager by default for remote targets.
- If no remote connections are found, you're prompted to create one. For more information, see Connect to your remote Linux computer.
When you open a CMake project folder, Visual Studio parses the CMakeLists.txt file, and specifies a Windows target of x86-Debug. To target a remote Linux system, you'll change the project settings based on your Linux compiler. For example, if you're using GCC on Linux and compiling with debug info, choose: Linux-GCC-Debug or Linux-GCC-Release.
If you specify a remote Linux target, your source is copied to the remote system.
After you select a target, CMake runs automatically on the Linux system to generate the CMake cache for your project:

Target Windows Subsystem for Linux
If you're targeting Windows Subsystem for Linux (WSL), you don't need to add a remote connection.
To target WSL, select Manage Configurations in the configuration dropdown in the main toolbar:
The CMakeSettings.json window appears.
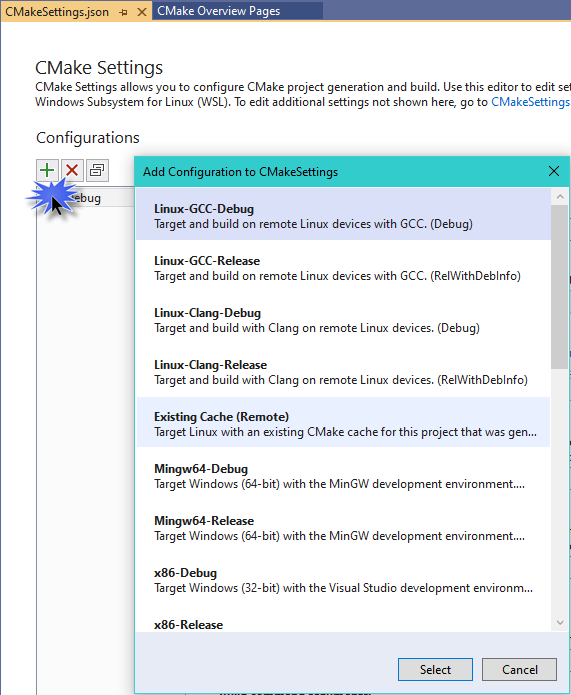
Press Add Configuration (the green '+' button) and then choose Linux-GCC-Debug or Linux-GCC-Release if using GCC. Use the Clang variants if you're using the Clang/LLVM toolset. Press Select and then Ctrl+S to save the configuration.
Visual Studio 2019 version 16.1 When you target WSL, Visual Studio doesn't need to copy source files and maintain two synchronous copies of your build tree because the compiler on Linux has direct access to your source files in the mounted Windows file system.
Accurate C++ IntelliSense requires access to the C++ headers referenced by your C++ source files. Visual Studio automatically uses the headers referenced by a CMake project from Linux to Windows to provide a full-fidelity IntelliSense experience. For more information, see IntelliSense for remote headers.
Visual Studio language settings aren't propagated to Linux targets because Visual Studio doesn't manage or configure installed packages. Messages shown in the Output window, such as build errors, are shown using the language and locale of the Linux target. You'll need to configure your Linux targets for the desired locale.
Use the following settings to run commands on the Linux system before and after building, and before CMake generation. The values can be any command that is valid on the remote system. The output is piped back to Visual Studio.
{
      "remotePrebuildCommand": "",
      "remotePreGenerateCommand": "",
      "remotePostbuildCommand": "",
}
Configure CMake debugging sessions
Working with project properties
Customize CMake settings
CMake predefined configuration reference