Events
May 19, 6 PM - May 23, 12 AM
Calling all developers, creators, and AI innovators to join us in Seattle @Microsoft Build May 19-22.
Register todayThis browser is no longer supported.
Upgrade to Microsoft Edge to take advantage of the latest features, security updates, and technical support.
Learn how to access Microsoft Graph from a web app running on Azure App Service.
You want to call Microsoft Graph for the web app. A safe way to give your web app access to data is to use a system-assigned managed identity. A managed identity from Microsoft Entra ID allows App Service to access resources through role-based access control (RBAC), without requiring app credentials. After assigning a managed identity to your web app, Azure takes care of the creation and distribution of a certificate. You don't have to worry about managing secrets or app credentials.
In this tutorial, you learn how to:
If you don't have an Azure subscription, create an Azure free account before you begin.
If you create and publish your web app through Visual Studio, the managed identity was enabled on your app for you.
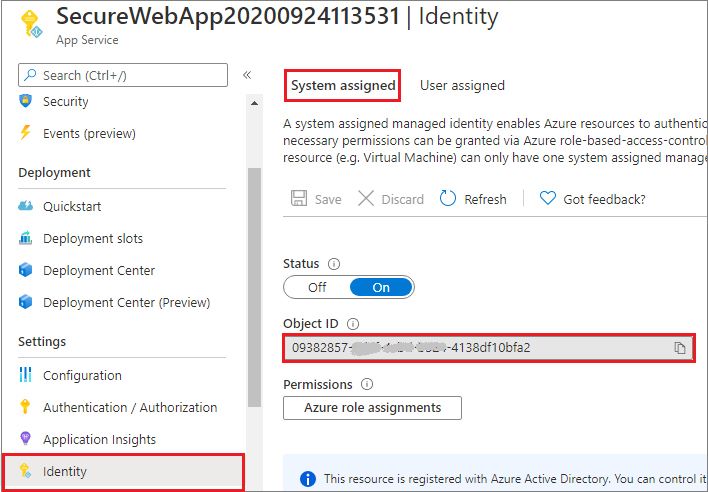
In your app service, select Identity in the left pane and then select System assigned.
Verify that Status is set to On. If not, select Save and then select Yes to enable the system-assigned managed identity. When the managed identity is enabled, the status is set to On and the object ID is available.
Take note of the Object ID value, which you'll need in the next step.

When accessing the Microsoft Graph, the managed identity needs to have proper permissions for the operation it wants to perform. Currently, there's no option to assign such permissions through the Microsoft Entra admin center.
Run the following script to add the requested Microsoft Graph API permissions to the managed identity service principal object.
# Install the module.
# Install-Module Microsoft.Graph -Scope CurrentUser

# The tenant ID
$TenantId = "aaaabbbb-0000-cccc-1111-dddd2222eeee"

# The name of your web app, which has a managed identity.
$webAppName = "SecureWebApp-20201106120003"
$resourceGroupName = "SecureWebApp-20201106120003ResourceGroup"

# The name of the app role that the managed identity should be assigned to.
$appRoleName = "User.Read.All"

# Get the web app's managed identity's object ID.
Connect-AzAccount -Tenant $TenantId
$managedIdentityObjectId = (Get-AzWebApp -ResourceGroupName $resourceGroupName -Name $webAppName).identity.principalid

Connect-MgGraph -TenantId $TenantId -Scopes 'Application.Read.All','AppRoleAssignment.ReadWrite.All'

# Get Microsoft Graph app's service principal and app role.
$serverApplicationName = "Microsoft Graph"
$serverServicePrincipal = (Get-MgServicePrincipal -Filter "DisplayName eq '$serverApplicationName'")
$serverServicePrincipalObjectId = $serverServicePrincipal.Id

$appRoleId = ($serverServicePrincipal.AppRoles | Where-Object {$_.Value -eq $appRoleName }).Id

# Assign the managed identity access to the app role.
New-MgServicePrincipalAppRoleAssignment `
    -ServicePrincipalId $managedIdentityObjectId `
    -PrincipalId $managedIdentityObjectId `
    -ResourceId $serverServicePrincipalObjectId `
    -AppRoleId $appRoleId
After executing the script, you can verify in the Microsoft Entra admin center that the requested API permissions are assigned to the managed identity.
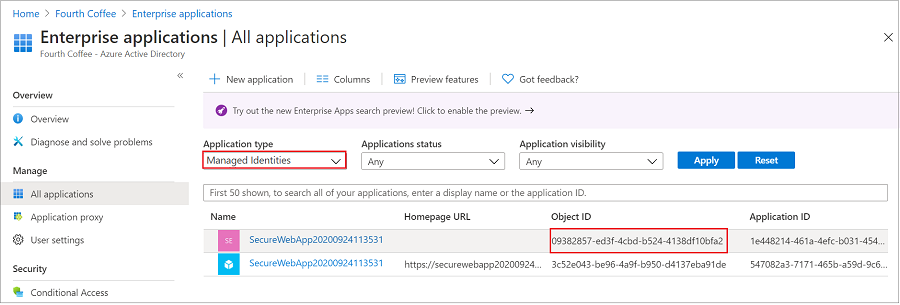
Go to Applications, and then select Enterprise applications. This pane displays all the service principals in your tenant. Add a filter for "Application type==Managed identities" and select the service principal for the managed identity.
If you're following this tutorial, there are two service principals with the same display name (SecureWebApp2020094113531, for example). The service principal that has a Homepage URL represents the web app in your tenant. The service principal that appears in Managed Identities should not have a Homepage URL listed and the Object ID should match the object ID value of the managed identity in the previous step.
Select the service principal for the managed identity.

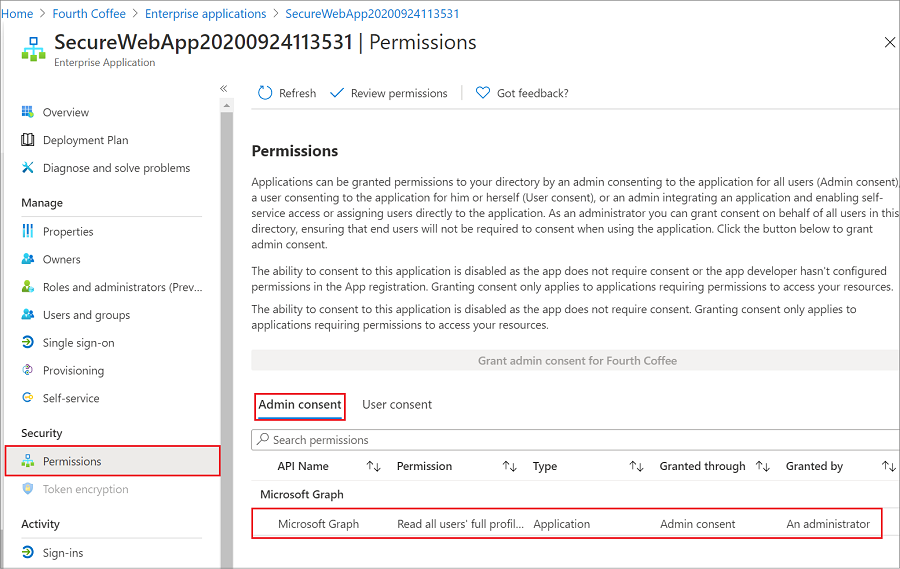
In Overview, select Permissions, and you'll see the added permissions for Microsoft Graph.

Your web app now has the required permissions and also adds Microsoft Graph's client ID to the login parameters.
The DefaultAzureCredential class from @azure/identity package is used to get a token credential for your code to authorize requests to Azure Storage. Create an instance of the DefaultAzureCredential class, which uses the managed identity to fetch tokens and attach them to the service client. The following code example gets the authenticated token credential and uses it to create a service client object, which gets the users in the group.
Note
The @azure/identity package isn't required in your web app for basic authentication/authorization or to authenticate requests with Microsoft Graph. It's possible to securely call downstream APIs with only the App Service authentication/authorization module enabled.
However, the App Service authentication/authorization is designed for more basic authentication scenarios. For more complex scenarios (handling custom claims, for example), you need the @azure/identity package. There's a little more setup and configuration work in the beginning, but the @azure/identity package can run alongside the App Service authentication/authorization module. Later, when your web app needs to handle more complex scenarios, you can disable the App Service authentication/authorization module and @azure/identity will already be a part of your app.
Install the @azure/identity and the @microsoft/microsoft-graph-client packages in your project with npm.
npm install @azure/identity @microsoft/microsoft-graph-client
// partial code in app.js
const appSettings = {
    appCredentials: {
        clientId: process.env.WEBSITE_AUTH_CLIENT_ID, // Enter the client Id here,
        tenantId: "common", // Enter the tenant info here,
        clientSecret: process.env.MICROSOFT_PROVIDER_AUTHENTICATION_SECRET // Enter the client secret here,
    },
    authRoutes: {
        redirect: "/.auth/login/aad/callback", // Enter the redirect URI here
        unauthorized: "/unauthorized" // enter the relative path to unauthorized route
    },
}
The following code shows how to call Microsoft Graph controller as the app and get some user information.
// graphController.js

const graphHelper = require('../utils/graphHelper');
const { DefaultAzureCredential } = require("@azure/identity");

exports.getUsersPage = async(req, res, next) => {

    const defaultAzureCredential = new DefaultAzureCredential();

    try {
        // get app's access token scoped to Microsoft Graph
        const tokenResponse = await defaultAzureCredential.getToken("https://graph.microsoft.com/.default");

        // use token to create Graph client
        const graphClient = graphHelper.getAuthenticatedClient(tokenResponse.token);

        // return profiles of users in Graph
        const users = await graphClient
            .api('/users')
            .get();

        res.render('users', { user: req.session.user, users: users });
    } catch (error) {
        next(error);
    }
}
The previous code relies on the following getAuthenticatedClient function to return Microsoft Graph client.
// utils/graphHelper.js

const graph = require('@microsoft/microsoft-graph-client');

getAuthenticatedClient = (accessToken) => {
    // Initialize Graph client
    const client = graph.Client.init({
        // Use the provided access token to authenticate requests
        authProvider: (done) => {
            done(null, accessToken);
        }
    });

    return client;
}
If you're finished with this tutorial and no longer need the web app or associated resources, clean up the resources you created.
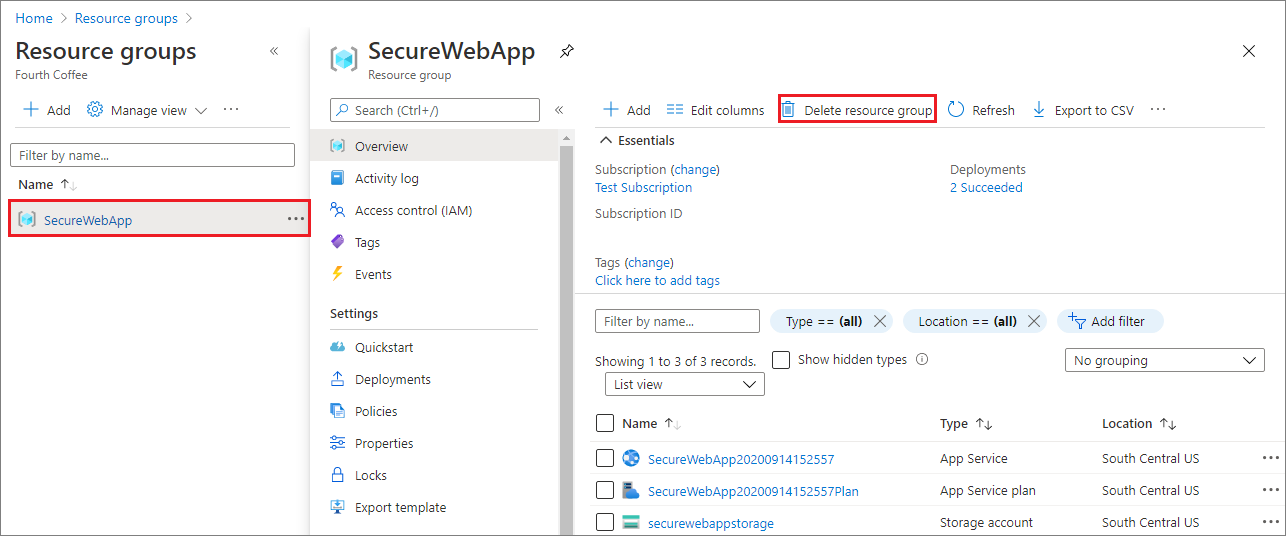
In the Azure portal, select Resource groups from the portal menu and select the resource group that contains your app service and app service plan.
Select Delete resource group to delete the resource group and all the resources.

This command might take several minutes to run.
In this tutorial, you learned how to:
Learn how to connect a .NET Core app or Node.js app to a database.
Events
May 19, 6 PM - May 23, 12 AM
Calling all developers, creators, and AI innovators to join us in Seattle @Microsoft Build May 19-22.
Register todayTraining
Module
Learn how to create a custom JavaScript application to retrieve Microsoft 365 data by using Microsoft Graph.
Certification
Microsoft Certified: Identity and Access Administrator Associate - Certifications
Demonstrate the features of Microsoft Entra ID to modernize identity solutions, implement hybrid solutions, and implement identity governance.