Boot Error – This is not a Bootable Disk
Applies to: ✔️ Windows VMs
This article provides steps to resolve issues where the disk isn't bootable in an Azure Virtual Machine (VM).
When you use Boot diagnostics to view the screenshot of the VM, you'll see that the screenshot displays a prompt with the message 'This is not a bootable disk. Please insert a bootable floppy and press any key to try again...'.
Figure 1

This error message means the OS boot process couldn't locate an active system partition. This error could also mean that there's a missing reference in the Boot Configuration Data (BCD) store, preventing it from locating the Windows partition.
Tip
If you have a recent backup of the VM, you may try restoring the VM from the backup to fix the boot problem.
Create and Access a Repair VM.
Set Partition Status to Active.
Fix the Disk Partition.
Recommended: Before you rebuild the VM, enable serial console and memory dump collection.
Rebuild the Original VM.
Note
When encountering this boot error, the Guest OS isn't operational. You'll be troubleshooting in offline mode to resolve this issue.
- Use steps 1-3 of the VM Repair Commands to prepare a Repair VM.
- Using Remote Desktop Connection connect to the Repair VM.
Note
This mitigation applies only for Generation 1 VMs. Generation 2 VMs (using UEFI) don't use an active partition.
Start a Remote Desktop connection to the recovery VM.
Open Computer management > Disk management. Make sure that the disk is flagged as Online in the Disk Management console. Note the drive letter that is assigned to the attached system disk.
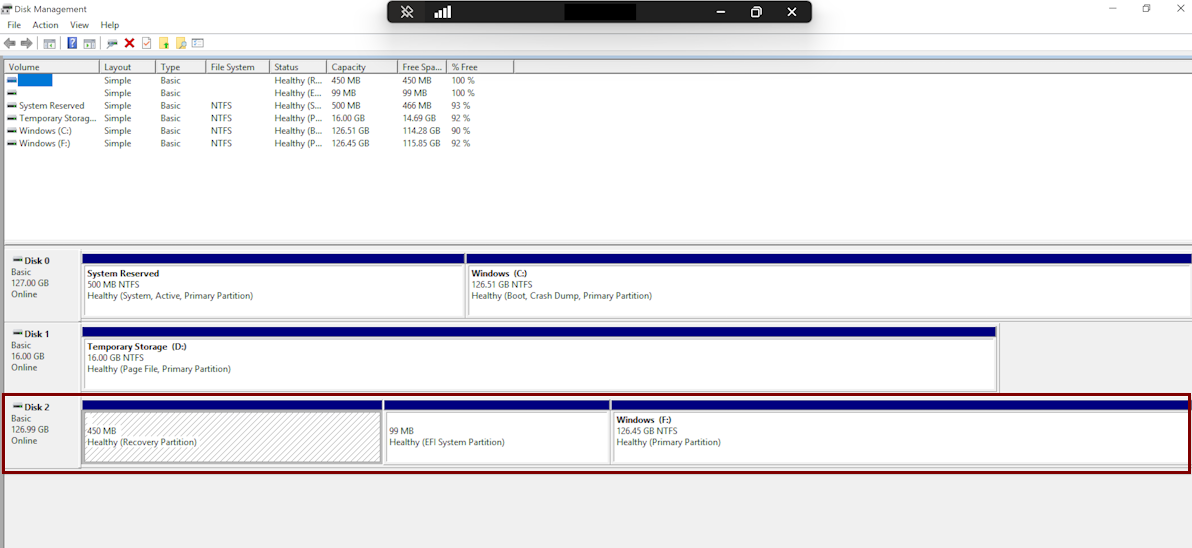
Identify the Boot partition and Windows partition. If there's only one partition on the OS disk, this partition is both Boot partition and Windows partition.
If the OS disk contains more than one partition, you can identify the partitions by viewing the folders in them:
The Windows partition contains a folder that is named Windows, and this partition is larger than the others.
The Boot partition contains a folder that is named Boot. This folder is hidden by default. To see the folder, you must display the hidden files and folders and disable the Hide protected operating system files (Recommended) option. The boot partition is typically 300 MB~500 MB.
Run the following command as an administrator to create a boot record:
bcdboot <Windows partition>:\Windows /S <windows partition>:Use the DISKPART tool to check whether the Windows partition is active:
Open an elevated command prompt and open the DISKPART tool.
diskpartList the disks on the system and look for added disks and proceed to select the new disk. In this example, the new disk is Disk 1.
list disk
sel disk 1
List all the partitions on that disk and then proceed to select the partition you want to check. Usually System Managed partitions are smaller and around 350 MB in size. In the following image, this partition is Partition 1.
list partition
sel partition 1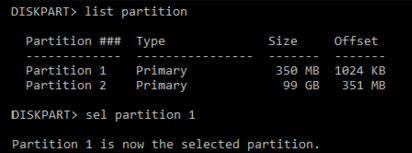
Check the status of the partition. In our example, Partition 1 is not active.
detail partition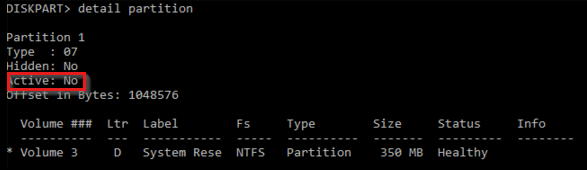
If the partition isn't active, change the Active flag and then recheck the change was done properly.
active
detail partition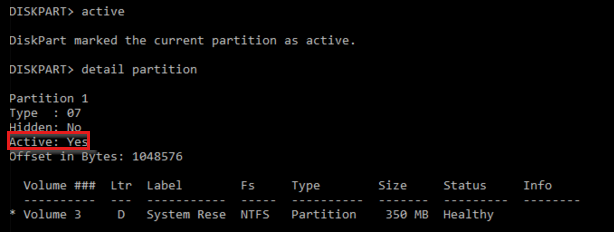
Exit the DISKPART tool.
exit

Open an elevated command prompt (cmd.exe).
Use the following command to run CHKDSK on the disk(s) and fix errors:
chkdsk <DRIVE LETTER>: /fAdding the '/f' command option will fix any errors on the disk. Make sure to replace <DRIVE LETTER> with the letter of the attached OS VHD.
To enable Serial Console and memory dump collection, follow these steps:
Open an elevated command prompt session as an administrator.
Run the following BCDEdit commands using the /ems and /emssettings options:
Enable the serial console:
bcdedit /store <volume-letter-containing-the-bcd-folder>:\boot\bcd /ems {<boot-loader-identifier>} ON
bcdedit /store <volume-letter-containing-the-bcd-folder>:\boot\bcd /emssettings EMSPORT:1 EMSBAUDRATE:115200
Verify that the free space on the OS disk is larger than the memory size (RAM) on the VM.
If there isn't enough space on the OS disk, change the location where the memory dump file is created, and refer that location to any data disk attached to the VM that has enough free space. To change the location, replace
%SystemRoot%with the drive letter of the data disk, such asF:, in the following commands.To enable the OS dump file, run the following load, add, and unload commands to implement the suggested configuration using the reg tool:
Load the registry hive from the broken OS disk:
reg load HKLM\<broken-system> <volume-letter-of-broken-os-disk>:\windows\system32\config\SYSTEMEnable on ControlSet001:
reg add "HKLM\<broken-system>\ControlSet001\Control\CrashControl" /v CrashDumpEnabled /t REG_DWORD /d 1 /f
reg add "HKLM\<broken-system>\ControlSet001\Control\CrashControl" /v DumpFile /t REG_EXPAND_SZ /d "%SystemRoot%\MEMORY.DMP" /f
reg add "HKLM\<broken-system>\ControlSet001\Control\CrashControl" /v NMICrashDump /t REG_DWORD /d 1 /f
Enable on ControlSet002:
reg add "HKLM\<broken-system>\ControlSet002\Control\CrashControl" /v CrashDumpEnabled /t REG_DWORD /d 1 /f
reg add "HKLM\<broken-system>\ControlSet002\Control\CrashControl" /v DumpFile /t REG_EXPAND_SZ /d "%SystemRoot%\MEMORY.DMP" /f
reg add "HKLM\<broken-system>\ControlSet002\Control\CrashControl" /v NMICrashDump /t REG_DWORD /d 1 /f
Unload the broken OS disk:
reg unload HKLM\<broken-system>
Use step 5 of the VM Repair Commands to reassemble the VM.
If you have questions or need help, create a support request, or ask Azure community support. You can also submit product feedback to Azure feedback community.