Note
Access to this page requires authorization. You can try signing in or changing directories.
Access to this page requires authorization. You can try changing directories.
This article shows you how to secure IBM WebSphere Liberty/Open Liberty applications with Microsoft Entra ID using OpenID Connect (OIDC).
In this article, you learn how to:
- Set up an OIDC provider with Microsoft Entra ID.
- Protect a WebSphere Liberty/Open Liberty app by using OIDC.
- Run and test the WebSphere Liberty/Open Liberty app.
Prerequisites
- An Azure subscription. If you don't have an Azure subscription, create a free account before you begin.
- An Azure identity with at least the Cloud Application Administrator Microsoft Entra role. For more information, see List Microsoft Entra role assignments and Microsoft Entra built-in roles.
- A Microsoft Entra tenant. If you don't have an existing tenant, see Quickstart: Set up a tenant.
- A local machine with a Unix-like operating system installed - for example, Ubuntu, macOS, or Windows Subsystem for Linux.
- Git.
- A Java SE implementation, version 21 or later - for example, the Microsoft build of OpenJDK.
- Maven, version 3.9.3 or later.
Set up an OIDC provider with Microsoft Entra ID
OpenID Connect is an industry standard authentication protocol well supported by Microsoft Entra ID. In this section, you set up an OIDC provider with Microsoft Entra ID for use with your WebSphere Liberty/Open Liberty app. In a later section, you configure the WebSphere Liberty/Open Liberty app by using OIDC to authenticate and authorize users in your Microsoft Entra tenant.
Create users in Microsoft Entra tenant
First, create two users in your Microsoft Entra tenant by following the steps in How to create, invite, and delete users. You just need the Create a new user section. Use the following directions as you go through the article, then return to this article after you create users in your Microsoft Entra tenant.
To create a user to serve as an "admin" in the app, use the following steps:
- When you reach the Basics tab in the Create a new user section, use the following steps:
For User principal name, enter admin. Save the value so you can use it later when you sign in to the app.
For Mail nickname, select Derive from user principal name
For Display name, enter Admin.
For Password, select Auto-generate password. Copy and save the Password value to use later when you sign in to the app.
Select Account enabled.
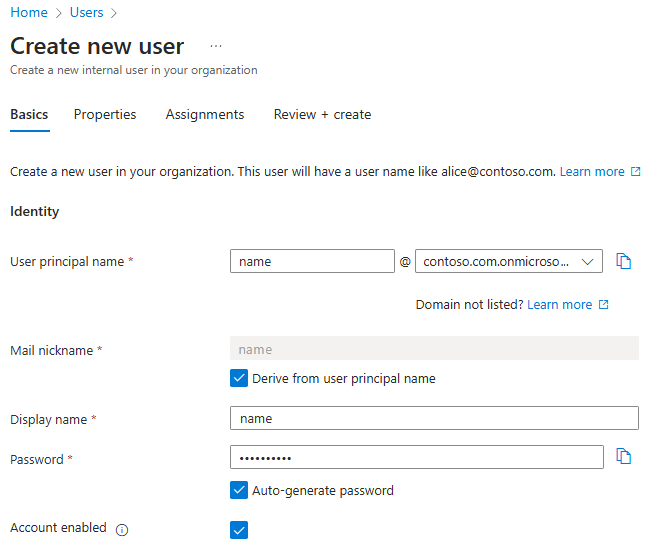
Select Review + create > Create. Wait until the user is created.
Wait a minute or so and select Refresh. You should see the new user in the list.

To create a user to serve as a "user" in the app, repeat these steps, but use the following values:
- For User principal name, enter user.
- For Display name, enter User.

Register an application in Microsoft Entra ID
Next, register an application by following the steps in Quickstart: Register an application with the Microsoft identity platform. Use the following directions as you go through the article, then return to this article after you register and configure the application.
- When you reach the Register an application section, use the following steps:
- For Supported account types, select Accounts in this organizational directory only (Default directory only - Single tenant).
- When registration finishes, save the Application (client) ID and Directory (tenant) ID values to use later in the app configuration.
- When you reach the Add a redirect URI section, skip the steps as for now. You add the redirect URI later when you run and test the sample app locally in this article.
- When you reach the Add credentials section, select the Add a client secret tab.
- When you add a client secret, write down the Client secret value to use later in the app configuration.
Add app roles to your application
Then, add app roles to your application by following steps in Add app roles to your application and receive them in the token. You just need the sections Declare roles for an application and Assign users and groups to Microsoft Entra roles. Use the following directions as you go through the article, then return to this article after you declare roles for the application.
When you reach the Declare roles for an application section, use the App roles UI to create roles for the administrator and the regular user.
Create an administrator user role by using the following values:
- For Display name, enter Admin.
- For Allowed member types, select Users/Groups.
- For Value, enter admin.
- For Description, enter Admin.
- Select Do you want to enable this app role?.
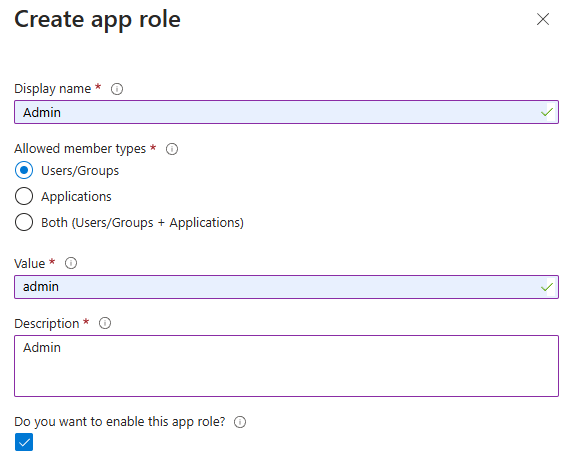
Select Apply. Wait until the role is created.
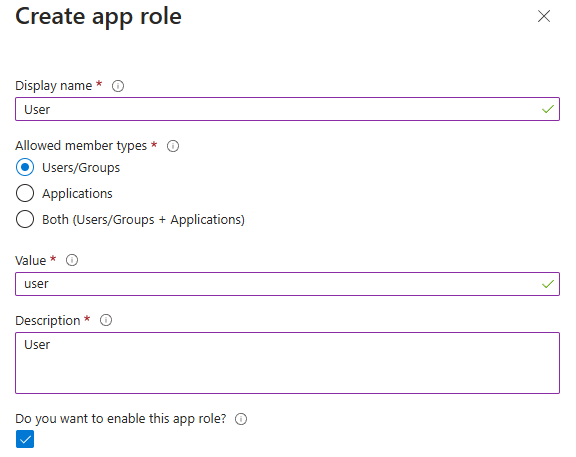
Create a regular user role by using the same steps, but with the following values:
- For Display name, enter User.
- For Value, enter user.
- For Description, enter User.
When you reach the Assign users and groups to Microsoft Entra roles, section, use the following steps:
Select Add user/group.
In the Add Assignment pane, for Users, select user Admin and for Select a role, select role Admin. Then, select Assign. Wait until the application assignment succeeds. You might need to scroll the table sideways to see the Role assigned column.
Repeat the previous steps to assign the User role to user User.
Select Refresh and you should see the users and roles assigned in the Users and groups pane.
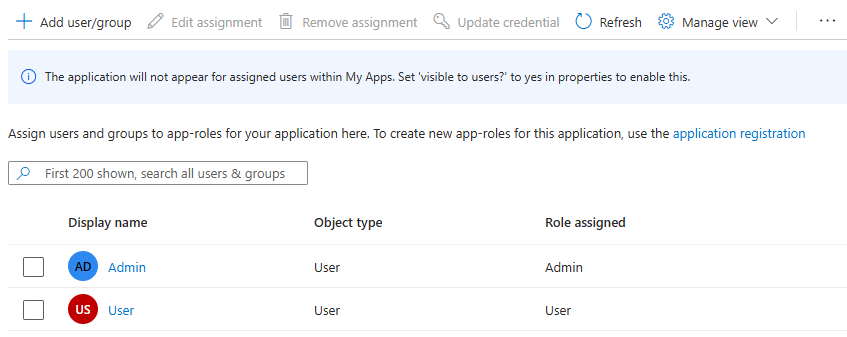
You might need to adjust the width of the column headers to make your view look like the image.


Don't follow any other steps in Add app roles to your application and receive them in the token.
Protect a WebSphere Liberty/Open Liberty app by using OpenID Connect
In this section, you secure a WebSphere Liberty/Open Liberty app that authenticates and authorizes users in your Microsoft Entra tenant by using OIDC. You also learn how to give users access to certain parts of the app using role-based access control (RBAC). The app uses the Programmatic Security Policy Configuration of the Jakarta Servlet specification. Jakarta EE also supports RESTful web services. See the Next steps section for a reference to an article about securing a RESTful web services application.
The sample WebSphere Liberty/Open Liberty app for this quickstart is on GitHub in the liberty-entra-id repository.
Enable authentication and authorization to secure app
The app has a welcome page resource defined in index.html, which is shown in the following example code. This page is accessible to unauthenticated users. The root path of the welcome page is at /.
<!DOCTYPE html>
<html>
<head>
    <meta charset="UTF-8">
    <title>Greeting</title>
</head>
<body>
<h1>Hello, welcome to Open Liberty/WebSphere Liberty and Microsoft Entra ID integration!</h1>
<h1>
    <a href="/profile/user">Sign in as user</a>
</h1>
<h1>
    <a href="/profile/admin">Sign in as admin</a>
</h1>
</body>
</html>
From the welcome page, users can sign in to the app to access the profile page. The welcome page has links to sign in as a user or as an admin. The links are at /profile/user and /profile/admin, respectively.
Both /profile/user and /profile/admin links point to the profile servlet, defined in ProfileServlet.java, as shown in the following example code. This servlet is accessible only to authenticated users by using the annotation jakarta.servlet.annotation.ServletSecurity and annotation jakarta.servlet.annotation.HttpConstraint. The attribute rolesAllowed = {"users"} specifies that only authenticated users with security role users can access the /profile path. The authenticated user is automatically assigned the users role in the Liberty configuration file server.xml.
package com.example;

import jakarta.servlet.ServletException;
import jakarta.servlet.annotation.HttpConstraint;
import jakarta.servlet.annotation.ServletSecurity;
import jakarta.servlet.annotation.WebServlet;
import jakarta.servlet.http.HttpServlet;
import jakarta.servlet.http.HttpServletRequest;
import jakarta.servlet.http.HttpServletResponse;
import java.io.IOException;

import com.ibm.websphere.security.social.UserProfileManager;
import java.util.List;

@WebServlet(name = "ProfileServlet", urlPatterns = {"/profile/user","/profile/admin"})
@ServletSecurity(value = @HttpConstraint(rolesAllowed = {"users"},
        transportGuarantee = ServletSecurity.TransportGuarantee.CONFIDENTIAL))
public class ProfileServlet extends HttpServlet {

    private static final long serialVersionUID = 1L;

    @Override
    protected void doGet(HttpServletRequest request, HttpServletResponse response)
            throws IOException, ServletException {

        List<?> roles = UserProfileManager.getUserProfile().getIdToken().getClaims().getClaim("roles",
                List.class);

        String path = request.getServletPath();
        if (path.equals("/profile/admin") && (null == roles || !roles.contains("admin"))) {
            response.sendError(HttpServletResponse.SC_FORBIDDEN);
            return;
        }

        String username = request.getUserPrincipal().getName();
        request.setAttribute("name", username);
        request.setAttribute("roles", roles);

        request
                .getRequestDispatcher("/profile.jsp")
                .forward(request, response);
    }
}
The profile servlet retrieves the user's roles from the ID token and checks if the user has the admin role when the user tries to access the /profile/admin path. If the user doesn't have the admin role, the servlet returns a 403 Forbidden error. In other cases, the servlet retrieves the user's name and forwards the request to the profile page with the user's name and roles.
The profile page is defined in profile.jsp, as shown in the following example. This page displays the user's name and roles. The profile page also has a sign-out link at /logout. The profile page is written JSP (Jakarta Server Pages). Note the use of ${} expressions in the page. ${} Indicates the use of Jakarta Expression Language (EL). EL expressions are replaced with the values of the corresponding variables when the page is rendered. See the Next steps section for a reference to the EL specification.
<%@ taglib prefix="c" uri="jakarta.tags.core" %>
<%@ page contentType="text/html;charset=UTF-8"%>
<html>
<head>
    <meta charset="UTF-8">
    <title>Profile</title>
</head>
<body>
<h1>Hello, ${name}</h1>
<h2>Roles</h2>
<ul>
    <c:forEach var="role" items="${roles}">
        <li>${role}</li>
    </c:forEach>
</ul>
<h1>
    <b><a href="/logout">Sign out</a></b>
</h1>
</body>
</html>
When the user selects the link to sign out, the app calls the sign out servlet, defined in LogoutServlet.java, as shown in the following example code. The sign out servlet calls the request.logout() method to sign out the user, and then redirects the user to the welcome page.
package com.example;

import jakarta.servlet.ServletException;
import jakarta.servlet.annotation.HttpConstraint;
import jakarta.servlet.annotation.ServletSecurity;
import jakarta.servlet.annotation.WebServlet;
import jakarta.servlet.http.HttpServlet;
import jakarta.servlet.http.HttpServletRequest;
import jakarta.servlet.http.HttpServletResponse;
import java.io.IOException;

@WebServlet(name = "LogoutServlet", urlPatterns = "/logout")
@ServletSecurity(value = @HttpConstraint(rolesAllowed = {"users"},
        transportGuarantee = ServletSecurity.TransportGuarantee.CONFIDENTIAL))
public class LogoutServlet extends HttpServlet {

    private static final long serialVersionUID = 1L;

    @Override
    protected void doGet(HttpServletRequest request, HttpServletResponse response)
            throws IOException, ServletException {

        request.logout();
        response.sendRedirect("/");
    }
}
Run and test the WebSphere Liberty/Open Liberty app
In this section, you run and test the WebSphere Liberty/Open Liberty app to see how it works with Microsoft Entra ID as the OIDC provider.
Add a redirect URI to the app registration
To successfully run and test the app locally, you need to add a redirect URI to the app registration. Follow the instructions in the Add a redirect URI section of Quickstart: Register an application with the Microsoft identity platform, and use the following values:
- For Configure platforms, select Web.
- For Redirect URIs, enter
https://localhost:9443/ibm/api/social-login/redirect/liberty-entra-id.
Prepare the sample
Use the following steps to prepare the sample app:
Use the following commands to clone the sample app from GitHub:
git clone https://github.com/Azure-Samples/liberty-entra-id
cd liberty-entra-id
git checkout 2024-09-26
If you see a message about being in
detached HEADstate, this message is safe to ignore. This message just means you checked out a tag.Use the following commands to define the following environment variables with the values you wrote down earlier:
export CLIENT_ID==<application/client-ID>
export CLIENT_SECRET=<client-secret>
export TENANT_ID=<directory/tenant-ID>
These environment variables provide the values for the built-in support of OIDC in WebSphere Liberty/Open Liberty. The corresponding OIDC configuration in the Liberty server.xml is shown in the following example.
 <oidcLogin
     id="liberty-entra-id" clientId="${client.id}"
     clientSecret="${client.secret}"
     discoveryEndpoint="https://login.microsoftonline.com/${tenant.id}/v2.0/.well-known/openid-configuration"
     signatureAlgorithm="RS256"
     userNameAttribute="preferred_username" />
If the value of a variable isn't defined in the configuration file, WebSphere Liberty/Open Liberty reads the value from the environment variables following its naming convention. For details on the naming conversion, see Variable substitution precedence.
Run the WebSphere Liberty/Open Liberty app
You can run the app using liberty-maven-plugin. To run the app, select one of the following methods:
Note
To enable WebSphere Liberty/Open Liberty to connect to Microsoft Entra ID, be sure to run the command in the shell in which you defined the environment variables shown in the preceding section.
Run the app in development mode:
mvn liberty:devRun the app in runtime mode:
mvn liberty:run
If you want to try different modes, use Ctrl+C to stop the app and then run the app in another mode.
Test the WebSphere Liberty/Open Liberty app
After the app is running, open a web browser with a private tab and navigate to https://localhost:9443. Since the certificate is self-signed, you might see a warning about the certificate. You can safely ignore the warning and proceed to the site.
You should see the welcome page with links to sign in as a user or as an admin. Using a private tab avoids polluting any existing Microsoft Entra ID activity you might have in your regular browser.

Gather the credentials for the two users
In this article, Microsoft Entra ID uses the email address of each user as the user ID for signing in. Use the following steps to get the email address for the admin user and regular user:
- Sign in to the Microsoft Entra admin center as at least a Cloud Application Administrator.
- If you have access to multiple tenants, use the Settings icon (
 ) in the top menu to switch to the tenant in which you want to register the application from the Directories + subscriptions menu.
 - Browse to Identity > Users > All Users.
- Locate the admin user in the list and select it.
- Locate the User principal name field.
- Use the copy icon next to the value of the field to save the email address of the user to the clipboard. Save the value for later use.
- To get the email address for the regular user, follow the same steps.
Use the passwords for the admin user and regular user that you set when creating the users.
Exercise the functionality of the app
Use the following steps to exercise the functionality:
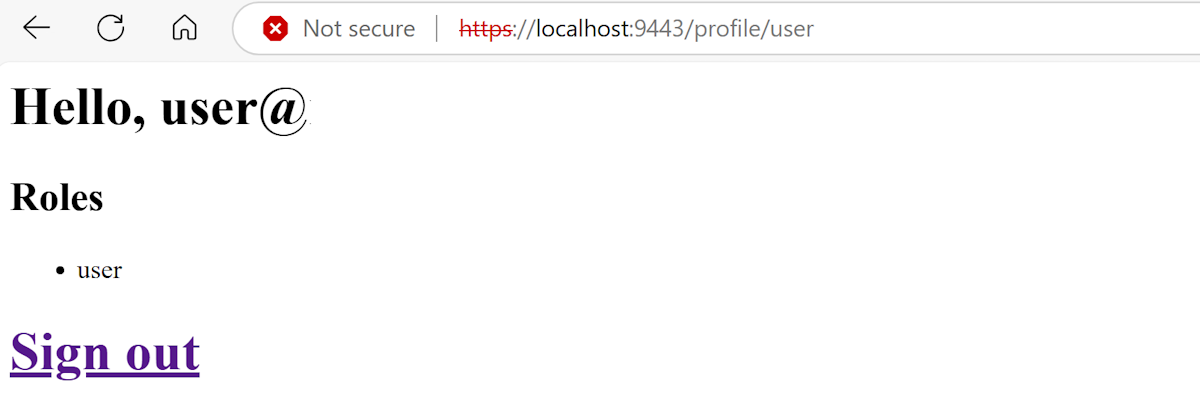
Select the Sign in as user link. Sign in with the regular user you created earlier. After you sign in, Microsoft Entra ID redirects you to the profile page, where you see your name and roles.
If this is the first time signing in, you're prompted to update your password. Follow the instructions to update your password.
If you're prompted with Your organization requires additional security information. Follow the prompts to download and set up the Microsoft Authenticator app, you can select Ask later to continue the test.
If you're prompted with Permissions requested, review the permissions requested by the app. Select Accept to continue the test.
Select Sign out to sign out from the app. After you sign out, you're redirected to the welcome page.
Select the Sign in as admin link. Microsoft Entra ID redirects you to the sign-in page. Sign in with the admin user you created earlier. After you sign in, Microsoft Entra ID redirects you to the similar profile page, with a different role
admin.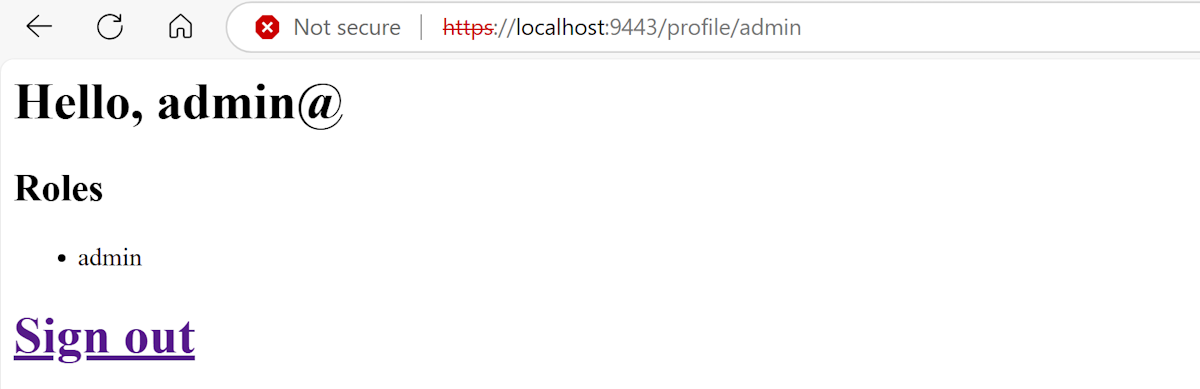
Sign out again and try to Sign in as admin with the regular user you created earlier. You should see an error message because the regular user doesn't have the
adminrole.


Clean up resources
This article doesn't direct you to deploy your app on Azure. There are no Azure resources to clean up for the app, although there are Microsoft Entra ID resources. To deploy an app on Azure, you can follow the guidance referenced in the next section.
When you finish with the resources for this sample app, use the following steps to clean up the Microsoft Entra ID resources. Removing unused Microsoft Entra ID resources is an important security best practice.
- Remove the app registration you created by following the steps in Remove an application registered with the Microsoft identity platform. You only need to follow the steps in the section Remove an application authored by your organization.
- The act of removing the app registration should also delete the enterprise application. For more information about deleting enterprise applications, see Delete an enterprise application.
- Delete the users you created by following the steps in How to create, invite, and delete users.
Next steps
In this quickstart, you protect WebSphere Liberty/Open Liberty applications with Microsoft Entra ID using OIDC. To learn more, explore the following resources:
- Deploy a Java application with Open Liberty or WebSphere Liberty on Azure Container Apps
- Deploy WebSphere Liberty and Open Liberty on Azure Red Hat OpenShift
- Deploy a Java application with Open Liberty or WebSphere Liberty on an Azure Kubernetes Service (AKS) cluster
- OpenID Connect authentication with Microsoft Entra ID
- Microsoft identity platform and OAuth 2.0 authorization code flow
- Authenticating users through social media providers
- Social Media Login 1.0
- OpenID Connect Client 1.0
- What is OpenID Connect
- Programmatic Security Policy Configuration
- How to Secure a RESTful Web Service Using Jakarta EE
- Jakarta Expression Language